Users employ the Windows search feature to help them find their files as fast as possible. However, they cannot explain how this feature came to be. A good number of them also know very little about its activities. Therefore, it is fair to say that they struggle to understand how it performs searches very fast.
The process of finding items by inputting their names into a text box on a computer has not always been easy, straightforward or effective as it is now. Microsoft launched the fast or instant search capability on Windows Vista roughly 10 years. It is fair to say that they have succeeded with it. They have come so far on the road, so the feature working better than ever on Windows 10 comes as no surprise to us.
In this guide, you are going to find out everything you need to know about the Indexing and Search feature on the Windows operating system. Its latest iteration (Windows 10) will serve as our base OS. We will also examine the most common problems associated with the services above and explore the best solutions to them.
Pro Tip: It is possible to fix many PC issues by using the PC Repair tool. PC Repair is easy to use and reliable Windows optimization software developed to fix hundreds of system issues.
Special offer. About Outbyte, uninstall instructions, EULA, Privacy Policy.
What is meant by indexing files?
Indexing is the collecting, parsing, and storing operations Windows does on your system to improve the speed and accuracy of data retrieval whenever you perform a search. Just like the Web indexing operations (Crawling) in which a search engine (Google, for example) indexes web pages through its robots and adds them to its database, the Index setup on your system does a similar job for Windows.
The search index is supposed to include only your selected locations. You can even create setups for what kind of files (types), their properties, or the contents you want the function to work on in your PC. The Index operates with the aid of the Windows Search Service. Its executable file (Searchindexer.exe) runs in the background.
Microsoft designed the Index to rebuild and update itself automatically to increase the search result accuracy on Windows in line with the changes that occurred in the selected locations since the last (or preceding) operation.
When you are actively using your computer, the Index maintains a minimum level of activity to avoid competing with you for your system resources. After you stop working, Windows becomes idle. Thus, the Index picks up the pace with its operations since they are now unlikely to hurt your PC performance.
The Search and Index Control Panel was the critical component behind the success of the Instant Search feature. Even today, it is still present in the latest version of Microsoft’s operating system as Indexing Options in its corresponding parent program.
How to fix problems with Indexing of drives and the Windows Search feature:
At one point or the other, you must have searched for an item using the Windows search feature. You can press the Windows button on your keyboard (or click on the Windows Start icon on your screen) and start typing your query. These days, you can also search for an item vocally thanks to Cortana.
Well, we are interested in knowing how it went. Did the feature help you find what you were looking for quickly? Did it waste your time by appearing to be busy searching for stuff but in the end came up with nothing related to what you needed?
For example, some users reported that they had got search results that had contained missing, invalid, outdated, or incorrect contents. In theory, if the Windows 10 Search service is operating normally, you are supposed to start seeing relevant seeing results even before you finish typing the complete text of what you are looking for on your computer.
If you experienced any trouble while using the service or things did not go you as you expected, then it is likely that the Search Index program on your system is not functioning correctly. Here, you will find solutions to all problems that are affecting the operations of this service negatively. After you finish your work on the index, it will start showing the accurate search results that you have always wanted.
Run the Search and Indexing Troubleshooter:
Luckily enough for you, Microsoft has embedded troubleshooters into its operating system to help users diagnose the cause of their problems or even proffer and apply solutions to the issues when possible. If you are experiencing problems with the Index feature on Windows, then a launch of the Windows Search and Indexing troubleshooter is an excellent idea.
Follow these instructions:
- Click on the Windows Start icon or press the Windows button on your keyboard. Select Settings from the list of applications and options that show up
- After the program window opens, click on Update and Security. On the next screen, select Troubleshoot
- Scroll down and find Search and Indexing from the list of troubleshooting options. Click on this item
- Click on Run the troubleshooter to initiate the procedure that will automatically help you check for errors and fix them if possible. Follow the on-screen instructions if necessary to ensure the success of the operation
- After the Troubleshooter finishes its work, restart your system to let the fixes take effect
After your computer comes on and boots up, check if the Index function of your Search feature now works correctly. Try to perform a search and observe how fast the results come up. If your problems persist, then the Windows Troubleshooter failed to help. Now you must attempt a more on-hand fix.
Restart the Search UI process:
A restart of the User Experience process for the Search feature might be enough to force the changes that will eliminate your problems. Follow these instructions:
- Press (and hold) the Windows button on your keyboard, then tap the letter X key to bring up a short list of programs and options. You can also execute the same operation by right-clicking on the Windows Start icon. Select Task Manager from the list
- After the program window opens, navigate to the Processes tab. Locate the Search service from the list. Click on it and select End task to stop it from running
- Reboot your computer. After the restart, verify that everything now works fine
Rebuild the Search Index on Windows 10:
The flexibility of options is one of the strongest points of Windows 10. However, sometimes the extreme variation of choices means that some decisions that some users prefer will end up causing unexpected issues for them. Therefore, it is understandable that the Search Index function can become a victim of the adverse effects of users’ customizations.
Here, we will examine the issue of Microsoft allowing a set-up that disables the Search Index function when it is not in use to save power and improve performance in systems. When the vital feature is turned off, you might struggle to see your files whenever you attempt a search for them. They might even appear as if they do not exist.
A manual rebuild of the index forces an instant update of the entire database after the completion of the process. You must be signed in as administrator to rebuild the Index. Otherwise, you will soon realize that you lack the permissions necessary to execute the operations below.
To restore the Index function to its former state in all its glory, you must go through the following steps:
- Right-click on the Windows Start icon. Click on Control Panel from the list that comes up
- After the program window opens, click on Indexing Options. Microsoft has buried this particular item deep in the Control Panel program on Windows 10 for some reason we do not understand. The tool is absent from the list of objects visible in the Control Panel default’s category view.
These quick steps might help you find it: Under the View by an option in the Control Panel program, choose either Large or small icons. Now scroll down, and you might see the Indexing Options link or shortcut from the items present.
If you still did not see this item directly, try to navigate through the menu of other programs in the Control Panel. You can even search for it in the available text box of the program
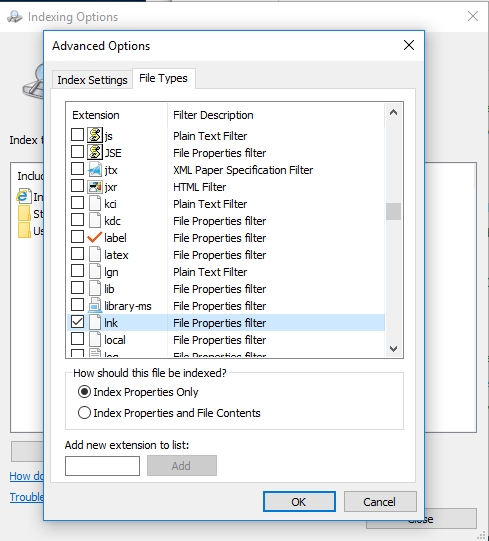
- If you successfully opened the menu for Index Options, you should see the Advanced button. Click on it. A small new window should pop up
- Navigate to the Files Types tab. Under the Add new extension to list option, type in “Ink” without the quotes into the available text box. Click on OK to add the item you just inputted

- Click on OK to confirm your action and continue with the process. The operation you just carried out forces Windows to rebuild the index associated with the Search and Indexing feature
- If the procedure above did not work for you, launch the small advanced options windows once more, but this time, you must click on the Rebuild button instead
- Note that the indexing process might take a while, so you must be patient enough to wait for long as possible until Windows finishes the procedure. If you get tired of it, you can click on the Pause button to stop your system from rebuilding the index temporarily
- After the process is complete, click on the Close button and exit all the windows you opened
- Restart your system and check if this fix worked for you.
How to add drives to the Windows 10 Search function:
You can find out which drives or locations Windows is indexing now through the Indexing Options dialog. You will also find information about the number of files that Windows found inside those folders and so on.
Microsoft set up Windows 10 to index 2 locations in particular by default. One of these essential locations is the Start Menu. The reason for this is apparent enough—the indexing of this specific location enables Windows to find and return application shortcuts. The User folder is also fair game in this operation. However, Windows does not work on hidden areas like the AppData, and Application Data folders.
The other vital directories that Windows 10 indexes are the ones that serve as storage for your files. The following folders fall into this category: Downloads, Desktop, Pictures, Music, and Videos. After all, they are all under your C:\Users\YourName\, and this indicates that they are associated with your personality.
If you wish to add a specific drive (connected to your system) to let its contents show up in the Windows 10 Search feature, you must perform the necessary procedures in the Indexing Options menu in the Control Panel program. The drive you want to add could be a non-system data partition, an external hard drive or even a simple SD card.
Here are the instructions that will guide you:
- Press (and hold) the Windows button on your keyboard, then hit the letter X key. Launch Control Panel by selecting it from the list of programs and options that came up as a result of your action
- After the program window opens, locate the menu for Indexing Options. Navigate through the necessary items to find it. If it is still not visible to you, you can quickly find it by searching for it in the text box available on the right-hand side of the Control Panel window
- This time you must click on the Modify button after you have located the menu. Now you are free to select the drives or directories in which you want the Index function to be active. You can add your entire disk, folders or the subfolders. For example, tick the checkbox for a folder if you want Windows to start indexing that particular folder. Otherwise, you must uncheck an item if you desire that Windows stops indexing it.
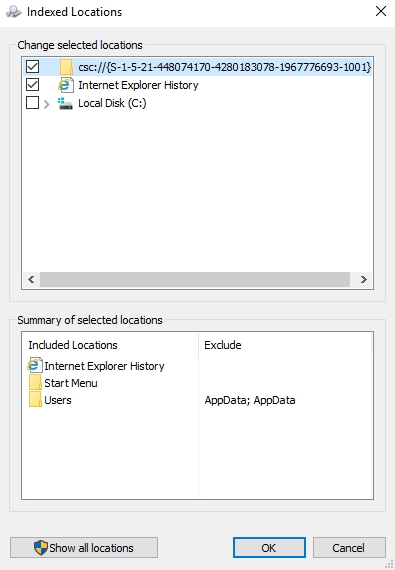
You can also stop Windows from digging into places you do not want by using the exclusions function. We recommend that you use this option in particular for folders with sensitive data. The items you saved in the specified locations would not appear in your search results.
Tips to remember when adding drives and directories to the index:
- We advise that you do not add too many items. Also, avoid selecting directories with questionable sizes because they probably contain far too many files. Try to choose the typical locations where you store your most useful data or items whose storage areas you are more likely to forget
For example, there is no need to select your entire hard disk as a location that Windows should index. Recall the folders that contain the items you use most and choose them instead. For instance, if most of your work is with files in the Documents folder of your system, then you must select Documents.
- If you want to be able to find your programs fast when you search for them in the text box, then you must include the Start menu directory as one of the items that the Windows Index service should work on now. Microsoft adds it by default for a reason.
Add your Pictures folder to the list if you view your images very often, and so on. Whatever you do, try to avoid choosing locations that are not worth the consumption of your system resources.
- If you select ridiculous amount of items for the Index function to work on, then the feature would struggle to handle all of them to an optimum level no matter how hard it tries. Your operations would become slower generally as a result, and such a scenario is one you must avoid at all costs
There is an alternative way of executing the same procedures on specific directories. To disable indexing on a particular drive or folder, follow these instructions:
- Press and hold the Windows button on your keyboard, then tap the letter E key to open the File Explorer program
- After the program window opens, navigate through the necessary path to locate the drive or folder you want to relieve of indexing activities. Right-click on it and select Properties from the list of options that come up. A new window should open
- Navigate to the General tab. Untick the checkbox for Allow files on this drive to have contents indexed in addition to file properties to disable indexing operations on the item involved
- Confirm your changes by clicking on the OK button
- Exit all open windows and restart your PC to let the changes take full effectIf you want to enable indexing on a specific directory, go through these instructions instead:
- Open the File Explorer app. Its icon should be on the taskbar on your desktop screen. Click on it to open it
- After the window launches, find the drive or folder you want to work on now. Right-click on it and select Properties from the list that pops up to open the required window
- Under the General tab, you should see the option for Allow files on this drive to have contents indexed in addition to file properties. Tick its checkbox if you want Windows to index this folder or its contents
- Click on OK to confirm your changes
- Close the programs running on your system. Reboot Windows
How to select partition files indexing in Windows 10:
These instructions on how to choose which kind of files Windows indexes would also prove invaluable to you:
- Click on the Advanced button to see the menu for the required operations. Click on Files tab. Now you should see a long list of file extensions. You can choose which file types you want Windows to work on and exclude the ones you do not need.There is also a way to specify if Windows is allowed to probe into the contents of the file and index the texts it contains too.
- If you cannot find the file type you want on this list, you must add a new extension for the item and ask Windows to index it.We think that the default settings for the files Windows must index are good enough. It is best to leave everything as it is, especially if you are in doubt about what to modify or remove. Just remember that this is how you change stuff if you ever need to.Always remember that your indexing speed is faster when you select fewer items and the Windows index service using less of your system resources is a good thing. So, we hope you make the right choices.
Other Advanced options:
The other advanced options are on the Index Settings tab (first tab) of the window you opened earlier. Since Windows does not index encrypted files by default, you can change this setting by ticking the required checkbox if you need to.
You can also rebuild the index from scratch, but note that this is an advanced procedure. We advise that you do not use it unless you have severe problems. We have provided instructions on using it as a fix in this guide anyway.
- After you have finished adding all the drives, directories or folders, click OK to save your changes. You do not even have to restart your system to let the new changes take effect. Windows should start indexing the required items immediately.You might see the message stating that the Indexing speed is reduced due to user activity. Do not be bothered by it. Its pace will increase after your PC becomes idle and the work will continue in the background even if you close the windows you opened.If you successfully executed the operation above, then you have brought back the good old days when the Search feature and the Indexing function used to monitor folders continually and update them when changes have occurred.Now you must know that this functionality will set you back some system resources (usually your computers’ battery life and processing power). We do recommend that you create this set-up on every device you own.On the other hand, if you have a PC that is always plugged into power, then you have nothing to worry about—you are all set and good to go. The new setup would probably save you a lot of time when you need to locate an obscured item on multiple drives and partitions. It is not a stretch to say that such smooth operations would have a positive effect on your productivity levels.
How to disable drive indexing on Windows 10?
We understand that people are different or that there are significant variations in the needs and wants of users. If you are one of those people who do not use the Search Feature at all, then you can disable its core components altogether. This procedure would make Windows stop indexing all files.
Nevertheless, the search feature will be available for you to access if you ever find yourself needing it. The significant difference here is just that the process of finding your desired item will become a lot slower. This change is a result of Windows now having to search through all your files due to your index being unavailable.
If you intend to disable the Search feature because you find it slow to use or because the Index operations are using up all your system resources, then you might be going about things the wrong way. Other issues might come as a product of the drastic action.
For example, some other apps use the Search setup to work and help you find something, and if you disable the Search feature, then those programs might struggle to perform some tasks. Microsoft Outlook is one example of the apps that we know to behave in such a way.
To be fair, the issues you experience when you try to find an item have no real home in Windows 10. Try to fix them first before doing away with such useful features in an extreme manner. After all, we have provided solutions to almost every problem that users encountered.
Well, if you have chosen to go on even after reading all the warnings, precautions, or downsides associated with the termination of the Search feature or Index functions, then we can no longer hold the instructions from you.
If you plan to use another search program (third-party application) to do a similar job, then you can disable the built-in Windows utility for locating items. Mainly, what you are going to do here is to stop a specific Windows service from running. Follow these steps:
- Press the Windows button on your keyboard (or click on the Windows start icon). Search for Services in the text box available. Click on the right result to open the program for the services running in your system
- After the window opens, locate the Windows Search service on the list of entries that you can see. Double-click on it. A new Windows Search Properties window should come up
- Under the General tab (the tab you are on), locate Startup type. Its current value should be Automatic. Click on its drop-menu and select the Disabled option to stop Windows from launching the service at bootup
- Now since the service will no longer run after your system restarts, the Windows start feature will stop functioning. If you want to see the effect of your action immediately, click on the Stop button to terminate the service now. After the Service status message confirms that your operation was successful, you can click on the OK buttonNow, remember that you have just done away with a useful function for reasons best understood by you. Windows will take the chance to remind you of this wrong move at every opportunity it gets. For example, if you try to search for an item with the execution of your request running slowing, your operating system would tell you that your operation is slow because the index is not running. It would also ask you turn the Index service back on.If you decide to give in to Windows or you later realize the error of your ways independently of your computer’s cravings, follow these instructions to turn the disabled service back on:
- Open the Services program as you did earlier. Locate the Windows Search Service
- Double-click on the entry to open its Properties window. Change the value for Startup type from Disabled back to Automatic. This new setup should go into effect the next time you boot up your computer. To make your changes effective immediately, you can click on the Start button to launch the service now
- Click on OK button. Close all the open windows. Some index operations should be active already
How to disable and enable drive indexing on Windows 10 using Control Panel
You can also perform the same action on Search Indexing, using an elevated Command Prompt window. To disable the feature, go through these steps:
- Press and hold the Windows button on your keyboard, then tap the letter X key. You should see a list of programs and options. Select Command Prompt (admin) to open the program with administrative privileges
- After the window opens, type in the following code and hit the enter key to run it:sc stop “wsearch” && sc config “wsearch” start=disabled
- If Windows executed the operation successfully, you should see a message on the screen stating that it was a success. You are free to exit the Command Prompt windowOn the other hand, if you are seeking to turn the feature back on, here are the instructions you need:
- Right-click on the Windows Start icon on your desktop screen and select Command Prompt (admin) from the entries that come to launch a Command Prompt window with administrative rights
- After the application loads up, input the following command and tap the enter key to force Windows to execute it:sc config “wsearch” start=delayed-auto && sc start “wsearch”
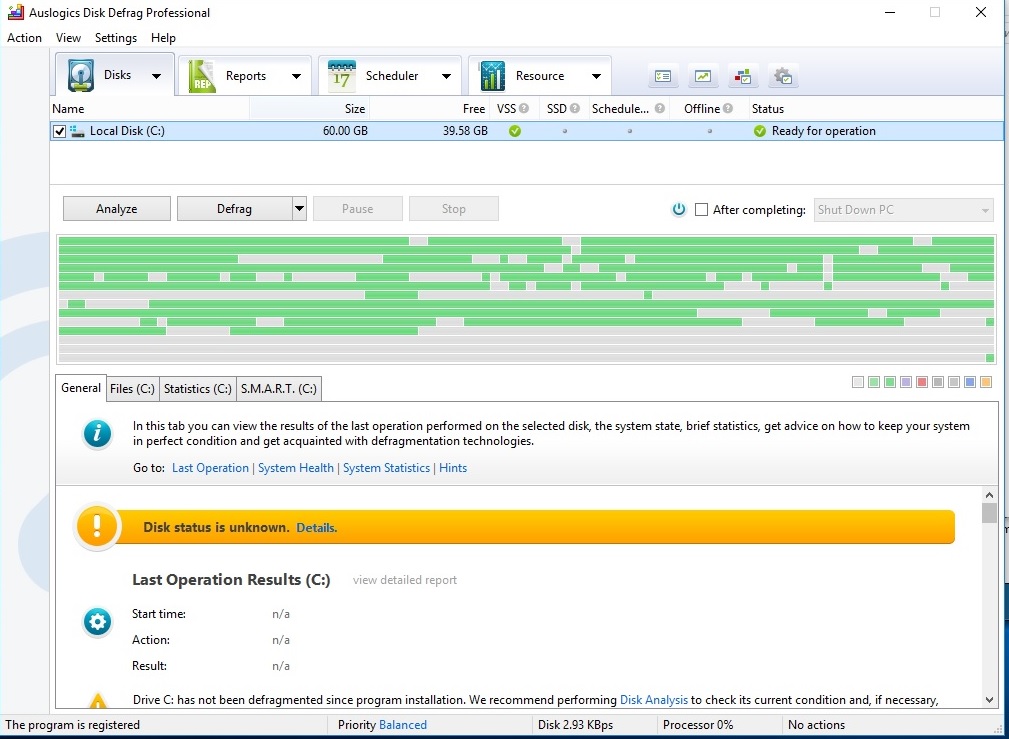
- If everything went well, a notification stating the operation was a success should appear on the program screen. Close the Command Prompt windowIf your problems with the Search feature or Index operations persist even after you did everything we asked of you, then there might be an underlying issue that has escaped our attention. You must investigate thoroughly and find out if your hard disk itself is faulty, or if something has corrupted far too many files on it, and so on.First, we recommend that you download and run Auslogics Disk Defrag Pro to defragment the items on your computer that are inaccessible during general Windows operations. This remarkable program will also help you optimize the placement of files on your hard disk, and the effect of this excellent work is an increase in data access speeds and improvement in your system’s efficiency or all-around performance.
- You can run the System File Checker program to scan for, and repair corrupted files on Windows. You should also open a Command Prompt window with administrative powers and enter the codes that will make Windows check for errors and faults in your system drive. Follow the instructions as they come up. After the completion of the needed procedures, restart your PC when Windows prompts you to do so.Whatever happens, since you have gone through this guide, you are now well equipped to deal with any issue related to the Search feature or the Indexing functionality on Windows 10. We are honored to have helped you.