Users can employ the new Mail app (which Microsoft bundled with Windows 10) as their default client to connect and manage all their email accounts regardless of the types of platforms involved. This way, you can enjoy a seamless experience with all the mail services you work with without having to go through multiple websites at several points in time.
What are the features of the Mail app in Windows 10?
The new Mail app on the latest version of the Windows operating system has all the features you need to manage the flow of emails or control interactions with them on a regular basis (like a day). We would be honest with you enough to inform you that while all the basic functionalities are available on this Mail app, it capabilities might be limited if you compare it to the Outlook app (Microsoft’s premium email client).
Why use Microsoft’s Mail app?
It all depends on what you do. If you are a regular user, then the Mail app will serve you excellently (probably better than you expect). To be fair, it is an email client for everyone. Nevertheless, if you are an advanced user who needs top-level functionalities, then the Outlook client is probably the one you would want to use.
Pro Tip: It is possible to fix many PC issues by using the PC Repair tool. PC Repair is easy to use and reliable Windows optimization software developed to fix hundreds of system issues.
Special offer. About Outbyte, uninstall instructions, EULA, Privacy Policy.
How to use the new Mail app on Windows 10?
Microsoft was successful in making Mail (their free email client) incredibly easy to use, and this feat appears even more impressive when you consider the fact that the simplicity or ease of use afforded by the Mail app takes nothing away from its completeness. You can always manage multiple email accounts without much trouble.
We will provide instructions you can go through to learn how to carry out some essential operations on the Mail app or take advantage of its useful features. Here we go:
How to add a new email account:
To use the app, you must log in at least one account on it for obvious reasons. Go through these steps to add a profile from virtually any email service:
- Press the Windows button on your keyboard or click on the Windows Start icon that is always visible on your desktop screen. From the options and programs you see, click on Mail to launch the needed app.
If you failed to locate the app, then input the following keyword into the text field present to a quick search: mail.
From the results that appear, click on the Mail app to open it.
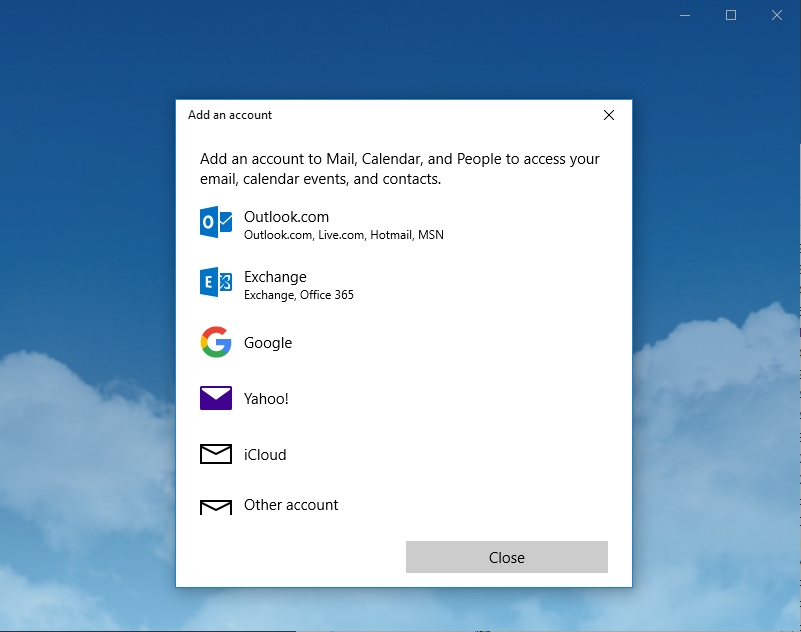
- After the Mail program window comes up on your screen, you will see the Add account button. Click on it. Under the Add an account menu, you must select the email service for the account you want to add.

- Follow the instructions that come up on your screen to continue. Once you have gone through the necessary details and selected the right options, click on the Done button.
- At this stage, we would like to believe that you have successfully added an account on the Mail app. If you want to add other accounts, all you have to do is go through the instructions above (starting from the second step) to carry out a similar procedure.
Note that in most scenarios where you attempt setting up your email account from the services supported by the Mail app, Windows will automatically figure out the required server settings so that you do not have to worry about them. All you have to do is ensure that you have inputted the correct login credentials (email address and password), and the operation will most likely be a success.
How to add multiple email accounts:
If you completed the setup for the Mail app some time ago, but later the need arises for you to have an extra account in it, then these instructions will prove useful to you:
- Open the Mail app. Instructions on doing this are available in the first step of the previous procedure. You are free to scroll up to see them if necessary.
- After the Mail window appears, you will see some options on the left pane. Click on the Settings gear or button (usually located at the bottom of the list). On the right pane, under the Settings menu, you will see some options from which you must click on Manage accounts.
- Click on the Add account button. Select the email service that you need from the list provided. Windows will now show you some instructions. Follow them to add up the account. If you want to add up another account, all you have to do is go through these instructions once more to repeat the procedure you have just completed.
How to change email account settings:
If the email service you employ allows for alteration of its base configuration, then you might be able to adjust some of the settings for your account. If you are interested in doing this, go through these steps:
- Open the Mail app. Check the first step of the first procedure if you are in doubt of how to do this. After the Mail app loads up on your computer screen, click on the Settings gear which is one of the options available on the left pane.
- On the right pane, click on the Manage accounts option. Click on the email account you want to work on now. The Account Settings window should come up soon. Under the text field for Account name, you can input a more descriptive or an easier to remember/recall name for the account.
- If you click on the Change mailbox sync settings link, then Windows will launch a new window or page where you can view and edit the necessary parameters. For example, if you expand the drop-down menu for Download new content, then you can set the timeframe for which the app should get in contact with the servers for your account to retrieve fresh content.
- If you want to save data, then you can go a step further to untick the checkbox for Always download full message and internet messages. Users with a metered connection or those people with limited bandwidth will welcome this change. This new setup also reduces the chances of your computer downloading malicious content that could lead to trouble.
- The options in the drop-down menu for Download email from allow you to specify the number of emails you want the Mail app to display in your desktop inbox. Under the Sync options, you can toggle off or on the switches that control the synchronization for a good number of items like Emails, Calendar, and Contacts.
Invariably, if you allow the Mail app to sync your calendar and contacts, then you will do well to take advantage of this setup by accessing the stored details through the Calendar and People apps on Windows 10.
How to check and reply to emails:
There is not much difference with how you go about checking and answering received messages on the new Mail app on Windows 10 and the way you carry out the same operations on other programs or interfaces. Go through these instructions if you are in doubt:
- Open the Mail app. After the program window shows up, click on the account you want to work on for now. Under Folders, you get to see the list of emails available.
- Click on the message you want to go through from the list provided. On the right pane, Windows will display the necessary details. If you want more space to view stuff, then you can collapse the items on the left pane to use all the space available on your computer screen. To do this, you have to click on the hamburger menu button usually in the top left corner of your current window.
- If you did not find the folder you wanted to access from the list that the Mail app provided, then you have to click on the More option. Now Windows will display more items for you to choose from, and we expect you to see what exactly you are looking for this time.
We recommend that you right-click on the folder once you have located it, then select the Add to favorites option. These changes will ensure that it appears under Folders so that you can find it quickly the next time you need it without you having to search for it like you just did.
- At this stage, we expect that you have opened the email. You are also viewing its content on the right pane. If you click on the reading pane toolbar, then you will see the options to perform the following actions: reply, forward the email to someone else, archive its content, delete it, or set a flag for it.
- You can access additional options that might prove useful by clicking on the menu represented by a three-dotted button. Here are some of the options we are talking about: move the email to a different folder, mark as spam, print, and so on.
If you could not find or locate the email you wanted to work on, then you must search for it using the text field provided. Nevertheless, you can also employ some options accessible from the drop-down menu on the left if you want to sort out your email messages in a way that will make them easy for you to find when the need arises.
Some useful functions of the Mail app in Windows 10
Personalization options: How to personalize the background image, color, and mode:
You can set the background image, alter the color accent, or switch between the dark and light modes available on the Mail app easily. These instructions will guide you:
- Open the Mail app. After the program window comes up, click on the gear button for Settings usually at the bottom of the left pane.
- Click on the Personalization option. On your current page, you will see some options for changing the color accent to adjust your experience. You can click on the radio button for either the light mode or the dark mode to select one of them. The Use my Windows mode allows the app to match its interface with the system mode currently in use on your device.
- If you want to fit more content on your screen while the Mail app is in use, you can adjust the display density. This option is available for you to edit from the Folder and message spacing settings.
- Under Background, you can access the options that allow you to set the wallpaper that will show up in the background when no email message has been highlighted or selected.
- You can also modify the available settings in different ways to let the chosen image fill up the entire experience. You can even select a custom image the Mail app should go with in general. You can also disable the feature altogether from here.
There are other things you can personalize to suit your taste. Here are some of them:
- The messaging list pane
- The reading pane
- Your email signature
- Your email notifications, and others
How to configure automatic replies:
If you want everybody to get a response after they send you a message even while you are away, then you will love this feature. With its help, you can set Windows to communicate with a specific message to every email address that sends you something or to a group of accounts.
Unfortunately, in the Mail app, Microsoft has the provided the feature for use on only Outlook accounts. If you have one, then you can follow these instructions to set up automatic replies:
- Open the Mail app as you have done several times before now. Once the program window is up, you must click on the gear button for Settings. You will find it at the bottom of the left pane.
- Click on the Automatic replies option you see. Expand the drop-down menu under Select an account to choose the Outlook account you want to work on here. Toggle on the switch for Send automatic replies.
- In the text field under Inside my organization, you must create a custom message that senders will receive while you are away. Similarly, in the second box, you can create a custom message that the Mail app will forward to only your contacts as responses while you are away.
- If you want the Mail app to send replies for emails that did not originate within your organization, then you must tick the checkbox for Send replies outside of my organization.
On the other hand, if you want the replies to be limited to a specific set of people, then you have to tick the checkbox for Send replies only to my contact.
If you did everything correctly, then the Mail app will start to transmit the required response based on your configuration and the details you inputted anytime an email comes in.
How to configure focused inbox:
If you use the email service from Microsoft (Outlook account), then you can enable Focused inbox. This feature will you organize your email messages into 2 tabs one of which is the Focused section.
Follow these instructions to enable or disable Focused inbox on the Mail app:
- Open the Mail app as you have done several times already. After the required program window comes up, you have to click on the gear icon for Settings usually at the bottom of the left pane.
- Click on the Focused inbox option you see. Under the Select an account section for Focused inbox on the right pane, expand the drop-down menu to see the list of accounts or email services available. You will only find email addresses from Microsoft there.
- You will now see the switch or toggle for Sort messages into Focused and Other. Turn it on if you want to enable Focused inbox. Do the reverse if you are here to disable it.
Anyway, after you complete the setup for Focused inbox, the Mail app will start to group your email messages to allow the most critical items appear in the Focused tab while the remaining stuff will find their way into the Other tab.
How to remove email accounts in the Mail app:
If you ever decide that you longer want to see or manage emails from a particular account or email service through the Mail app, then you can quickly get rid of it from the list. Here are the instructions you need to follow:
- Open the Mail app. We would like to assume that you are used to doing already. After the required program window shows up, you must click on the Settings gear button. This object is usually at the bottom of the left pane of your current window.
- On the right pane, click on the Manage accounts option. Now you will see the list of accounts that you have added for the Mail app to manage. Select the one you want to get rid of to continue.
- The Account Settings window should be on your screen by now. Click on the Remove this account from this device link under Delete account from this device. A small dialog box or window requesting confirmation for the operation you initiated might come up now. Click on the Delete button there to confirm.
Windows now will remove the email account, its data, and so on. You will no longer be able to access the deleted account through the Mail app unless you add it again.
How to reset the Mail app on Windows 10:
If you ever run into trouble with the Mail app, then this procedure will come in handy. To be fair, the Mail app is far from perfect, and sometimes you might struggle to get it to sync your emails no matter how hard you try. We have seen reports of users experiencing other forms of problems with it.
The good news is a reset of the app is usually enough in most cases to bring about changes that will resolve your issue. Go through these steps if you want to reset the Mail app:
- Press the Windows button on your keyboard or click on the Windows Start icon that is always visible on your desktop screen. From the programs or options you see, click on Settings to open the required program.
- Click on Apps. Click on Apps and Features. Under the Apps and Features menu on the right pane, you will see the “Search, sort filter by drive. If you would like to uninstall or move an app, select it from the list” option. Search for the Mail app in the text field available by inputting this keyword: mail.
- Select the app that comes up from the search results to highlight it. Click on the Advanced options link below it. The Settings screen for the app will appear now. Click on the Reset button under the Reset menu and its description.
- A dialog box or small program window might come up to seek confirmation for the procedure you initiated. Click on the Reset button there to confirm and move on. As expected, Windows will now reset the app to its factory settings.
In theory, Windows will install a fresh version of the program, and this means that you will have to setup it up, add your accounts, and repeat everything else you did when you started using it initially. All you have to do is go through the procedures we outlined above starting from the first one.
Tip:
We have come to the end of this guide. If you are going to perform many operations using the mail app, then you will do well to worry about your security considering the threats associated with the attachments in emails and similar dangerous items that could cause harm to your system.
Therefore, we implore you to download and run Auslogics Anti-Malware to take your security setup up by several levels. Even if you have an antivirus running as your primary security app, the extra line of protection that this excellent app provides will go a long way in making you safer than before.