“If you set goals and go after them with all the determination you can muster,
your gifts will take you places that will amaze you.”
– Les Brown
Pro Tip: It is possible to fix many PC issues by using the PC Repair tool. PC Repair is easy to use and reliable Windows optimization software developed to fix hundreds of system issues.
Special offer. About Outbyte, uninstall instructions, EULA, Privacy Policy.
In this article, we are going to be talking about Microsoft Windows Defender; how to turn it on and off, go through the settings, as well as enable the Crapware Blocker. Let’s get started by opening up Windows Defender.
There are a few different ways to open up Windows Defender. It is always running by default as a background app, together with any other third-party antivirus you have installed on your system.
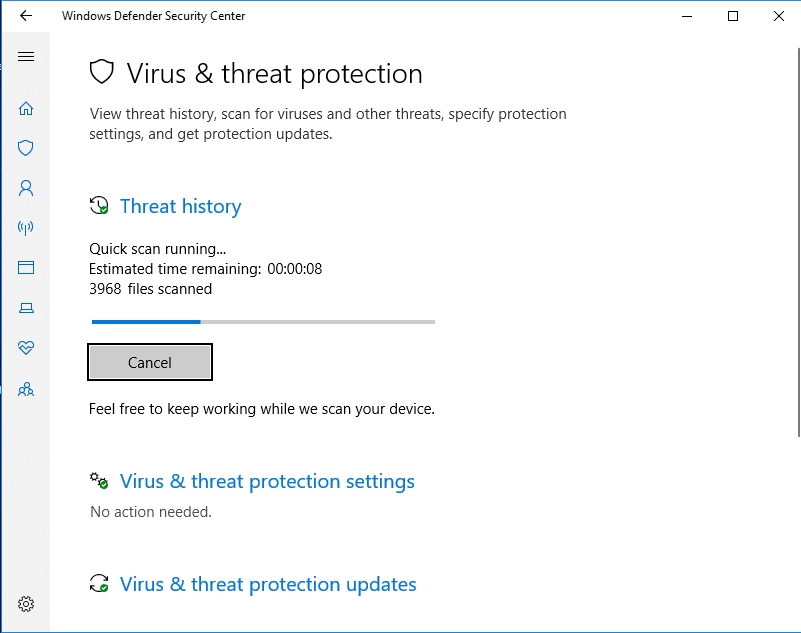
One way to open up Windows Defender is going down to the taskbar and clicking on the up arrow. This is going to show a pop-up menu where you can click. An alternate way of opening up the new interface for Windows Defender in the Windows 10 Creators Update is by going down to the Start menu and left-clicking it. Scroll down the apps column and click on Windows Defender Security Center. It opens up the Windows Defender Security Center window. If you go into this new Windows Defender Security Center window, which has been completely redesigned and revamped and is extremely user-friendly, you can select he scan option and it will begin immediately scanning your computer. If you feel that you have or you are suspicious of having a virus on your computer, you can do a quick scan. It detects any virus which is lurking around, but usually not accurate. We recommend you do a quick scan regularly. You will also find a link which says Scan history. This gives you information on the last time your system was scanned.
You can run a new quick scan or an advanced scan
If you click on Advanced scan, it will give you an option to either leave it at the default of a full scan, or a custom scan where selected folders are scanned, or you can have Windows Defender do an offline scan. On the Virus and threat protection settings, you can disable or enable real-time protection on the computer system and any operations being performed on the cloud. Also, you can enable or disable any information that Microsoft will be receiving based on what Windows Defender discovers.
If you want to, you can turn the real-time protection off
This leaves your computer vulnerable. You might ask what reason anybody would have for disabling the virus real-time protection scanning. Sometimes, when you’re installing an app or a game, the real-time protection can interfere with the installation. Also, some games do slow down a little bit when real-time scanning is enabled. If you feel the game you’re playing could be improved upon by disabling the real-time protection, then go ahead and do so. However, be sure to enable it once you are done playing the game. The last thing is the protection updates notification that is present on the Windows Defender icon as an exclamation mark. it may be present when you have not scanned or updated your definitions or device in a while.
Let’s go back to the home page
This is a user-friendly interface compared to the older version of Windows Defender. The next item to talk about is the Device performance and Health. If you click on it, you can get some reports on Windows updates, system device drivers, and battery life. You can click on Fresh Start if your computer is heavily infected with a virus and when Windows Defender just doesn’t seem to be doing the job that you expected it to. Also, if Windows is giving you a lot of issues, then you may consider doing a clean and up-to-date installation of Windows. This will delete your personal files and some Windows settings, as well as remove some of your apps. So, do not forget to do a backup of your system.
The next item is the Firewall and Network protection
You can enable or disable the firewall as well as public networks. Here, you will find settings like Allow an app through the firewall, Network and Internet troubleshooter, Firewall notification settings, Advanced settings, and Restore firewalls to defaults. And if for some reason you choose to restore this firewall back to the default settings the way Windows 10 had it set up to begin with, you can click on Restore firewall on to defaults, and that will put everything back to factory defaults.
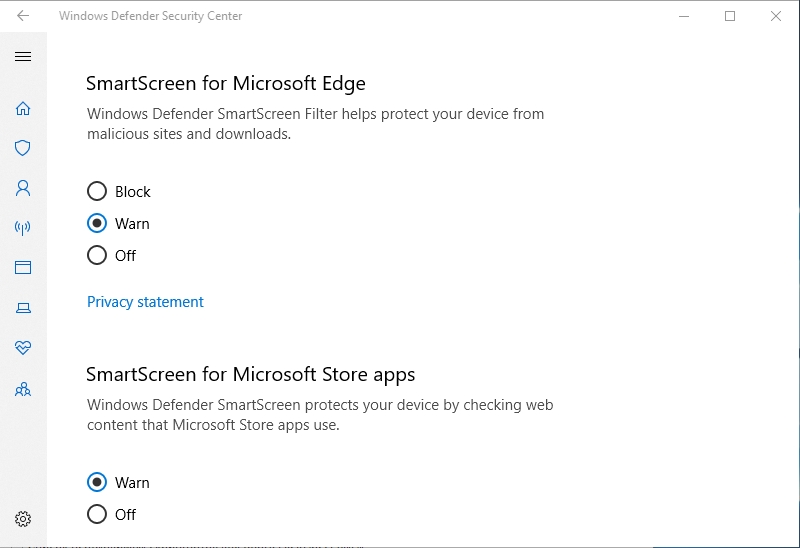
Let’s go back Home and click on App and browser control
This basically allows you to make some changes on Windows Defender’s SmartScreen settings. In some cases, you have three settings; Check apps and files, SmartScreen for Microsoft Edge, SmartScreen for Windows Store apps. So, by default all three of these are set for the warning. They warn you with a message if Windows Defender SmartScreen discovers something suspicious. If you choose to, you can come in here and click Block to turn off completely all three of these settings.
The last item is Family options
Here, you can simplify your family’s digital life. It gives you parental controls. It has several options like: help protect your kids online, set good screen time habits, keep track of your child’s digital life, let your kids buy appropriate apps and games. You can choose which website your kids can visit as they explore the web, using Microsoft edge. Now keep in mind that this is tailored to the Windows Microsoft Edge internet browser. It has been redesigned, and it is super user-friendly. Windows Defender Security Center is doing a good job within Windows 10. It is not as good as most paid third-party virus protection software applications that you might buy, but if you want to save some money, use Windows Defender on Windows 10. It’s free, and it costs you nothing and does a good job of protecting your computer.
What is Windows 10’s secret antivirus?
Microsoft’s Windows Defender does a good job, but unfortunately, it still lets crapware through its defenses. Fortunately, Microsoft included a setting which is intended for larger companies and which will add an extra layer of protection against viruses. This provides a way to remove crapware from Windows 10 without using third-party software. Usually, users pick up crapware when downloading free software from the internet. Crapware is more of ads, programs that track your browsing history, processes that use up your system’s resources, etc., rather than malware. If you are vigilant, you will notice that sometimes after installing a third-party program, you have some unknown additional browsing toolbars, or weather docks, or some PC optimization tool. These are perfect examples of crapware. Here is how to enable the crapware blocker in Windows Defender:
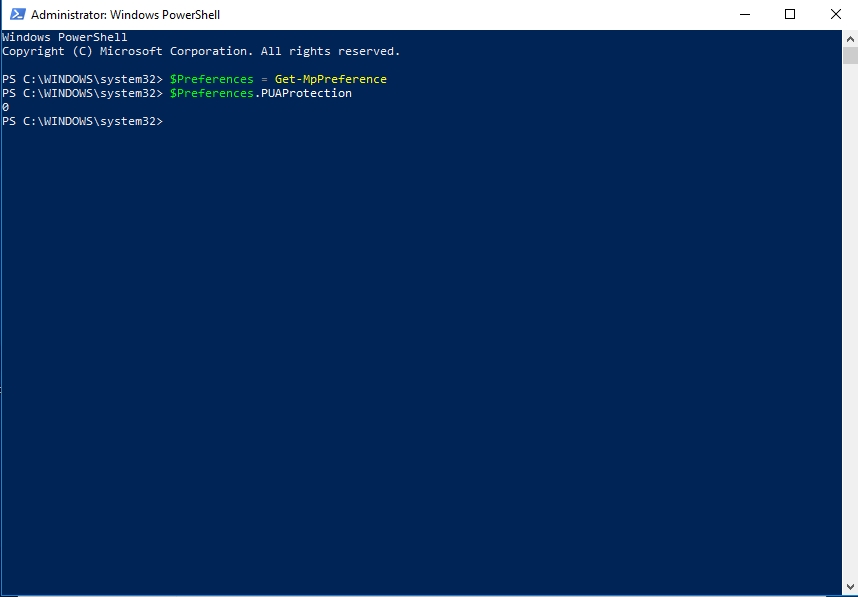
- Right-click on the Start or Home button and select PowerShell (Admin) to run it as an administrator.
- This will open the PowerShell window.
- InputSet-MpPreference -PUAProtection 1
- This command will enable the crapware blocker. If you want to disable it, repeat the process but replace 1 with 0.
- Run the following commands in PowerShell to check if the crapware blocker is enabled on your PC:
- $Preferences = Get-MpPreference
- $Preferences.PUAProtection
- 1 indicates the crapware blocker is enabled, 0 means it is disabled.
With this, your system will be more protected.
Note that Windows Defender will not protect you against all the malware out there. That is why we recommend you download and install Auslogics Anti-Malware. This tool will augment the security system of your PC. It scans your computer for malware on a regular basis. You can browse the internet free of viruses. Its virus database is updated regularly so it can defend your system against all types of malware.

We hope that this article has shown you how to use Windows Defender’s crapware blocker. Share it with others in need of such information.
We appreciate your ideas and comments, and we are ready to answer all your questions regarding the above topic.