Windows 10 has arrived with a plethora of new and exciting opportunities to enhance the modern digital experience. However, with great power comes great responsibility. For some users, this means a new error that needs troubleshooting. If your computer has limited network connectivity and you cannot seem to connect to the internet no matter what you do, you will find this article useful.
Mainly, when no other problem has presented itself, the “Diagnostics policy service is not running” error occurs when you are trying to connect to the internet or any network that has access to the web, resulting in low connectivity.
Sadly, when you resort to the Windows Network Diagnostic troubleshooter, it doesn’t do much and you are left again with the same sign: “Diagnostics policy service is not running”. Below you will find a few methods that users have found useful.
Pro Tip: It is possible to fix many PC issues by using the PC Repair tool. PC Repair is easy to use and reliable Windows optimization software developed to fix hundreds of system issues.
Special offer. About Outbyte, uninstall instructions, EULA, Privacy Policy.
How to fix “Diagnostics policy service is not running” error?
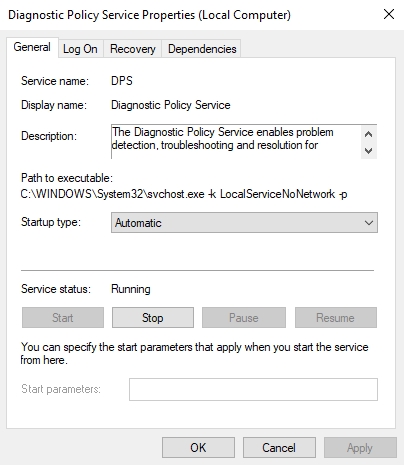
Method 1. Enable the Diagnostic Policy Service.
You might be getting the error message that says that there is a problem, but does it really say anything more than that the program is not running? It’s more of a confirmation of the fact. So, to make sure you don’t troubleshoot for nothing, first check that the Diagnostics Policy Service is running. To do that, follow these instructions:
- Step 1. Use the shortcut combination of the Windows key and R to open Run.
- Step 2. Type ‘services.msc’ into the search box and hit Enter.
- Step 3. Look for Diagnostic Policy Service and double-click it.
- Step 4. In the opened window, in the General tab, see the ‘Service status’, it should say ‘Running’.
- Step 5. If the service says ‘Stopped’, press the Start button below to enable the Diagnostics Policy Service.
- Step 6. Select ‘Automatic’ in the startup type and hit Apply to confirm this setting.

- Step 7. Click OK to close the window. You have enabled the Diagnostics Policy Service, and you should be able to run the Windows Network Diagnostics now.
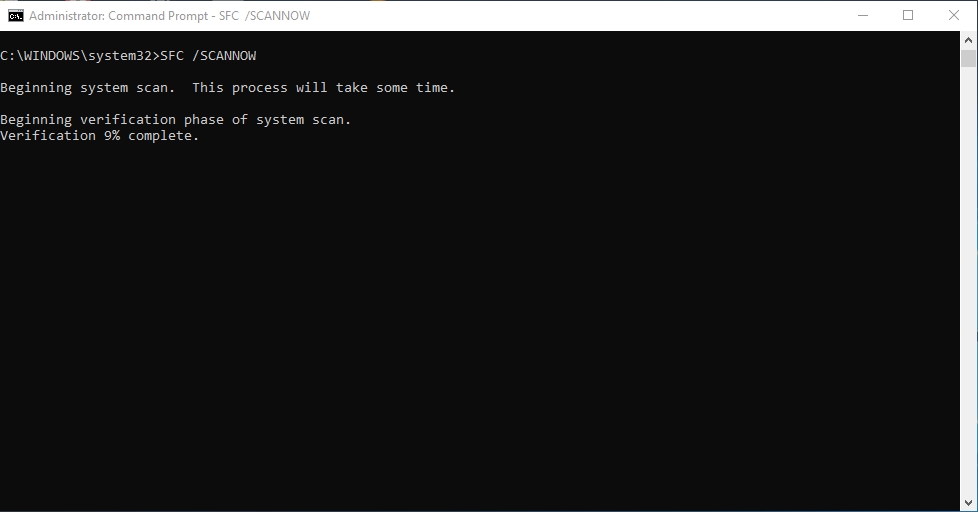
Method 2. Run a System File Checker scan.
A fail-safe option that you can always use for most Windows 10 errors is running a System File Checker Scan. This quick check will give you some idea as to what could be causing your particular issue. In most cases, the results of the scan come back with repairs needed for corrupted system files. But in order to get this information, you need to manually scan the system on a regular basis. Here is how to initiate this scan:
- Step 1. Start with clicking the Control Panel.
- Step 2. In the search box, type in ‘cmd’ to access Command Prompt.
- Step 3. Right-click Command Prompt and select “Run as administrator”
- Step 4. A window will open up, where you need to enter ‘DISM.exe/Online/Cleanup-image /Restorehealth’
- Step 5. The next command will be to enter ’sfc /scannow’ into the Command Prompt to initiate the scan, then hit Enter.
- Step 6. The scan may take up to 30 minutes to complete. Remember to restart your computer after the scan.
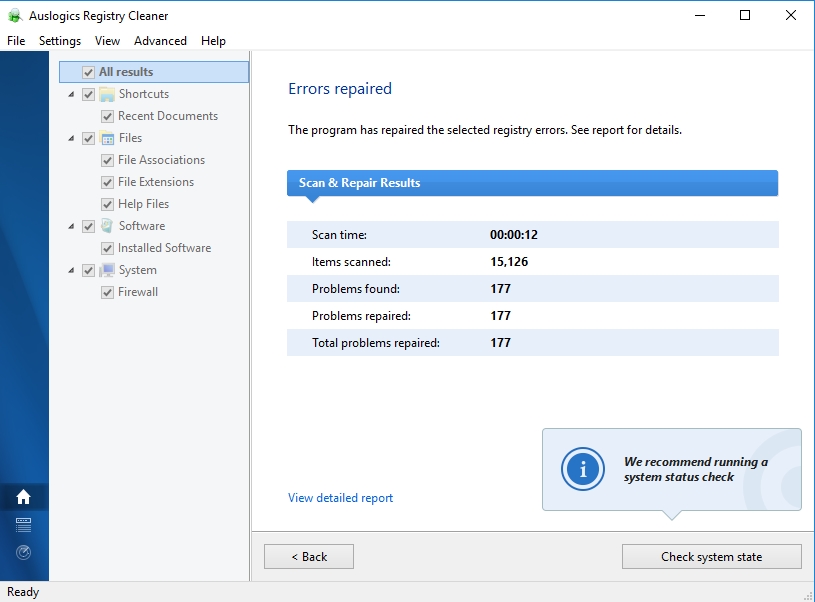
Alternatively, you can install a free registry cleaner – Auslogics Registry Cleaner, for example. This will automate the scanning process, and you will be able to schedule scans and get results from a scan that has occurred without your interference. It’s also a handy tool if you need to repair a corrupted file but you are not a technician. We don’t want you to mess the Registry up even more, so we advise to use a tool that was specifically created for this purpose.
Method 3. Modify Network Services.
This method was reported as a great fix by some users that are trying to access the internet from a corporate computer. By granting admin privileges to the local and network services, you can work around the “Diagnostics Policy Service is not running” issue. Follow the instructions below to give admin privileges to Network Services on your computer.
- Step 1. Open Command Prompt.
- Step 2. Type in ‘net localgroup Administrators/add networkservice’ and hit Enter.
- Step 3. Enter the command ‘net localgroup Administrators/add networkservice’ into the Command Prompt and hit the Return keyboard key.
- Step 4. Restart your computer.
Method 4. Check your drivers
Whenever you are upgrading your computer or installing new updates or software, it’s important to remember what kind of drivers you have so that you can, in due course, update them too. Most errors stem from unupdated drivers. What happens is this: the software is trying to access commands that do not get through to the hard drive and as a result, no action is executed and the error message is presented to the user. There are two options you can take regarding this method.
The first one is reinstalling the network adapter card driver. You know you should go with this method when your computer is old and the network adapter card driver is even older. Reinstalling it might help bring the vitality to your system. Also, there may be corruption taking place, which you can easily fix by reinstalling the driver altogether. If you don’t know how to reinstall the network adapter card driver on your computer, follow this guide:
- Step 1. Using the shortcut provided above, open the Run accessory.
- Step 2. In the search box, type in ‘devmgmt.msc’ and hit Enter
- Step 3. In the Device Manager window, find and double-click Network adapters to see the whole list.
- Step 4. From the list of network adapters, select the one you need to uninstall and right-click it. Select the Uninstall device option.
- Step 5. In the Device Manager window, select the Action tab and check the Scan for hardware devices option from the drop-down menu.
- Step 6. Restart your PC.
- Step 7. Check online if your current network driver is compatible with Windows 10. If it’s not, you need to update it by downloading the latest version from the manufacturer’s website. Be sure to check the compatibility with your hard drive and the version of OS that you are using.
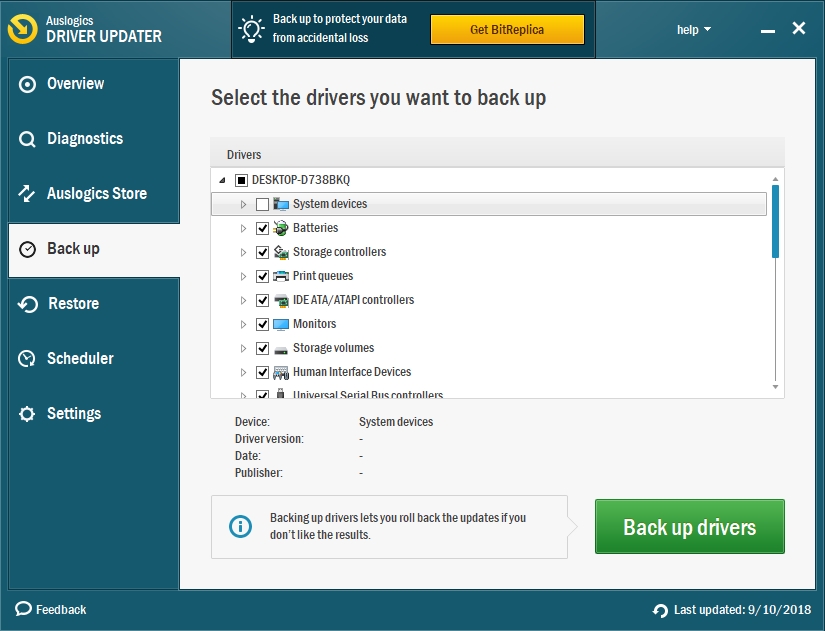
The second option is to get a tool like Auslogics Driver Updater and forget about manual reinstallation. This option is especially desirable if you don’t have any previous experience of reinstalling drivers to your system. This tool will maintain the course that you have set for it and ensure the health of your drivers at all times. All you need to do is schedule the scans and check-ups and then accept the needed installations. Auslogics Driver Updater will automatically search online for the driver that you need and install it on your computer.
Method 5. Restore Windows to a saved version.
This is not so much a fix but a workaround if you don’t feel like going through all the troubleshooting options we have laid out for you. Some users have reported that rolling their Windows 10 back to a restore point has fixed the DPS error for them. Assuming there was a time when you could connect to a network without any errors popping up, this may be a valid option. Be sure to back up all your sensitive data before going through the restoring process. Below you will find instructions on how to restore your system.
- Step 1. Open the Run search window and type in ‘rstrui’, then hit Enter
- Step 2. A System Restore window will open, where you will see all the previous versions that you have saved. Hover your mouse over the last one to select it and then click Next to continue.
- Step 3. You should be aware that all the software that you have installed after the saved restore point will be deleted. If you don’t remember what happened after the saved point and whether you need those programs in your life, there is a button at the end of the page – by pressing it you will scan for affected programs.
- Step 4. Hit Next and Finish to confirm the restore point. Your system will restart to the selected point, and there is a chance that your DPS error will become a thing of the past.
Windows 10 has arrived with a plethora of new and exciting opportunities to enhance the modern digital experience. However, with great power comes great responsibility. For some users, this means a new error that needs troubleshooting. If your computer has limited network connectivity and you cannot seem to connect to the internet no matter what you do, you will find this article useful.
Mainly, when no other problem has presented itself, the “Diagnostics policy service is not running” error occurs when you are trying to connect to the internet or any network that has access to the web, resulting in low connectivity.
Sadly, when you resort to the Windows Network Diagnostic troubleshooter, it doesn’t do much and you are left again with the same sign: “Diagnostics policy service is not running”. Below you will find a few methods that users have found useful.
How to fix “Diagnostics policy service is not running” error?
Method 1. Enable the Diagnostic Policy Service.
You might be getting the error message that says that there is a problem, but does it really say anything more than that the program is not running? It’s more of a confirmation of the fact. So, to make sure you don’t troubleshoot for nothing, first check that the Diagnostics Policy Service is running. To do that, follow these instructions:
- Step 1. Use the shortcut combination of the Windows key and R to open Run.
- Step 2. Type ‘services.msc’ into the search box and hit Enter.
- Step 3. Look for Diagnostic Policy Service and double-click it.
- Step 4. In the opened window, in the General tab, see the ‘Service status’, it should say ‘Running’.
- Step 5. If the service says ‘Stopped’, press the Start button below to enable the Diagnostics Policy Service.
- Step 6. Select ‘Automatic’ in the startup type and hit Apply to confirm this setting.
- Step 7. Click OK to close the window. You have enabled the Diagnostics Policy Service, and you should be able to run the Windows Network Diagnostics now.
Method 2. Run a System File Checker scan.
A fail-safe option that you can always use for most Windows 10 errors is running a System File Checker Scan. This quick check will give you some idea as to what could be causing your particular issue. In most cases, the results of the scan come back with repairs needed for corrupted system files. But in order to get this information, you need to manually scan the system on a regular basis. Here is how to initiate this scan:
- Step 1. Start with clicking the Control Panel.
- Step 2. In the search box, type in ‘cmd’ to access Command Prompt.
- Step 3. Right-click Command Prompt and select “Run as administrator”
- Step 4. A window will open up, where you need to enter ‘DISM.exe/Online/Cleanup-image /Restorehealth’
- Step 5. The next command will be to enter ’sfc /scannow’ into the Command Prompt to initiate the scan, then hit Enter.
- Step 6. The scan may take up to 30 minutes to complete. Remember to restart your computer after the scan.
Alternatively, you can install a free registry cleaner – Auslogics Registry Cleaner, for example. This will automate the scanning process, and you will be able to schedule scans and get results from a scan that has occurred without your interference. It’s also a handy tool if you need to repair a corrupted file but you are not a technician. We don’t want you to mess the Registry up even more, so we advise to use a tool that was specifically created for this purpose.
Method 3. Modify Network Services.
This method was reported as a great fix by some users that are trying to access the internet from a corporate computer. By granting admin privileges to the local and network services, you can work around the “Diagnostics Policy Service is not running” issue. Follow the instructions below to give admin privileges to Network Services on your computer.
- Step 1. Open Command Prompt.
- Step 2. Type in ‘net localgroup Administrators/add networkservice’ and hit Enter.
- Step 3. Enter the command ‘net localgroup Administrators/add networkservice’ into the Command Prompt and hit the Return keyboard key.
- Step 4. Restart your computer.
Method 4. Check your drivers
Whenever you are upgrading your computer or installing new updates or software, it’s important to remember what kind of drivers you have so that you can, in due course, update them too. Most errors stem from unupdated drivers. What happens is this: the software is trying to access commands that do not get through to the hard drive and as a result, no action is executed and the error message is presented to the user. There are two options you can take regarding this method.
The first one is reinstalling the network adapter card driver. You know you should go with this method when your computer is old and the network adapter card driver is even older. Reinstalling it might help bring the vitality to your system. Also, there may be corruption taking place, which you can easily fix by reinstalling the driver altogether. If you don’t know how to reinstall the network adapter card driver on your computer, follow this guide:
- Step 1. Using the shortcut provided above, open the Run accessory.
- Step 2. In the search box, type in ‘devmgmt.msc’ and hit Enter
- Step 3. In the Device Manager window, find and double-click Network adapters to see the whole list.
- Step 4. From the list of network adapters, select the one you need to uninstall and right-click it. Select the Uninstall device option.
- Step 5. In the Device Manager window, select the Action tab and check the Scan for hardware devices option from the drop-down menu.
- Step 6. Restart your PC.
- Step 7. Check online if your current network driver is compatible with Windows 10. If it’s not, you need to update it by downloading the latest version from the manufacturer’s website. Be sure to check the compatibility with your hard drive and the version of OS that you are using.
The second option is to get a tool like Auslogics Driver Updater and forget about manual reinstallation. This option is especially desirable if you don’t have any previous experience of reinstalling drivers to your system. This tool will maintain the course that you have set for it and ensure the health of your drivers at all times. All you need to do is schedule the scans and check-ups and then accept the needed installations. Auslogics Driver Updater will automatically search online for the driver that you need and install it on your computer.
Method 5. Restore Windows to a saved version.
This is not so much a fix but a workaround if you don’t feel like going through all the troubleshooting options we have laid out for you. Some users have reported that rolling their Windows 10 back to a restore point has fixed the DPS error for them. Assuming there was a time when you could connect to a network without any errors popping up, this may be a valid option. Be sure to back up all your sensitive data before going through the restoring process. Below you will find instructions on how to restore your system.
Step 1. Open the Run search window and type in ‘rstrui’, then hit Enter
Step 2. A System Restore window will open, where you will see all the previous versions that you have saved. Hover your mouse over the last one to select it and then click Next to continue.
Step 3. You should be aware that all the software that you have installed after the saved restore point will be deleted. If you don’t remember what happened after the saved point and whether you need those programs in your life, there is a button at the end of the page – by pressing it you will scan for affected programs.
Step 4. Hit Next and Finish to confirm the restore point. Your system will restart to the selected point, and there is a chance that your DPS error will become a thing of the past.