Error 0x80070017 is one of the most widely known error messages or codes users can encounter on the Windows operating system. The vast majority of its occurrences and manifestations are limited to these scenarios:
- During the installation of a fresh copy of Windows or its reinstallation. The error usually comes up while the verification stage is ongoing. The operation then fails abruptly, and the user cannot continue with the installation process
- During the installation of Windows updates. From the reports we have seen, we can safely say that the Windows Anniversary update and the Creator updates are the most common upgrades with which users experience the problem in view.
Here are some examples of the messages in which Windows usually embeds the error code:
“Windows could not search for new updates. An error occurred while checking for new updates for your computer.”
- “Some updates were not installed. Failed: XX updates”. XX represents the number of updates here
- “Error(s) found: Code: 0x80070017 Windows update encountered an unknown error“
- “Windows Cannot Copy files required for installation. The Files may be corrupt or missing… Error code: 0x80070017”
Nevertheless, some users also confirmed that they had received an error message with Error 0x80070017 as a vital part of the description while they had been trying to use the System Restore program on their computer. Events like this are much less sporadic when compared to the scenarios we identified as the most prevalent of the lot.
Pro Tip: It is possible to fix many PC issues by using the PC Repair tool. PC Repair is easy to use and reliable Windows optimization software developed to fix hundreds of system issues.
Special offer. About Outbyte, uninstall instructions, EULA, Privacy Policy.
Moreover, the causes of the error in such a case are easily identifiable. Thus, users can apply straightforward fixes, which are often surprisingly effective enough to get rid of the problem. To be fair, this error does not exactly fall into the class of the most difficult or troublesome issues.
For example, some antiviruses interfere with the operations of the System Restore program, and Error 0x80070017 could be the result of such interferences. The obvious solution here is the disabling of the security program. After the System Restore program has completed its work, users are free to reverse the action that they carried out earlier on their antivirus.
Since we have already established that Error 0x80070017 is associated with bad or faulty Windows installation media and Windows update files, we can now move on to expand on its effects and consequences while we proffer solutions for it.
The underlying issue can prevent you from updating your system or upgrading the Windows on your PC to a newer version or iteration. Surely, you would want to get rid of it as soon as possible. You are in luck; we have just what you need in this guide.
How to resolve error code 0x80070017 on Windows 10 and older operating systems?
The first set of fixes we are going to outline will resolve Error 0x80070017 for users who experienced it while they were trying to update Windows. If you belong to the stated group, then you must attempt the solutions below starting from the first one on the list until you arrive at what works for you. There are also solutions for the other category of users who saw the error when they were trying to install Windows.
Carry out basic troubleshooting procedures:
Regardless of where they came from, differences in their nature and behavior, a good number of technical glitches that appear on Windows like Error 0x80070017 tend to go away after some troubleshooting operations. Do the following:
- Restart your PC multiple times. Try to update Windows or execute the installation operations each time it comes on. If experienced no success with this procedure, perform numerous reboots in quick succession, and then you can now attempt to complete your work
- Disconnect all peripherals or external devices. Some items you connect to your PC are not compatible with your system, or they might be interfering with things they have no business with on Windows.
If you do away with all devices that are not primary hardware components of your computer, then Error 0x80070017 might disappear. Otherwise, you can at least rule out the incompatibilities or interferences involving them as the cause of your headache.
- Disable your internet connection. After Windows finishes downloading the update files, you can proceed with the installation because the internet connectivity is no longer needed
- Run a fast scan for viruses or malware. Malicious items engage in many activities that cause a lot of harm to their hosts. You would want to be sure that your problem has nothing to do with them
- Check or ensure that you have enough space on your hard disk.
Disable your antivirus:
Antivirus and similar programs work hard to protect and defend your system from threats or harmful items. However, they also tend to complicate things unnecessarily with their hard work, overreaching abilities or extensive capabilities on your PC. In many scenarios, Error 0x80070017 came up because an antivirus interfered with operations it was not supposed to disturb.
The logical line of action here would require you to disable your antivirus or give it less power, but these operations are not as easy as they seem to execute for most people. There are also other things to consider. For one, we do not recommend that you cut off all protection at once. It is far too risky, and there is no guarantee that the effort itself will do enough to justify the consequences that might come along.
You should employ a more intuitive approach to carry out the needed operation. For example, you can disable its firewall, and see what happens. You can also disable or disrupt its real-time protection features, and from then on, you must observe the state of things.
Now it is time you took the procedure at least one level up if things remained the same: open the required application, navigate through its settings or options menu until you find the entry that allows you to disable its activities or operations entirely at one go. After you have done what we recommended, restart your PC and see if the problem persists.
If nothing changes or you suspect that the action you took was not enough to stop your antivirus from poking its nose into your business, then a further line of action is necessary to ensure that the app stops overreaching in every way—you should consider uninstalling your antivirus. This recommendation might seem too harsh, but remember that you have come a long way before you arrived at your current destination. Of course, you can only do so much at this point.
Users with systems running Windows 10 can follow these instructions to uninstall their antivirus:
- Press the Windows button on your keyboard or click on the Windows Start icon that is always visible on your desktop screen. From the menu or the list of items that come up, select Settings
- After the program window opens, click on System. On the left pane, you should see Apps and Features. Click on this item. Now you should see the list of applications currently installed on your PC
- Select the app you intend to do away with (your antivirus in this case). The Uninstall button should appear once you successfully select an application. Click on it to remove the app
- A small dialog box requesting confirmation for your action should come up. Click on the Uninstall button there to confirm and move on. Follow the instructions that come on the screen (if any). Be patient and wait while Windows uninstalls the selected app
- After the completion of the app removal process, you are free to close all open windows and reboot your PC. After your system comes on, perform the Windows update operation or the installation of Windows once more and see if anything changes.
If everything now works fine after the removal of your antivirus, then you have just seen that your security application was the source of your problem. You could not have seen this coming. Now you must decide if you want to continue working on your PC without a security application running on it.
It all depends on what you do, the type of risks you are exposed to, your level of technical expertise, and so on. Windows Defender might be enough for some people. We cannot speak for everybody though so we would give recommendations that would work well enough to keep everyone safe regardless of the individual or personality involved.
You can try out a different antivirus brand and see if the new program works differently and suits you better than the previous one. After all, there are many excellent security products on the market with enough flexibilities and variations in their approaches in answering the question of safety.
You could even download and try out an excellent antimalware program like Auslogics Anti-Malware. This application does more than enough to provide you with top-notch protection against malware and other threats without the downsides associated with the overreaching behavior of the typical antivirus app.
Furthermore, the program is very much capable of working alongside an antivirus without causing conflicts and other software glitches that users expect to come up when multiple applications designed to do similar work are running. This compatibility fact is another testament to Auslogics Anti-malware’s exceptional ability to work with others without causing problems.
Use the Windows Update troubleshooter:
Microsoft introduced troubleshooters a while back, and it seems they are here to stay. As far as we know, for almost every problem that can appear on the Windows operating system, there is virtually always a troubleshooter that users can run to help them quickly diagnose or resolve the issues (if possible).
Windows 10, in particular, has a wide variety of troubleshooters, and the Windows Update Troubleshooter is the one we are going to use now. Follow these instructions to run the required utility that can help you to get rid of Error 0x80070017:
- First open the Settings app by pressing (and holding) the Windows button on your keyboard, then tapping the letter I key. Or you can open the same app through this alternative method: press the Windows key or click on the Windows start icon to see a list of programs or options. Select Settings to open it
- After the program window opens, click on the Update and Security section. Navigate through its menu and the list of items on the left pane and click on Troubleshoot
- In the right pane, you should see the Windows Update troubleshooter. Click on Run the troubleshooter button. Follow the necessary instructions as they come up on the screen to complete the procedure
After the troubleshooter finishes its work, you might see some details about the issues it identified, the solutions it applied to fix them, and so on.
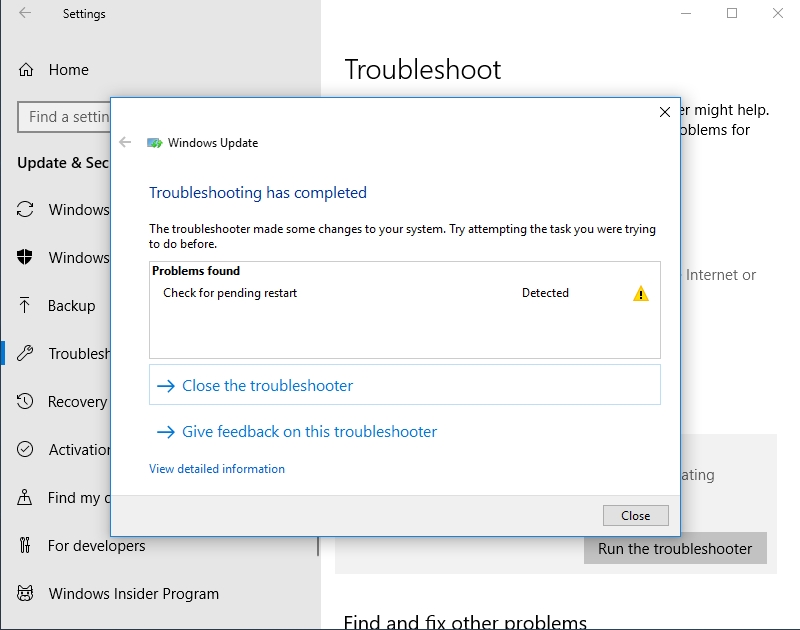
The utility might even ask you to perform a specific operation to solve the problem. Most times, Windows will prompt you to restart your PC. Whatever happens after the end of all activities, check if your problem with Windows Updates persists.
If nothing changed, then either the troubleshooter failed to detect the problems, or it did not do enough to fix the issues it identified. You must move on to other fixes.
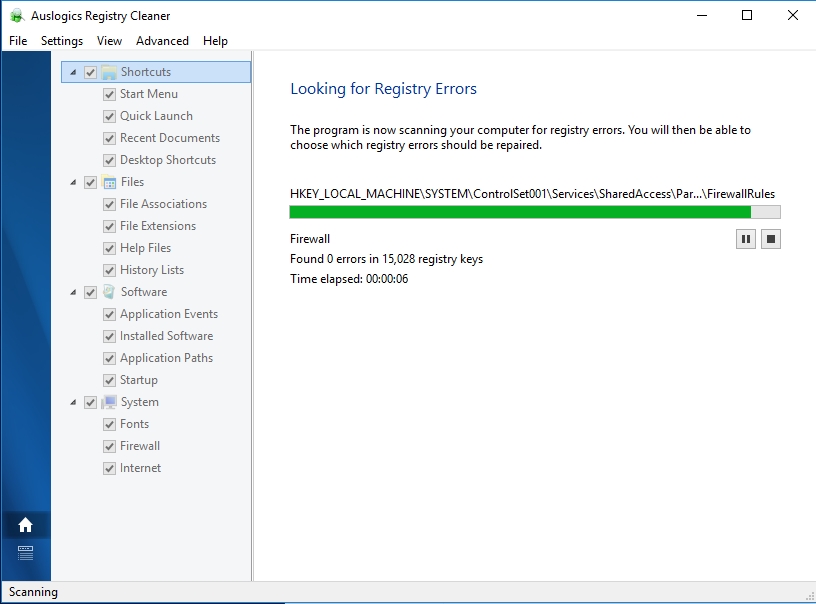
Clean your registry and fix corrupted files:
From the description of the fix, it should be obvious already that there are 2 things you must do here. Although you can employ the built-in System File Checker utility to resolve the issue of corruption in your computer files, you should know that there is no standout Windows program or app you can use to perform the necessary operations on your registry.
For the work on the registry, we advise that you download and run Auslogics Registry Cleaner. This excellent tool will help you remove invalid items, clean and optimize the entries on your system to eliminate error messages or stop crashes from occurring. The recommended program is FREE and completely safe to use. After using this app, restart your system and observe any changes.
If the first operation had a negligible effect on your problem, then it is time you followed these steps to fix corruption and restore your system files to a functional state:
- Open a Command Prompt window with administrative powers. Press the Windows button on your keyboard (or click on the Window start icon), search forcmd
in the text box present, right-click on the result (Command Prompt app) and select Run as admin
You can also open the same program by pressing (and holding) the Windows button, tapping the letter X key, and finally, selecting Command Prompt (Admin) from the list of items that appear
- Once the program window loads up, input the following command and hit the Enter key to execute it:sfc /scannow
- The scanning process should commence. You should be patient as it might take a while. If everything goes fine, Window will show you a message informing you about the success of the operation and the things it did
- You should also type in this code and tap Enter to initiate another process to fix file corruption: DISM.exe /Online /Cleanup-image /Restorehealth
- Restart your computer after the last operation ends and check if the error has stopped bothering you
Reset your Windows Update components:
A good number of files, processes, programs or utilities work together to improve the Windows operating system through Windows updates. Now we can collectively refer to these items as components of Windows Updates. If any of them fails to work correctly, then issues described by the Error message 0x80070017 might appear.
Unfortunately, it is incredibly difficult to identify which exact component is malfunctioning or struggling to do its job. In fact, it could be that there are multiple items among the lot that we can say are the cause of your problem. What we can do, however, is to try and fix the problem by assuming all of them are faulty. This way, we are unlikely to miss anything.
A reset of the Windows Updates components is an operation powerful enough to force a positive change in the behavior of the items involved. Luckily for you, the procedures involved here are relatively easy to carry out. Follow these instructions:
- First, you must launch an elevated Command Prompt window (one with administrative rights or power). You can do this by right-clicking on the Windows Start icon always present on your desktop screen to see a list of programs and options, and selecting Command Prompt (Admin).
You can also open the needed program window by pressing the Windows button on your keyboard or clicking the Windows start icon on your desktop screen, searching for Command Prompt in the text box present, right-clicking on the result, and selecting Run as administrator. You should arrive at the same conclusion with either of the methods we provided.
After the program window launches, input the following lines of code (one at a time) and press the Enter key after each one:
- net stop wuauserv
- net stop cryptSvc
- net stop bits
- net stop msiserver
- Ren C:\Windows\SoftwareDistribution SoftwareDistribution.old
- Ren C:\Windows\System32\catroot2 Catroot2.old
- net start wuauserv
- net start cryptSvc
- net start bits
- net start msiserver
Ensure that you have inputted every command on the list correctly. Otherwise, you might unintentionally compromise the success of this fix. After you have done everything required, Windows should restart all services associated with the Windows Updates process. Your problem should disappear almost instantly if this particular solution was what your problem needed.
Install the Windows Updates manually:
If you got to this point, then it means the solutions above had little or no effect at all on your problems. It is fair to say you are getting a bit desperate. Therefore, this time, instead of a straightforward fix, we recommend you try out a workaround to circumvent the issue associated with the appearance of Error 0x80070017.
Since you cannot download or install Windows updates the standard way due to the error, then you must try out an alternative method of executing the same operation. Here, you are going to fetch and install the updates manually. Follow these instructions:
- Open the Windows update program and identify the update you are struggling to install or use. Take note of the KB number. Copy it or write it down somewhere. You can now exit the window you opened
- Launch your web browser and search for “Microsoft Update Catalog” without the quotes in the text box present. Click on the link under the first result on the list of items on the search results page
- You should see the webpage for Microsoft Update Catalog now. You should see a text box on the right pane of the page. Input the code or data associated with the update you are struggling with on your PC
The code usually consists of letters and numbers (begins with KB and some numbers in the end). Recall earlier that we told you to find the necessary information in the Windows Updates program menu.
- After you have entered the necessary code, click on the search button or press the Enter key on your keyboard. You should see the update on the result list. Click on it
- Carefully go through the available variants and take note of the one that matches your system architecture, configuration and so on. You surely would want to avoid downloading the wrong thing since you already have enough problems
- Click on the Download button to save the required item on your system. Your browser should request the file from Microsoft’s servers, and your download should begin soon enough. After its completion, open the stored file by clicking or double-clicking on it
- Some instructions should come up to guide you through the installation process. Follow them when necessary to ensure the success of this operation
If everything goes as planned, then you have somehow updated the Windows on your system against all the odds. You will do well to remember that the actual problem or its cause is still likely to be active. Then again, maybe you never really cared that much about them, but you just wanted to update Windows for obvious reasons.
Install Windows from a different installation media:
If you are trying to install Windows 10 or older versions (Windows 8.1, Windows 7, and so on) on your PC and are struggling to complete the operation due to Error 0x80070017, then doing the same thing a little differently might be all you need to bypass the issue. You will understand what we mean by this soon enough.
Sometimes there are hidden issues or the unexplainable things associated with the Windows installation media you are using that are the cause of Error 0x80070017. When the source of a problem is incredibly unclear, then you can do very little to solve it. Best to do away with it if possible. For example, how can you know if there are bad sectors on your Windows installer DVD?
Therefore, if you are using a particular Windows CD as your Windows installation media, it is time you tried another one. Preferably, use a completely different CD. If nothing changes, then maybe you must consider doing away with the installation of Windows through your DVD drive. There is a good chance that your optical drive has gone bad, so your PC is struggling to read the contents of the Windows installation disk.
Get a problem-free flash drive, download the necessary tools and files and create a bootable USB drive that you can use to install Windows. Here are the complete instructions on doing this:
- Open your web browser and search for Media Creation Tool. Click on the first result (a Microsoft webpage link). After your browser loads the page up, click on the download button to save the file to your PC
- Click on the downloaded file to run it. After Windows opens the program, you must select Accept to agree to the stated terms and move on
- Tick the radio button for Create installation media for another PC option and click on Next to continue. You should now see a window where you have to choose the right things or enter the correct values for the following: Language, Windows version, and Architecture.
If you want to make things faster, you can tick the checkbox for Use the recommended option for this PC. This action forces Windows to choose or enter the settings suitable for your PC. However, you must note the default operating system version for this setup is Windows 10. If you want to use a different OS iteration, you will have to choose it manually
Click on the USB drive radio button and click on Next to move on. Now it is time you inserted your device into your system. It should appear automatically. Otherwise, you must click on Refresh drive list until the flash drive becomes visible. Also, remember that you will lose everything stored on the device you inserted.
Click on Next to initiate the process. Windows should format the drive, embed it with the necessary files and make it bootable
After the work is complete, shut down your computer. Turn on your PC, but this time you must boot from the inserted USB device to install Windows from it. You might be surprised with your success this time.
Update your device drivers:
Drivers are essential components that help the hardware devices and the software running on a computer function correctly. If you are seeing Error 0x80070017 and you are struggling to install Windows updates or complete the installation of a new Windows build, then there is a good chance that something is wrong with your drivers.
The most common driver issues involve corruption of critical files. Sometimes vital drivers go missing. Other times, the drivers age and become outdated. There probably other problems that affect the function of drivers but the issue at hand is most likely a result of old drivers, so our focus will be along that line.
Some users confirmed that they stopped getting the Error 0x80070017 message after they had updated some old drivers. There are numerous device drivers on your system. Thus, you might find it incredibly difficult to identify the old drivers or the ones that you need to upgrade.
Besides, even if you somehow managed to complete the strenuous task of having to identify all the outdated drivers correctly, you will have to update every one of them yourself. Then, you will realize that the actual operation is significantly more difficult than the first step you carried out earlier.
You do not have to put too much effort into the manual way of updating drivers because you can achieve the same goal differently with much less energy and time. We advise that you download and run Auslogics Drivers Updater to upgrade all your device drivers automatically. This method is easily the most efficient one.
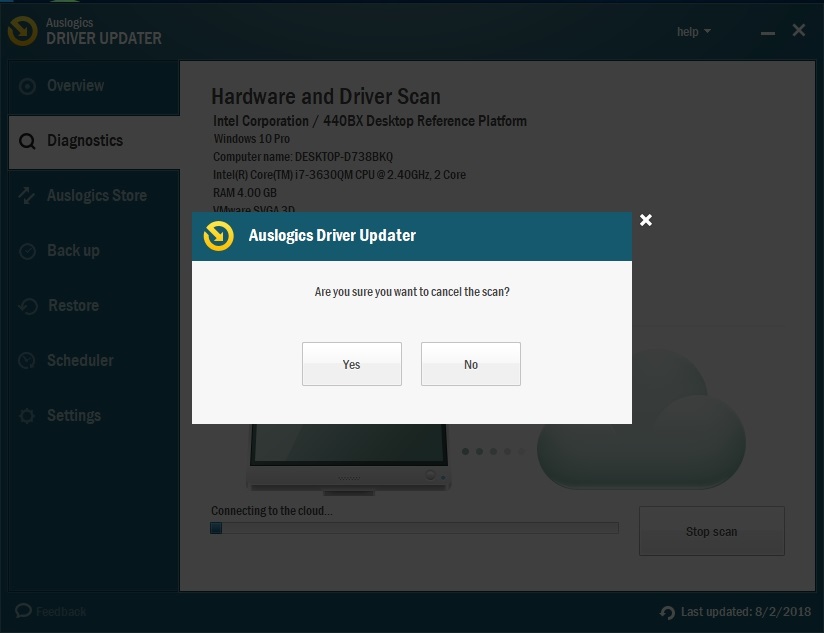
The recommended program is an excellent piece of software that works this way: It scans your computer to detect the missing or outdated drivers you have and give you a report on the issues it identified. Finally, it provides you with the option (or button you can click) to quickly get the latest manufacturer-recommended versions of the driver software needed.
Check your hardware devices:
At this point, it is fair to suspect that the cause of your problem might have something to do with damaged or faulty hardware. A hard drive, for example, is an essential physical unit present in almost every PC for quick access to and storage of data. It is easy to see that it plays an important role when you are trying to update Windows or during the installation of a specific Windows version or build.
Therefore, if the files on your hard drive suffer corruption or if the disk itself becomes damaged, then serious problems might come. Error 0x80070017 represents some of the issues we are referring to that might have something to do with a corrupted or faulty drive.
It is a hypothesis though at the moment. You can never know if Error 0x80070017 has something to do with faults on your hard drive until you carry out a test on the device. Even if you get a result from the first test that supports your assumptions, you might still have to run other tests to confirm. Only then can you be sure of what the problem is and its solution becomes apparent.
First, we recommend that you perform a basic test on your hard drive to check for errors, file corruption, and related problems. Follow these instructions to run the Chkdsk utility:
- Open an elevated Command Prompt. You should right-click on the Windows start icon always present on your desktop screen and select Command Prompt (Admin) to launch a Command Prompt window with administrative privileges
If you are running Windows 7 or older versions of Microsoft’s operating system, you can open a Command Prompt window with administrative rights by following these steps instead: Press the Windows button on your keyboard or click on the Windows start icon on your desktop screen, type
Command Prompt
into the text box present to perform a search.
Once you see the Command Prompt program from the list of results, right-click on it and select Run as administrator to open the required application.
- After the program window opens, type in the following code and hit the Enter key on your keyboard to run it:chkdsk /f C:
Note that the letter C in the code represents the drive on which you installed the Windows on your computer. If your system drive differs from the stated location, then you must use the letter that corresponds to that place instead
- If you did everything correctly, Windows should display a message asking you if you want to perform a Chkdsk scan after your computer restarts. Press Y or follow the instructions presented to continue. Your system should reboot itself now
During the scan, Windows will try to correct errors, fix bad sectors, and solve other problems it comes across. If it fails in the process or it encounters something it cannot deal with, you will see a message informing you about the event. In such a scenario, you will have to perform extensive tests to confirm that a problem indeed exists and understand its scope.
If the scan was successful, try to update Windows or install a new copy and see if Error 0x80070017 disturbs you this time. If things go smoothly now, then there is little doubt about what your problem was since the operation you just carried out had a significant effect on it. Otherwise, you will have to test other hardware parts like your memory (or RAM) for problems and see how it goes.
Do a clean boot:
A clean boot is the advanced troubleshooting method experts employ when they suspect that a problem on the Windows operating system is a result of the influence of an external program or process. In this mode of booting the OS, users start Windows with a minimal amount of drivers and startup programs.
Since external influences and software conflicts are non-existent in Windows after a clean boot, users can isolate the source of the problem. The procedure (though advanced in its abilities) is rather easy to initiate. Follow these instructions:
- Press (and hold) the Windows button on your keyboard and tap the letter R key to launch the Run app. You can also open the Run program by clicking on the Windows Start icon, typing Run into the text box present to search for this keyboard, and selecting the required app from the list of result
- After the program window opens, input the following code into the text box present and hit the Enter key to run it or click on the OK button: msconfig
- You should see the System Configuration window now. Navigate to the Services tab. There, look down and tick the checkbox for Hide all Microsoft services
- Now click on the Disable all button to carry out the necessary operation on the remaining visible services. Minimize your current window
- Navigate to the Startup tab and click on the Open Task Manager link there. If you cannot find the link or the Task Manager program failed to open, you can open the application yourself by right-clicking on the Windows Start icon or right-clicking on your Task Bar and selecting Task Manager from the list of programs or options that show up
- Once you have the Task Manager program running, go to the Startup tab and disable all startup applications (apps that come on automatically at boot-up). Identify the necessary items, right-click on them and select Disable from the list of options you see
- Once you have finished disabling all the startup items, you must return to the System Configuration window you opened earlier. Now click on Apply. Click on the OK button
- Restart your PC. After your computer boots up, you must try to download or install the update you are struggling with due to Error 0x80070017, and everything should work fine this time.
Perform an in-place upgrade:
If by now you are still struggling with your problem while you are at the end of our guide on
how to fix Windows update error 0x80070017,
then it is timed you considered using another workaround since the direct fixes have had limited or no effect on your troubles.
Here, you are going to take advantage of the in-place upgrade option. With this procedure, you can install your preferred version or the latest iteration of Windows without the loss of programs or files.
Follow these instructions to perform an in-place upgrade:
- Open your web browser and search for Media creation tool in the text box present. From the search results, you should see a link from Microsoft’s webpage (usually the first item on the list). Click on it
- After the page loads, click on the Download button. Your browser should start fetching the file from Microsoft servers now. Once the download is complete, click or double-click on the downloaded item to open and run it
- You should see the Upgrade this PC now option. Click on it. Click on Next to continue. Now you should be patient enough to wait while setup prepares the necessary files. It might take a while
- Select the Download and Install updates (recommended) option. Click on Next to confirm your choice and move on
- Now some series of instructions that will guide you on what to do next should start appearing. Follow them correctly or do everything required. If all goes well, you should end up at the Ready to install screen
- At this junction, you get to choose the items or group of things you prefer to keep. Select Change what to keep
- We recommend that you select the Keep personal files and apps option. As usual, you must click on Next to move on. Windows should now provide you with further instructions that will guide you until the end of the process.
If you got everything right, at the end of the entire operation, after your system restarts, you should have the latest version of Windows running, and all programs or files should remain intact. This way, you finally managed to get rid of the disturbing Error 0x80070017, and in the process, you even managed to complete the task you were working on in the first place.