If verified reports, statements, and anecdotes are anything to go by, then World of Warcraft is undoubtedly an exciting title to play. Nevertheless, the game has its demons like every other program. To be fair, the application itself might not be to blame in the case of users being unable to launch it due to the appearance of an error message preventing them from doing so.
WoW (the acronym the game fans regularly use to refer to it) is often a victim of circumstances. For example, the problem affecting the title sometimes springs up after users carry out a supposedly harmless operation—downloading and installation of Windows updates. In other scenarios, a known bug often uninstalls the necessary driver software, and you probably know what comes next.
From the reports we have seen, the notification indicating a problem is usually something of this form:
- World of Warcraft was unable to start up 3D acceleration
Alternatively, you might have seen it in its narrative form:
- World of Warcraft was unable to start up 3D acceleration. Please make sure DirectX 9.0c is installed and your video drivers are up-to-date
The underlying problem is the same regardless of which of the messages above you saw. It is a widespread error, so do not be alarmed—many people have seen the same notification and struggled with the problem. In this guide, we will proffer a reasonable number of solutions you must use to stop the error message from coming up and disturbing you. Relax, your game will be up and running in no time.
Pro Tip: It is possible to fix many PC issues by using the PC Repair tool. PC Repair is easy to use and reliable Windows optimization software developed to fix hundreds of system issues.
Special offer. About Outbyte, uninstall instructions, EULA, Privacy Policy.
How to fix World of Warcraft was unable to start up 3D acceleration on Windows 10, Windows 8.1, and Windows 7
We would like to assume that your PC specifications exceed or at least match the stated requirements for the game. Please check and confirm that this is the case before moving on. The necessary information is usually on the game’s developer website.
If your computer specs are incapable of handling the title, then we advise that you do not bother yourself trying out fixes. Other problems or issues will eventually spring up, so you might end up wasting all your time and effort.
If you have gone through the game requirements and everything is in order as regards your computer, then you can rest knowing that you are going to resolve the problem you are currently experiencing. In fact, regardless of your PC settings, configuration, and so on, these fixes below would prove effective in dealing with the issue.
As usual, we recommend that you start with the first one and move on only if necessary. You will eventually arrive at that fix which would bring about your breakthrough.
Do a quick refresh:
You have two options here on refreshing the critical variables involved in the manifestation of the problem in view: Your drivers and Windows OS itself are the target items for the stated procedure.
- Work on drivers
The first one involves a fast refresh of your drivers. You can use these combinations of keys to carry out the necessary operation: Windows button, Ctrl, and Shift keys. This procedure is easily the snappiest of both options. Your screen will flicker; you might hear a beep. Soon enough everything should be back to normal.
In case you are wondering, this procedure is a safe one. All it does is restart your driver. The operation does not affect or alter any variable in your custom settings. Relaunch your game and observe any changes.
- Action on Windows
Most users refuse to restart the Windows operating system regularly. Far too many people abuse the Sleep and Hibernate options. If you see the World of Warcraft unable to start up 3D acceleration message each time you try to play your game, then a restart of your system might be all you need.
Reboot your PC. Your computer should come on, and Windows will settle down in no time. Finally, you can check if the issue affecting World of Warcraft persists. If this operation was enough to solve your headache, then it means the most straightforward fix was the solution you needed.
Nevertheless, we have to inform you that this fix is unlikely to have a permanent effect on your problem. The World of Warcraft application might work well the first time immediately after a reboot of Windows, but if you exit the game and try to open it again, then the issue you thought you dealt with will probably spring up again.
If you belong to the category of users who do not mind restarting their systems every single time they want to play World of Warcraft, then it is all good. However, we feel such acts are impractical. After all, you can move on and go through the fixes below to get a lasting solution. Then again, it is all about your choice.
On the other hand, if you are one of those who restarted their systems but saw no change in the course of the problem, then your options are limited. Move on to other fixes.
Reinstall your video card driver:
The 3D acceleration capability that World of Warcraft was unable to start up (according to the error messages and notification) is a feature that has something to do with the rendering of graphics. Your graphics card drivers come into play here. After all, drivers handle almost all interactions between or activities involving the hardware components on your computer and the software running on it.
To fix the stated problem, you will have to uninstall your graphics driver, then do a reinstallation of its software. Here are the instructions that will guide you:
- First, you need to open the Device Manager app (the program that handles stuff involving drivers). It is one of the items on the Power User menu, which you can bring up by pressing (and holding) the Windows button on your keyboard, then tapping the letter X key. You can arrive at the same result by right-clicking on the Windows start icon always present on your desktop screen.
Select Device Manager from the programs and options you see to launch the needed program
If you are running an older version of Windows, then you must do things differently. Open the Run app by pressing (and holding) the Windows button on your keyboard, then tapping the letter R key. After the small program window appears, you must input the following code into the text box present: devmgmt.msc
Hit the Enter key or click on the OK button to run the code. Device Manager should appear now
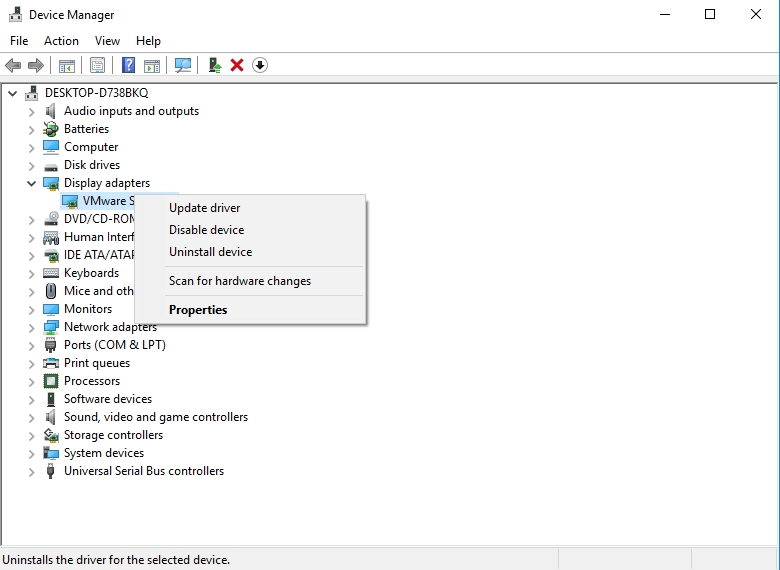
- After the program window comes up, you will see a list of items which corresponds to the groups for your device drivers. Go through them and locate Display Adapters. Click on it to expand its menu
- We expect you to see 2 items there. One of them is usually your integrated graphics card (made by Intel in most cases), and the other is supposed to be your dedicated graphics card (from AMD or NVIDIA in the vast majority of scenarios).
If your graphics cards are currently disabled, then you must enable them before you move on by right-clicking on them and selecting Enable from the short menu list (operate one item at a time)
- Now it is time you uninstalled the drivers. Right-click on one of them and select Uninstall from the options that appear.
 A small dialog box requesting confirmation for your action should appear. Ensure that you tick the checkbox for Delete the driver software for this device there
 - Click on the Uninstall or Yes button to continue. Windows should now remove the driver files, its software, and so on. Perform the same operation on the other driver
- To reinstall the driver, all you have to do is reboot your system. Your PC will come on. Windows will settle down, then it will detect that some drivers are missing automatically. It will then search for and install the required files or software for them
- Finally, at the end of it all, you have to launch the game you struggled with due to the error and see if everything goes fine this time. If World of Warcraft opens, but you still see the Unable to start up 3D acceleration error message, then you need to carry out a different kind of operation on your drivers. Check out the next fix
 A small dialog box requesting confirmation for your action should appear. Ensure that you tick the checkbox for Delete the driver software for this device there
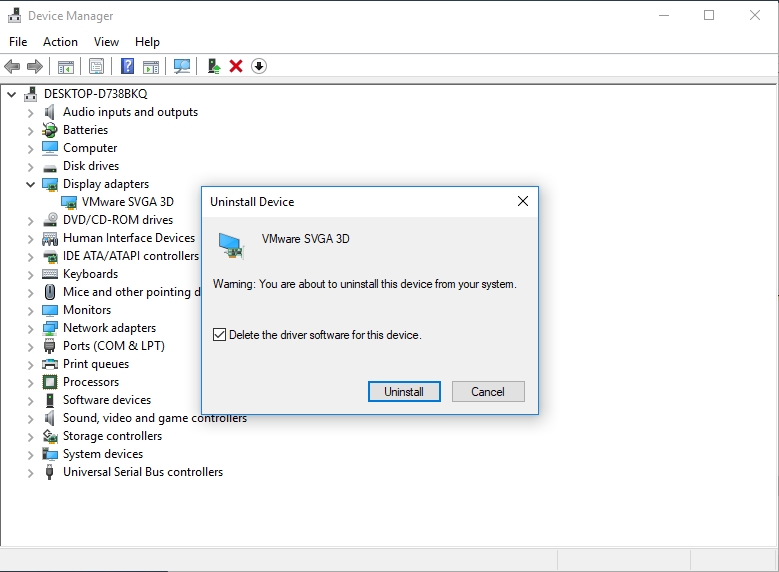
Update your GPU drivers:
Besides the fact that we already established that a bug involving your graphics drivers leads to the Unable to start up 3D error message and problem, you should know that similar issues that have something to do with your driver software result in the same thing. For example, your driver could be missing, corrupted or outdated.
We do not care about finding out what exact problem of the lot plagues your drivers because it is unnecessary. You can quickly fix any issue involving your drivers by simply downloading and installing the latest builds or versions. There are several ways of carrying out the required operation.
Best method
We recommend that you go with the automatic method of updating drivers. You have to download and run Auslogics Driver Updater. This excellent app will help you execute all the manual and technical operations necessary to update a driver. With its help, the job gets done in the safest, fastest and most efficient way.
The recommended program works by first performing a scan to detect what drivers are missing. It will also identify the corrupted or outdated drivers. It will show you a report to inform you of the problems it found. From then on, you will get to use the Update button (you must click on it) to upgrade the drivers to their latest manufacturer-recommended versions.
The manual way
If you belong to the group of people who always prefer to do it all alone, then you might find solace in the manual approach to updating drivers. However, you must understand that this approach is more demanding when compared to the first one we proposed in terms of computer skills, time, effort, and so on.
Here, you usually would have to identify the drivers that need updating, but luckily for you, this part of the job is done already. You know that your Graphics Processing Unit drivers are the only ones that require updating for now.
Follow these instructions:
- Open the Device Manager program. We outlined instructions on how to do this earlier in the first step of the previous fix, so no extra words here. Scroll up if you have to
- After the required program window comes up, you must go through the list of items there and locate Display Adapters. Expand the menu for this item by clicking on it
- Since there are 2 drivers, you will have to choose which one of them you want to begin your work on first. Whichever one you go with, click or double-click on it to open its Properties menu
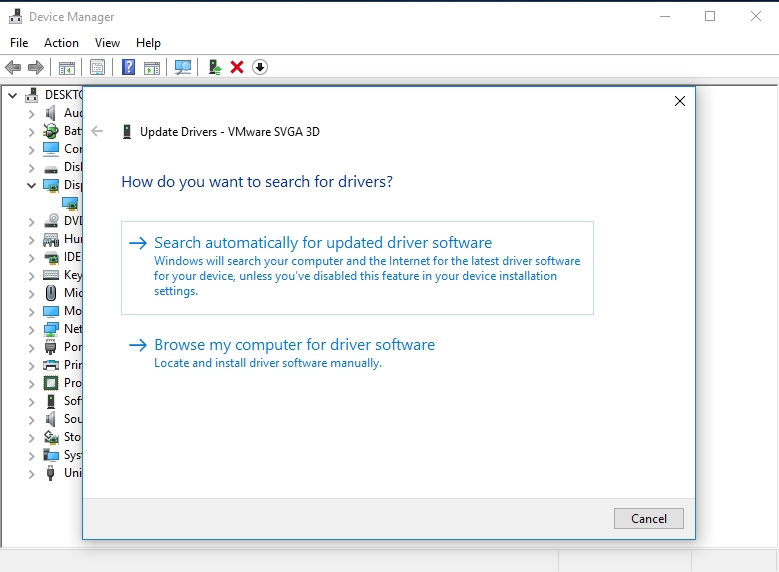
- After the Properties window shows up, you must navigate to the Driver tab. There, you will see the Update button which you must use (click on it) to update the driver
- Windows will show you 2 options which you can select from to search for and install the driver. Go with whichever one you believe best suits you. Try out the other one if the option you went with initially fails to work for you
If everything goes well, Windows will locate some drivers for you and present some instructions for you to follow to ensure the success of the operation.
Sometimes, no matter how hard you try, you might be unable to find the latest drivers through the Device Manager program in Windows. In that case, you will have to continue with the steps below:
- Return to the Driver tab. Take note of the information there like the driver name, its version, and so on. Armed with the necessary details, you are going to search for the driver you need online
- Launch your web browser app and input the necessary keywords into the address bar or the text box there to search on Google. You might see relevant information on the first result page, depending on how good you are at finding things.
If you are not so lucky, you might end up going through multiple Google search result pages without finding what you need.
- Although we do not care much about how you go about the process, you must take note of these important guidelines:
- Ensure that you download only the correct versions of the drivers you need. If you obtain the wrong items, they will struggle to work well on your device due to compatibility issues. Other driver-related problems might also arise
- Avoid downloading stuff from questionable sources. If you go against this advice, then you are putting your system in harm’s way. A good number of users have infected their computers with viruses or malware by fetching files from dubious websites and the likes. If you cannot find a reliable place to obtain the drivers, then you must terminate the search
- Save the driver files to a folder you can easily access. After the download is complete, you must click or double-click on the setup file from the lot to open and run it. Some instructions should come up which you must follow to install the drivers.
Alternative methods for selected users:
- If your driver came with a unique program for setting its capabilities and controlling its activities, then you might find an option there which you can use to update the driver to its latest version. Open the required app and work your way through its menu
- For example, users with NVIDIA GeForce cards can go through the NVIDIA GeForce Experience utility. AMD used to provide a similar program but discontinued its release and stopped the provision of support for reasons best known to them. You might be able to get a similar program to do the same job from their site though.
The roundup
At this point, we would like to assume that you have successfully downloaded and installed the latest drivers, using any of the methods we provided. Now it is time you restarted your PC to guarantee that the drivers have started working. Some drivers tend to begin their work immediately after the installation process while others do not. Only a reboot of Windows ensures the obvious.
After your computer comes on and the Windows OS reaches stability, you are free to find to out if the problem defined by the World of Warcraft unable to start up 3D acceleration message is gone for good.
Disable full screen optimizations:
Game developers often include full screen optimizations or similar options in their titles. Gamers often employ them to optimize or improve the performance of games when they are running in the Windows operating system. Some programs even enable this capability by default without most people knowing.
We have seen reliable reports from a reasonable number of users who stated that they had been able to fix the 3D acceleration problem by merely disabling their full screen optimizations. To be fair, we never exactly thought of this procedure before the confirmations of its effectiveness started getting in, but it all makes sense somehow.
We still fully do not understand the intricacies of how this fix works to give you the relevant details about its operations, but you probably do not care about this. Well, it is time to carry on. Go through these steps:
- Open the File Explorer program on your computer. Its icon is usually on the taskbar on your desktop screen, so you can check for it there and click on it to launch it
You can also open the required program through this method: Press (and hold) the Windows button on your keyboard, then tap the letter E key
- After Windows displays the needed program window, you must click on My PC or this PC. Navigate through the following items: C:/Program Files/World of Warcraft/
Now you should see the game executable file (usually ends with .exe). Right-click on it and select Properties from the list of options that show up.
If you cannot find the required file in your current location, then you must do this: Locate the World of Warcraft shortcut you often use to launch the game on your desktop, right-click on it and select Properties from the short menu that appears
- After the Properties window comes up, you must navigate to the Compatibility tab. There, you must tick the checkbox for Disable full screen optimizations under Settings
- Click on the Apply button to continue. Click on the OK button to save the changes you just made. Exit all the program windows you have running and restart your PC
- As usual, after Windows boots up and settles down, you must open the affected game to find out the status of things regards the World of Warcraft was unable to start up 3D acceleration error message and the problem that comes with it
Update the DirectX on your system:
DirectX consists of several components (usually application programming interfaces or APIs) that handle operations or tasks relating to multimedia. In simpler terms, it is the software that enables the rendering of 2D or 3D vector graphics, video output, and the playing of audio.
If you are still struggling with the problem of your game being unable to start up 3D acceleration, then there is a good chance your computer is running an outdated or incompatible version of DirectX. The obvious fix to the issue would be you installing the latest iteration of DirectX that runs the right way on your PC.
In theory, if you are running the latest version of Windows and your system is updated, then the newest version of DirectX should be on your computer. We, however, understand that exceptions are likely to occur due to bugs and other inconsistencies.
The game in view requires DirectX 9, but any version of DirectX higher than this iteration would also work. Remember, this statement is one that holds in theory, once again. Note that only users with systems running the latest version of Windows (Windows 10) can enjoy the newest iteration of DirectX (DirectX 12).
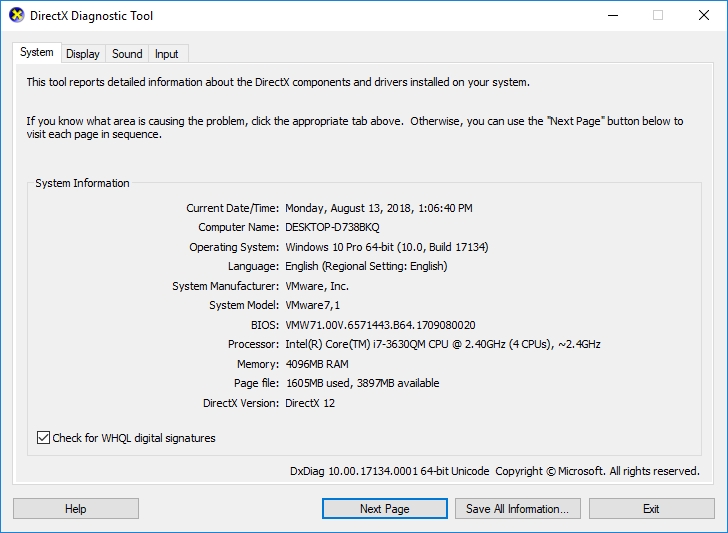
To find out what version of DirectX you are running, follow these instructions:
- Press the Windows button on your keyboard or click on the Windows Start icon always present on your desktop screen. Input the following code into the text box present to perform a quick search: dxdiag
Click on the result that comes up
- After the DirectX Diagnostic Tool program window shows up, you should see what version of DirectX your system is using under the System tab.
You can continue with the instructions below to upgrade to the latest DirectX version:
- Open your web browser. Input the following keywords into the address bar or the text box present there to search on Google: download DirectX
- From the results page, you must click on the first link you see there. You will end up on Microsoft DirectX End-User Runtime page. Select your language from the list available on the drop-down menu
- Click on the Download button there. On the page that follows, you might have to untick the checkbox for these items if you do not want them: MSN default homepage & Bing default search engine; Windows Malicious Software Removal Tool XX-bit (XX represents the bit value of your Windows, which could be 32 or 64)
- Finally, you have to click on the No thanks and continue DirectX End-User Runtime Web Installer button to get the item you need. After your browser finishes downloading the file, you must click or double-click on the stored object to open and run it
- You must follow the instructions that come up as they appear to install the necessary DirectX files. Once the installation is complete, you must restart your system to let the new changes become effective. As usual, in the end, you must verify that your troubles defined by the World of Warcraft unable to start up 3D acceleration error message are no more
Alter a specific variable:
If you see the World of Warcraft was unable to start up 3D acceleration error message or notification only with a particular user account for the game, then this fix is probably the solution best suited to resolving the issue. Follow these instructions:
- Open the File Explorer program. We provided instructions on doing this earlier in the first step for the fourth fix, so nothing to see here
- After the program window opens, you must navigate through the following items: C:\Program Files (x86)\World of Warcraft\WTF\Account
- Go through the items in your current location. You must locate this file: config-toonname-realm.wtf
- Open or edit it with a suitable app. You have to find this line in it: SET gxApi “D3D11”
- Replace the 11 in that code with 9. We mean that you should end up with this: SET gxApi “D3D9”
- Save the changes you just carried out and exit the program windows you opened
- Try to open World of Warcraft as usual and see how things go. If the problem in view persists, you must restart Windows, wait for Windows to settle down after your computer comes on, then try again.
If the incredibly rare event in which all the fixes above fail to work for you occurs, you must check out this short list of others to try in fewer details:
Verify and ensure that the game is using your dedicated graphics card:
If Windows is running the World of Warcraft app with your integrated graphics card (the onboard Intel GPU), then you might keep on seeing the message stating that the program failed to star up 3D acceleration irrespective of your actions. The reason for this should be apparent enough—that card most likely does not meet the standard requirements for the title.
You will have to alter the necessary settings or configure your PC to use the NVIDIA or AMD card always. If there is an option for creating an exception for the game, take advantage of it. For most NVIDIA cards, we believe that you should be able to carry out the necessary operations in the NVIDIA Control Panel utility under the Manage 3D settings menu or section.
Download and install the latest Windows updates:
There is a good chance that Microsoft has gotten rid of the bugs involved in the build-up to the event that results in the World of Warcraft was unable to start up 3D acceleration in newer builds of its OS. After all, the operating system maker provides bug fixes and patches for various issues through Windows updates.
Therefore, if you have not updated the Windows on your PC in a while, then you know what you have to do to find if Windows was making you pay the price for your inaction through the occurrence of the problem involving WoW.
We have come to the end of this guide. At this point, if you are reading this, we can do nothing but hope that the fixes we provided on resolving the World of Warcraft was unable to start up 3D acceleration problem on Windows 10, Windows 8.1, and Windows 7 proved practical and potent enough for you.