USB ports are almost dispensable regarding their usage today. Flash drives (connected via USB ports to a PC), for example, are effortless to use, convenient to carry about, and they help us transfer data resourcefully. Users also connect their mobile devices to their PCs through the same method.
There are many other applications of the technology in view, but we would be focusing on one of the problems associated with its use. The USB device not recognized message could pop up in select scenarios. Some users get it whenever they try to plug in a device through one of the Universal Serial Bus ports on their computer. Others get it irrespective of whether an item is connected to their systems.
The message can also appear in its narrative form: USB device not recognized, the last USB device you connected to this computer malfunctioned, and Windows does not recognize it.
Pro Tip: It is possible to fix many PC issues by using the PC Repair tool. PC Repair is easy to use and reliable Windows optimization software developed to fix hundreds of system issues.
Special offer. About Outbyte, uninstall instructions, EULA, Privacy Policy.
The consequences of this error message can range from mild to severe. When the disturbing notification is active on some systems, the affected computers cannot recognize any USB device. In less critical scenarios, the port involved might work just fine, and it is only the consistent and unnecessary alerts that drive people crazy.
What causes the USB device not recognized problem?
The error message or notification is often a result of one of the following factors or events:
- Lack of critical Windows updates and similar software issues
- Wrong USB controller settings
- Corruption of USB controller or outdated device drivers
- Faulty or damaged USB device
- Influence of external drives on USB suspend
How to fix USB device not recognized problem?
Now we would try to explore all possible solutions to the issues we identified earlier as the cause of your computer failing to recognize or detect connected USB devices. There are also fixes for those who have no underlying problem but still need to get rid of the notification disturbing their system activities.
Restart your computer:
When the error or failure is due to random occurrences like unexplainable inconsistencies that disrupt a system’s state, then a restart of the machine in view might be all that is required in getting rid of the problem. Follow these instructions:
- Unplug the USB device involved from your PC’s port. Wait for a reasonable amount of time (a few minutes is enough)
- Click on the Windows start icon on your desktop screen
- Click on the Power icon and select Restart from the short list that comes up. Be patient while your PC reboots itself
- After Windows loads up, reconnect the USB device and see how it goes this time
Sometimes a more grounded restart method might be necessary:
- Disconnect your power cable from your PC. Shut down Windows
- After your system goes off, remove the battery from its body. Insert the battery back while holding the power button of your computer. Turn on your system. Do not connect it to external power for the time being
- Insert your USB device and check if your problems persist.
Check the USB device itself:
You need to be sure that the equipment (with which you are experiencing the problem) is not faulty before you begin attempting advanced operations to fix something that is not there. You surely do not want to tamper with things and end up with more trouble.
Try to connect the affected hardware on another PC through that system’s USB ports as usual. If you experience the same problem or the device does not work as expected, then that device is faulty, and your computer is not to blame.
Some users reported that they had fixed their problems by inserting the affected device into another PC to let it load the necessary drivers or files, and then they had connected the USB device back to their computer. If the equipment involved is a flash drive, you can also try formatting it and see if it works fine after this operation.
If the device worked fine while it was connected to a different computer, then it is a software issue, which you can resolve on your computer. Move on and continue with other solutions.
Disconnect other devices:
If there are many hardware devices connected to your system via your USB ports, then conflicts between ongoing operations or interferences from great programs are likely to occur. Your PC struggling to recognize another connected piece is a consequence of such events or actions.
Stop using external USB hubs. They are mediocre at transferring the data of multiple devices at once to your computer, and the error disturbing you might be the product of their use. If you want to rule out conflicts and interferences as the cause of your headache, you must also disconnect other USB devices and see if your computer finally recognizes the one you are struggling to get to work.
Alter the power management settings for the USB Root hub:
There are many shortcomings in specific power settings that can cause issues like a computer not recognizing a USB device. Follow these instructions:
- Press and hold the Windows button on your keyboard, then tap the letter R key to open the Run app. After the required window opens, inputdevmgmt.mscinto the text present and hit the Enter key to run this code
- After the Device Manager program opens, locate the Universal Serial Bus controllers device on the list of drivers. Click on it to expand its menu. Locate USB Root Hub. Right-click on it and select Properties from the options that come up
- After the Properties window opens, navigate to the Power Management tab and untick the checkbox for Allow the computer to turn off this device to save power. Click on OK to save the changes you just made
- Go back to the list you saw on the Universal Serial Bus controllers menu and perform this operation for every item there. Your computer has more than one USB Root hubs after all, and you would want to make sure that the problem stops occurring on every one of the ports
- After you have finished executing the required operations, plug the affected USB device back into your computer and verify that your PC can recognize it this time.
If the problem is still active, then it is apparent that the action you just took did work against the issue. Therefore, it is advisable that you undo whatever you did earlier—open Device Manager and tick back the checkbox for Allow the computer to turn off this device to save power in the menu of the items you worked on for your computer.
Uninstall USB controllers:
Here, you are not going to get rid of any device drive permanently. You are going to remove your USB controller to force a reset of its configuration when it returns to your system. The operations involved here might be enough to bring about a change that eliminates the USB issues and forces Windows to stop bothering you with the error messages.
Follow these instructions:
- Press and hold the Windows button your keyboard, then tap the letter X to bring up a list of programs and options. Select Device Manager from the lot
- After the required window opens, find the Universal Serial Bus controller driver on the list (it is usually located at the bottom due to its name). Expand this driver to see the items under it. You should see the USB Root hub devices
- Right-click on those devices (one at a time) and select Uninstall device from the short list that comes up. A small window with a message requesting confirmation for your action should come up. Click on Uninstall to confirm and initiate the driver removal process

- After you have performed this procedure on every item (you saw on that list), exit all open windows. Restart your computer
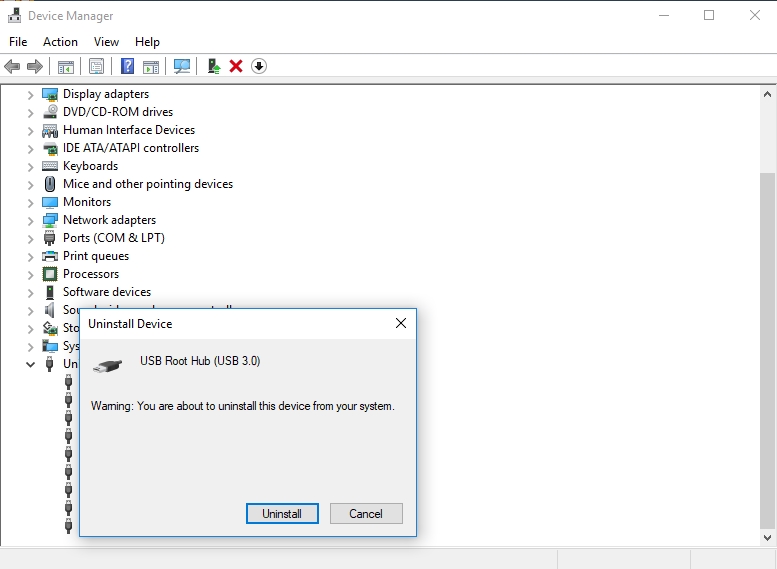
After your system comes on, Windows should automatically detect that some drivers are missing, and it will reinstall the necessary software once more. Once these operations come to an end, connect your USB device and see if the issues and errors are still active.
If Windows fails to install the required drivers or your problems persist after it does so, then you must move on to the next step on updating (or fixing) the latest drivers for your system.
Update your device driver:
Recall that we earlier identified missing or outdated drivers as the reason a computer might fail to detect a USB device. Well, now it is time you applied the solution that will end the problem if your suspicion here holds true.
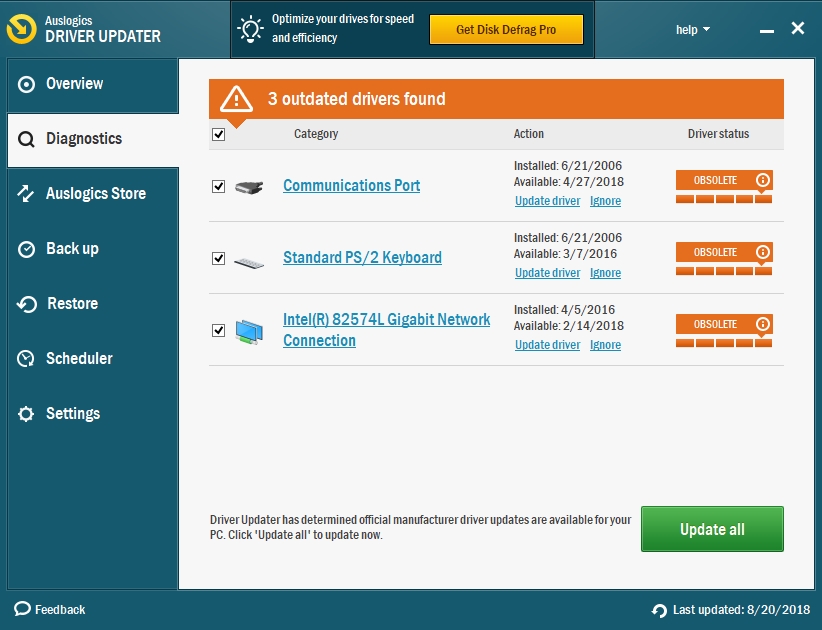
If the fixes above failed to help you, then it is very likely that the failure to recognize USB devices issues are driver related. You must update the USB controller or port driver. You can do this entirely by yourself, but we feel that the manual procedure does not deserve your precious time and efforts.
We recommend that you download and run Auslogics Driver Updater to upgrade the problematic driver (or even all the drivers on your system at once) in the most efficient and risk-free way possible. This excellent program would scan your system to detect the missing or outdated drivers and help you update all of them to their manufacturer-recommended versions.
If you ignored the more straightforward approach of updating drivers above because you prefer to do everything yourself, then the instructions you need are also here:
- You must open Device Manager and identify the affected driver device, its version or build, and other necessary information. Extract as much data as you can.
- With the details you obtained, you must search for the updated version of the old driver online. Your PC’s manufacturer webpage is one of the first places you must look at to get what you need. If you are lucky enough, you might find what you are searching for there. Under challenging scenarios, a user might have to dig deep into several Google search result pages.
- Whatever you do, ensure that you find a reputable or trusted source to obtain the needed software. You surely would want to avoid downloading and installing malware or any other software that could affect the performances of your computer. Even a very similar driver would not do. You must download only the correct, technically precise and updated versions of the necessary drivers.
- Download the necessary files and run them once they are ready. Restart your system to let the new software take effect when Windows prompts you to do so. After the reboot, check if the problem with the USB device persists.
Alter the power supply settings to turn off fast startup:
Some users confirmed that changing this particular setting had fixed their problem, so we recommend you try it out and see if it works for you as well.
Here are the instructions you must go through:
- Right-click on the Windows start icon on your desktop and select Control Panel from the list of programs and options that come up
- After the required window opens, click on the Hardware and Sound menu. Select Power Options from the list of items for this option
- Click on the Choose what the power button does link (you should see this option on the left-hand side of the window). Click on Change settings that are currently unavailable
- Under Shutdown settings, untick the checkbox for Turn on fast startup (recommended) and click the Save Changes button to ask Windows to store your new settings
- Reboot your computer. After the restart, plug in the affected USB device and check if the problems associated with it disturb you again.
Fast startup, as its name implies, enables Windows to boot up faster. After you disable it, your system might start up slower than usual. You should expect this change. Do not be bothered by it.
Alter the USB selective suspend settings:
Before you go through the full details of the operations you are required to carry out for this fix, we advise that you go through a brief explanation of the necessary terms to understand the nuances of what you are dealing with on your system.
What is the USB selective suspend setting?
The USB selective suspend setting is a feature that allows Windows to place certain USB ports in a low power mode to save power. This option is necessary because users connect many USB devices to their computer, but these items (for example, camera, fingerprint scanner, and so on) are not always in active use.
The “selective suspend” in particular means that your system’s hub driver can suspend or manipulate the options for a specific port without affecting the operations of other ports on your PC. However, inconsistencies on some systems associated with the functionality of this feature can cause problems resulting in a computer struggling to recognize USB devices. Hence, the error message that comes up.
Follow these instructions to fix the issue:
- Open Control Panel (by following the steps we outlined earlier for doing this). You can also launch it this way: click on the Windows start icon on your desktop, search for Control Panel in the text box present and select the required program from the list of results that come up
- After the Control Panel window opens, click on Power options. Click on the Change plan settings link to edit the data contained in the power plan
- Click on the Change advanced power settings to access very sensitive details of the plan. A small new window should pop up now
- Under the Advanced Settings tab, locate USB settings from the list of items you can see there. Click on it to expand its menu. You should see USB selective suspend setting
- Disable this setting for both the On Battery and Plugged in scenarios for your computer
- Click on Apply. Click on OK to save the changes you have just made
- Exit all opened windows and reboot your PC. After your system comes on, connect your USB device. See if it works fine this time or if the disturbing notification fails to come up
Install Windows updates:
If you have not updated your system in a long while, then it is time you downloaded and installed Windows updates. If the USB device not recognized message is a result of the lack of necessary files or driver software, then this operation might be your best bet in resolving the problem.
- Follow these instructions to get and install the latest updates on Windows 10 (or even older iterations of Microsoft’s operating system):Ø Click on the Windows start button your desktop screen. Search for Windows update in the text box present
- From the list of results that shows up, click on Windows update or Check for updates. After the required window opens, click on the button for Check for updates. Windows should now contact Microsoft servers to see if there is an update available for your computer
- After Windows has finished communicating, found and downloaded the necessary updates, click on Install now. Your system should now download, install and apply the latest updates
- Restart your system when Windows prompts you to do. After the reboot, your system should come on. Now connect your affected device and check if your USB troubles are no more
10. Work on the file associated with USB operations:
Here, you are going to perform series of steps on the usbstor.inf file to fix your problems. Follow these instructions:
- Press and hold the Windows button on your keyboard, then tap the letter E key to open the File Manager program
- After the required window opens, navigate to the following folder: C: \ windows \ inf
- In your current location, you should see the usbstor.inf file. Right-click on this file and select Cut from the list of options that show up. Paste the item on your clipboard to somewhere safe and secure on your PC. Your desktop is a decent location, for example
- Plug in the USB device with which you were experiencing problems. Verify that the message does not pop up or check if your issues are gone. If everything went successfully, then it is time you returned the file you moved back to its original location
If you could not find the required file in the stated location, navigate through the following folders in the File Explorer program: C: \ Windows \ System32 \ DriverStore \ FileRepository
- This time, you must check for a slightly different item in your final destination there: usbstor.inf_XXXX (the XXXX is a representation of some values you need not bother about)
- Right-click on the following items: usbstor.inf and usbstor.PNF (one at a time). Select Copy from the options that show up
- Navigate to this folder and paste the items on your clipboard there: C: \ windows \ inf
- Now you should reboot your PC. After your system restarts, plug in your USB device, and you might not experience the problem anymore.
11. Uninstall hidden devices from Device Manager:
Here, you are going to get rid of unknown or unused devices that might be affecting the operations of your PC to cause the USB device not recognized message or problem in general. Follow these instructions:
- Press and hold the Windows button on your keyboard, then tap the letter X key. This action forces Windows to show a list of programs and options. Select Command Prompt (Admin) to launch a code executer app with administrative rights or powers
- After the required window opens, type in the following series of command (one after the other) and hit the enter key after inputting each line of command:
- set DEVMGR_SHOW_DETAILS=1
- set DEVMGR_SHOW_NONPRESENT_DEVICES=1
- start devmgmt.msc
- After the Device Manager window opens, click on View (you should see this option at the top of the window). Select Show hidden devices
- Expand the menu for the following items (one after the other): Computer and Disk driver. You can also check the drivers under the other options on the list. Meanwhile, you must take note of any device driver under their menu that is grayed out or any driver that has a yellow exclamation mark
- Right-click on any device driver that fits the description we gave above and select Uninstall to get rid of it. When the window with a message requesting confirmation comes up, click on Uninstall to complete the removal process
- Reboot your PC and see if things get better with your USB devices
12. Turn off notifications for USB errors:
This fix is for those who are seeing the ominous warning about the USB device not recognized in Windows 10 in error. If the message keeps popping up on your screen although there are no underlying issues, then this procedure might also work for you. Here, you are directly going to stop Windows from showing you messages on USB issues.
Follow these instructions:
- Press and hold the Windows button on your keyboard, then tap the letter I key to open the Settings program. After the required window opens, click on the Device icon to open its menu
- Click on USB (this option is located on the left side of the opened window). Under Notify me if there are issues connecting to USB devices, toggle the button or switch to turn off this option
Now you should stop seeing unnecessary notifications about Windows failing to recognize your USB device. If you are an advanced user capable of working safely on a system’s registry, you can perform the same procedure by altering the necessary entry you would find by navigating through the following folders:
HKEY_CURRENT_USER \ SOFTWARE \ Microsoft \ Shell \ USB
If you are sure of a particular port being faulty and you want to stop getting notifications for it since you are unbothered to fix it, you can completely disable that USB hub. Follow these instructions:
- Right-click on the Windows start icon and select Device Manager from the list of useful programs and options that come up
- Locate the Universal Serial Bus controllers menu on the list device drivers on your system. Expand it. You should see your USB root hubs
- To identify the exact port on your PC, right-click on the hubs and select Properties. Navigate to the Power tab to see what is plugged in under it. You might not find everything you are expecting to be there
- After you have correctly identified the hub, right-click on it and select Disable from the short list of options you see. In theory, if you knowingly prevent the hub itself from functioning, then Windows should stop displaying notifications for it.
We have included a short list of other things to try for users who are still struggling with problems associated with the USB device not recognized error message on Windows 10:
13. Try using other ports on your computer to get around the problem if the issue is associated with a specific port
14. Download and run the USB troubleshooter (from Microsoft) or any similar problem-fixing program on your system to diagnose and resolve the Universal Serial Bus device issues
15. Update your computer’s BIOS (Basic Input Output System) and install the latest drivers for your motherboard chipset
16. Run the System File Checker to let Windows scan for and repair damaged system files 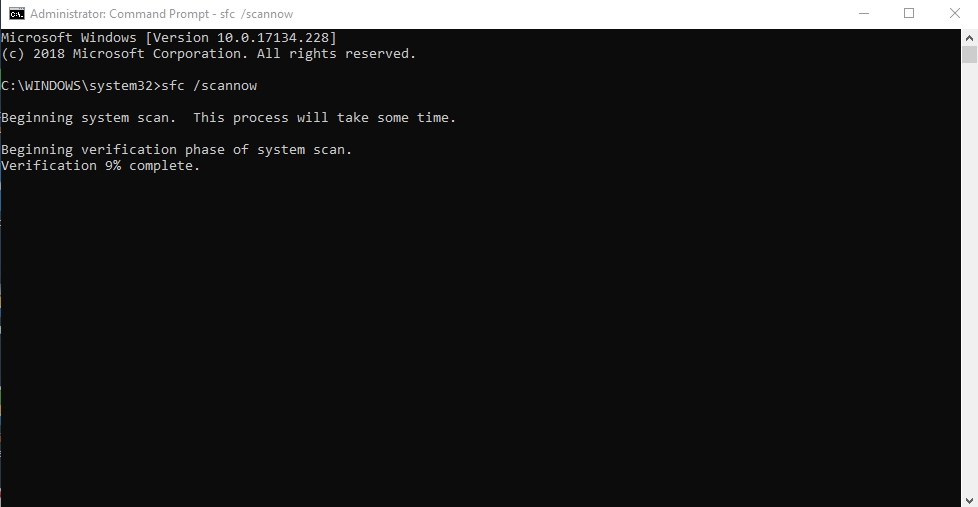
17. Carry out series of operations to partition the affected USB device and get a letter assigned to it
18. Use System Restore to reverse the changes that took place on your system if you suspect that the error is a consequence of past events or activities