We believe that your experiences on Windows when your device is without an internet connection have never been good. It is the same for almost everyone. Most users cannot watch their favorite films or series, play games online, follow events or happenings, work online to make money, and so on when their PC lacks a connection to the web.
In this guide, we are going to explore numerous solutions to common internet issues and help users fix no internet connection on Windows 10 and older versions of the operating system. Before we move on, we would like you to understand that internet connectivity failure is often a result of software problems, hardware issues, or both in extreme cases.
We believe that a good number of users facing the problems either downloaded and installed Windows updates recently or moved to a new operating system version (major upgrade like Windows 10) or had their PC involved in an important event or activity.
Pro Tip: It is possible to fix many PC issues by using the PC Repair tool. PC Repair is easy to use and reliable Windows optimization software developed to fix hundreds of system issues.
Special offer. About Outbyte, uninstall instructions, EULA, Privacy Policy.
How to fix unable to connect to the internet problem and similar issues on Windows 10 and Windows 8.1?
You will find a good number of solutions for fixing internet connection on Windows 10 (the latest version of Windows) and Windows 8.1 (the previous version). The complexity of the fixes (defined by the operations you are required to carry out) might increase as you move through them.
It is logical for you to start with the first one on the list. It is also reasonable to move on to others if any fix fails.
Execute some troubleshooting operations on your PC and other devices involved:
Your PC and router are the 2 components you are going to do some work on to find out if there is an underlying problem that is preventing you from connecting to the internet. Follow these instructions:
- Restart your PC. After your computer comes on and Windows settles down, check that your wireless network adapter is turned on (move to the next step if you have confirmed this already). Some system manufacturers include a button that users can tap to turn on or turn off the component we described on their devices. Press the required key to turn on the hardware component.
If your system manufacturer did not include any button to control the feature in view, you would have to turn it on through a software means. Open your Settings app and navigate to the Internet Connection menu there
The icon for wireless connectivity might appear on the taskbar on your desktop screen to indicate that you have successfully carried out the needed operation. The occurrence of this event is not a conclusive proof though, and the lack of it does not mean you failed at what we asked you to do.
- Once your wireless adapter has come on, you should see the list of available networks around you (WIFI in most cases). Connect to the network you need to reach. After you acquire a successful connection, check if you can browse the internet.
If you could not connect to any network (especially the one you control through your router), then continue with the instructions below
- Press (and hold) the Windows button on your keyboard, then tap the letter I key to open the Settings app. Click on Network or Connectivity, depending on the options on the menu you see. Click on the Connect button to communicate with the network you want
- Now you must press the WPS button on your router or hardware device for connecting to the internet. WPS stands for Wi-Fi Protected Setup, so the option we described is only for users with routers that possess the functionality.
After you pressed the WPS button on the device, your router should immediately allow your PC to get through without you having to enter the username or password details for the network.
If after you connected to the web, your internet connection breaks frequently, do this: disconnect from the network, try to reconnect again, but this time you must remember to tick the checkbox for Connect Automatically. This action should solve your problem
- If at this point you are still struggling to connect to the internet, then it is high time we verified that your connection exists and ensure that it is in an excellent working state. Try to connect to the internet from multiple programs and see what happens. For example, if you are using Google Chrome, you must launch Mozilla Firefox and attempt to reach the web or vice versa if the latter is your default browser.
You could also launch other apps that require internet connectivity to function and observe the state of things. Variety can only be a good thing here.
If you discover that you can access the web on other platforms besides your web browser, then you have to uninstall its app, download and install updates for it. Get a patch or the version that corresponds to your operating system or PC configuration.
- If you cannot access the web on any platform or app on Windows regardless of what you did or how much you tried, then we must move on to see if your internet is working at all. Maybe we were too quick to blame your PC in the first place.
If you are using an Ethernet cable to access the network, you must connect that cable to a different PC to test or see if everything is in order. If the test device too ends up lacking internet connectivity, then maybe your connection is not active. You will have to contact your ISP (Internet Service Provider) or a trusted expert to help you resolve the issue.
On the other hand, if your internet connection appears and works fine on that test computer, then you know that your PC is the device housing the problem. You are free to continue with other fixes.
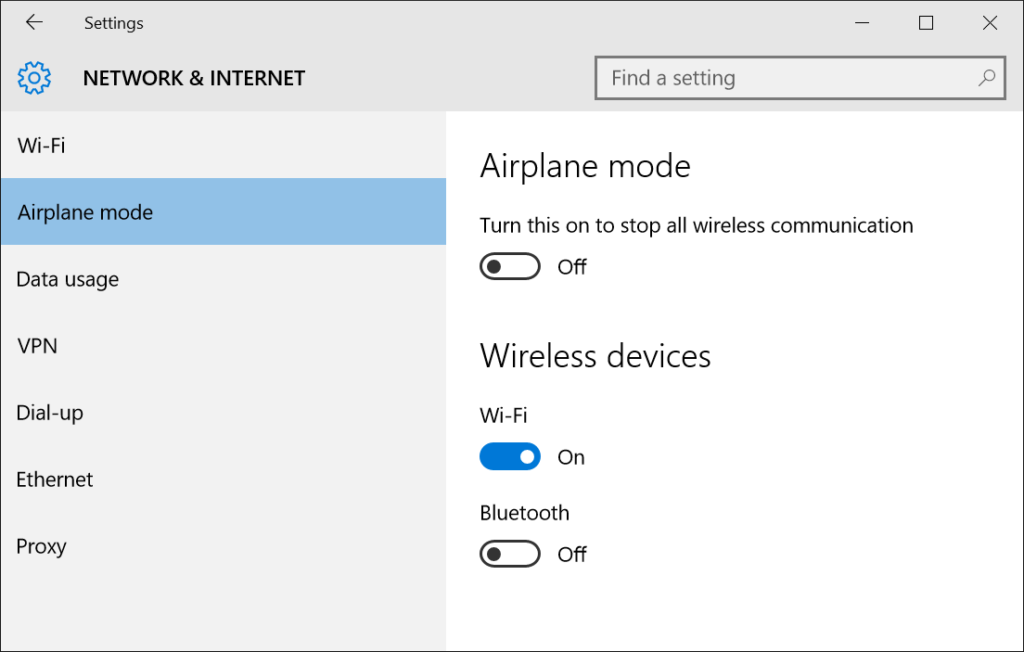
Disable Airplane mode:
In Airplane mode, Windows disables or prevents your device from using any form of wireless connectivity. If you are struggling with internet connections problems, then there is a good chance that your PC is in such a state (do not be surprised). To be fair, some events or operations are capable of turning on Airplane mode without asking for your input. We know of specific Windows updates that do this, for example.
Follow these instructions to disable Airplane mode:
- On the taskbar or in the right-hand side of the notification panel on your desktop screen, you must check for the Airplane mode icon (usually in the form of a plane). Click on the symbol to disable it or right-click on it and select Disable from the short menu list that shows up
If you are running Windows 10, continue with the instructions below if you could not find the Airplane icon or if you did locate it, but you could not turn off the mode
- Open the Settings app by pressing (and holding) the Windows button on your keyboard, then tapping the letter I key. Click on Network and Internet to enter its menu
- Click on Airplane mode. Toggle off its switch to disable it
Run the internet troubleshooter:
By its pure definition, a troubleshooter (usually a tool which could be in the form of a program or even a human) works to diagnose and solve problems. You have just completed some troubleshooting procedures in the first fix manually, and it is time you asked a program to help you do the same.
On Windows 10 or Windows 8.1, there are numerous built-in troubleshooters that users can call upon to help them when they are confronted by an issue too difficult enough for them to resolve on their own. Of course, there is a troubleshooter for internet connection problems. Follow these instructions to run it:
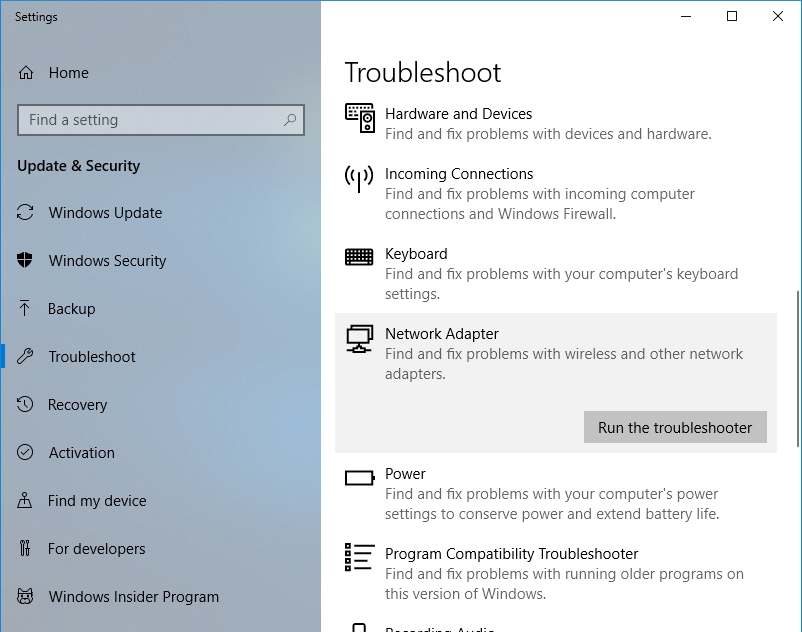
- Press the Windows button on your keyboard or click on the Windows start icon always present on your desktop screen. Input the following keyword into the text box present (start typing even if no field is visible): troubleshooting
From the result list, click on Troubleshooting (it usually the first item that comes up on the list anyway)
- After the program window shows up, you should see a list of troubleshooters or troubleshooting options (click on View all if you cannot find anything). Select the one for Internet connectivity or connection problems, or Network adapter, or anything else with a similar description. Run the troubleshooter (the most significant move in the entirety of this fix)
- The troubleshooter should start scanning your computer to detect the internet connectivity issues plaguing your device. Follow any instructions correctly, as they appear on your screen. The troubleshooter might request that you perform a specific operation. Please do as you are told in any scenario to avoid jeopardizing the success of this fix
If you are lucky, the troubleshooter (after identifying all the variables involved and obtaining the necessary information) might fix your problem immediately without asking anything of you. Such events vary far too much for us to tell.
Whatever happens, after the troubleshooter states that it has completed its job, and after you have finished all the operations it asked of you, you must exit all open windows, launch your browser and see if you can reach the web. Move on if you find out that nothing has changed.
Reset your network adapter:
Here you are going to perform some operations to reset the network adapter. This procedure is powerful enough to force a change in the configuration or settings of the physical component that gets you online. Follow these instructions:
- If your system is running Windows 8.1, move your cursor to the upper right-hand corner of your screen, then drag it down and select Search or its icon from the short menu that appears. In the text box present, you must perform a search for the following keywords: Network and Sharing center. Click on the first result that you see
- A Control Panel window should come up. You will see some options from which you must select Change adapter settings usually on the left side of your screen. Windows will now direct you to a list of internet connections available, which you can choose from now
- From the items present, locate your WIFI network. Right-click on it and select Disable. Wait for some time. Finally, you must select Enable (the reverse) to force Windows to reset your network adapter
- Exit the windows you open, launch your web browser, try to surf the web and see if any change has occurred.
Roll back your drivers:
If your problems persist even after you perfectly executed all the troubleshooting procedures we provided and ran the built-in troubleshooter for internet connection, then maybe a restoration of your network adapter drivers to their old version would help you.
In many cases, Windows installs new drivers to overwrite the original versions of the software for the network components. To be fair, this act is a noble one, but its effects are not always practical (since they might give rise to internet connectivity problems). Follow these instructions to revert to the previous drivers:
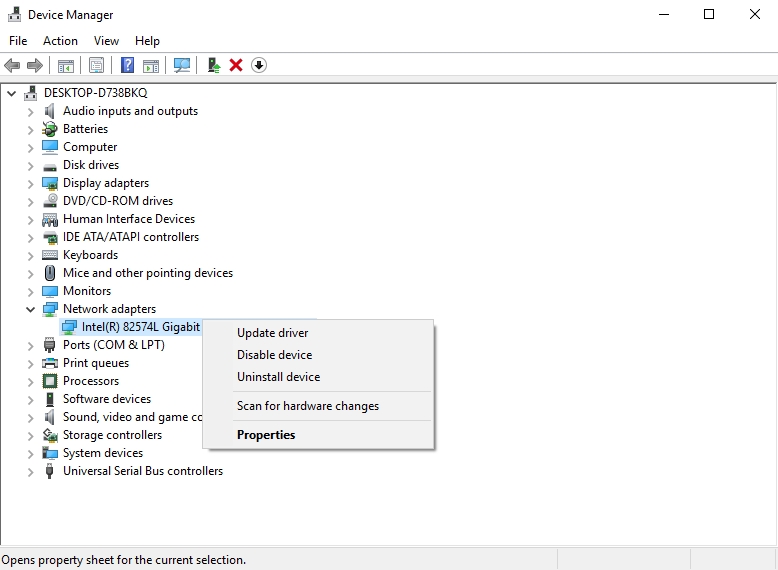
- Open the Device Manager program. We know of a couple of ways you can do this. This method should be the fastest (in terms of the time spent or the number of moves you need to make until you arrive at your destination): Right-click on the Windows Start icon always present on your desktop and select Device Manager program from the list of programs and options that appear
This way should be universal (in terms of its success on almost all recent versions of the Microsoft operating system like Windows 10, Windows 8,1 or even Windows 7): First, you have to open the Run app by pressing (and holding) the Windows button on your keyboard. Finally, you must input the following code into the text box present and hit the Enter key to execute it swiftly: devmgmt.msc
- Windows should launch the program window, and you will see the menu list for your drivers. From the items present, locate Network Adapter and expand its content by clicking on it. You will see the driver components for some network functionalities
- Click or double-click on WI-FI adapter (if you are trying to reach the web via WIFI) or the driver for your Ethernet (if you use a cable) to open the Properties menu for the item
- After the Properties window launches, navigate to the Driver tab. There, you must click on the Roll Back Driver button present to restore the old driver software. Windows will perform a quick scan to find the necessary software, and after it locates the files it needs, it will install the drivers
If the Roll Back Driver button was grayed out or unavailable for you to use, then one of these two events is likely:
- You are using the driver that came along with your device. In this case, the solution to your problem will probably involve an update of the drivers since they have been there for an extended period.
- The old driver files are missing or corrupted. Try and see if you can obtain them online from other sources. Nevertheless, remember to be careful with the content you get from the internet
- After Windows finishes restoring the drivers, a restart of your PC is required to let the new drivers become active. Exit all programs and reboot your computer. After your computer comes on and Windows becomes stable, check and confirm that your connection issues are no more.
Fix the primary driver problems associated with network adapters:
In case you are yet to notice, we consistently stressed that the network adapter is a critical component of your computer with respect to internet connectivity. Thus, if there are problems with the item (usually its drivers) or if it is not working, then you will not be able to reach the web no matter how hard you try.
Corrupted, outdated or missing driver software form the bulk of issues that affect the network adapter. The solution to a missing driver is obvious enough—you must install what your computer lacks. If your system is using an outdated driver and experiencing problems because of this, you must install an upgrade. Finally, you can fix the problem of corruption in drivers by getting rid of the useless data and replacing it with the right files.
We know of a single solution to all the driver problems we identified above— an update of the drivers. With this procedure, you can quickly replace your driver if it is missing, outdated, or whatever. It is the best fix of the lot because in the end, you get to install the latest versions of the drivers, and this can only be a good thing.
We recommend that you download and run Auslogics Driver Updater to resolve your driver issues. To be fair, the best way of getting the job done involves the use of a program to automate the process of updating drivers, and we have just shown you an excellent application that you could use.

The recommended app will perform a thorough scan of your PC to identify the missing, corrupted or outdated drivers. You will see a report on the issues it detected. From there on, you will be able to use the option (usually in the form of a button you can click on your screen) to upgrade the drivers to their latest manufacturer-recommended versions quickly.
Finally, after the program has completed its job, you must restart your system to let the new drivers take charge and start working.
For some strange reason, you might end up refusing to use the automatic method of updating drivers. In such a scenario, below, you will find the relevant instructions that will guide you through the manual procedure:
- Open the Device Manager program. No words here because we showed you how to do this not so long ago.
- After the program window shows up, you should see the list of drivers available on your PC. You should see Network Adapters. Click or double-click on this item to expand its menu. You should see a list of adapters that control your connectivity. Click or double-click on any one of them you wish to work on to open its Properties window menu
- After the small window shows up, you have to navigate to the Driver tab. There, you will see the Update button. Click on it. Usually, Windows will present you with 2 options on how it can go about the process of updating your drivers. Choose the one that best suits you.
- Follow the instructions that appear on your screen as Windows guides you to complete the operation. Reboot your computer to round it all off.
We have just outlined the procedure and the instructions for the manual method. You must know that in the end, you will have updated only a single driver. Your PC has more than one network adapter driver, so you must perform the same operation on every one of them.
If you fail in the process or you did not get the result you were expecting, please refer to the automatic method of updating drivers because you will experience fewer setbacks and complications with it.
Reset TCP/IP stack:
Here, you are going to run several codes in an elevated Command Prompt program window to resolve inconsistencies or shortcomings involving your system connection setup. The procedure is relatively easy to carry out; you only have to be careful while inputting the commands to avoid making errors. Follow these instructions:
- Open an elevated Command Prompt window. You can do this in several ways as usual. In the first method, you must right-click on the Windows Start icon always present on your desktop screen to see a list of programs and options; then you must select Command Prompt (Admin)
These are the steps for the alternative way: press the Windows button on your keyboard or click on the Windows Start icon to perform a search. Input cmd into the text box present, right-click on the first result you see and select Run as administrator from the short list of options you see
- After the program window shows up, type in the following commands (one at a time) and hit the Enter key to run them (after each line of code you input):
- netsh int ip reset
- netsh int tcp set heuristics disabled
- netsh int tcp set global autotuninglevel=disabled
- netsh int tcp set global rss=enabled
- At the end of it all, you must close all open windows and restart your PC. After your computer comes on, try to connect to the internet and see if things have gotten better.
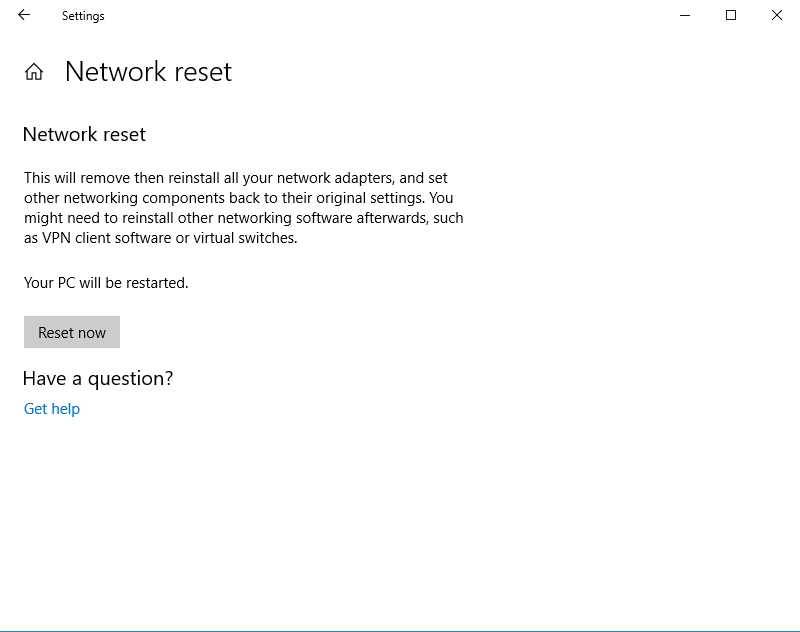
Use the network reset feature (Windows 10 only):
The operations or series of steps involved here make this fix one of the most effective solutions here if not the not most potent of the lot. We only decided to include it as the last thing on the list of detailed procedures because it is incredibly disruptive. People who believe we should save the best for last might find this attitude pleasing though.
If you have not figured out what this fix does from its description already, it is time we told you that it resets every component or feature that has something to do with your network connectivity. Follow these instructions to use it:
- Open the Settings app. We have provided instructions on doing this a reasonable number of times already. After the program window shows up, click on Network and Internet to open their menu
- Remain in the section where you see Status. Scroll down until you see Network Reset. Click on it. Follow the instructions as they appear to complete the operation
- Once all is set and done, you must restart your PC.
If you tried all the fixes above, but the internet connection problems refused to go away, then we think your issues run more profound than they appear. We have provided an extended list of other things you could try in fewer details to end your nightmare of no internet connection.
Try out a different power plan:
Some power plans limit the abilities or functionalities of a PC to save energy. If you are using an option that strongly influences the performance of your computer negatively, then it is time you went with a different one. Go with the High-performance plan this time
Turn off your firewall and disable your antivirus:
Threats from the web cannot get into your system if your PC lacks an internet connection. Therefore, there is no point in your firewall working against something that does not exist. We understand that your security setup tries to stop suspicious programs from making contact with the web, but in this case, they are working against you, so it is only fair you arrest them for the time being and see if things improve.
Do a clean boot:
With this advanced troubleshooting procedure, you can boot Windows with the fewest amount of drivers, processes, startup programs, and so on. In this controlled environment, your PC is free from software conflicts and similar problems. Therefore, you can easily find out if your internet connection problems are internal or a result of the interferences from third-party programs.
Update your BIOS (basic input/output system):
If there is any operation left to fix problems associated with drivers after you have upgraded all the device drivers available on your PC, then it is this one. We did not include it earlier because the operations involved are not exactly straightforward to carry out or execute.
Moreover, the procedure involved is harmless most times, but when it goes wrong, terrible things happen. For example, in worst-case scenarios, a system might refuse to boot. Therefore, we advise that you create a backup of all the good stuff on your PC before you begin.
Reset your router:
Most routers have a button on them, which you can press to force a reset of its integral components or settings. If your device lacks it, then you will have to make do with the simple restart procedure instead. You must unplug the router from the power source abruptly, wait for some time, and put it back in.