“Failure Will Never Overtake Me If My Determination
To Succeed Is Strong Enough.”
– Og Mandino
Pro Tip: It is possible to fix many PC issues by using the PC Repair tool. PC Repair is easy to use and reliable Windows optimization software developed to fix hundreds of system issues.
Special offer. About Outbyte, uninstall instructions, EULA, Privacy Policy.
Not having access to any of your disk drives or external storage devices can be really frustrating. This is because you will not be able to access your important files and folders which you stored in them for backup. If you tried to open your disk drive and you were prompted with the error “The device is not ready”, then this is the article for you. This issue can occur in any version of Windows. It is a very common Windows error, and most users have experienced it. That is why we have compiled a list of solutions for you in this article.
There are a few reasons why you are experiencing this error:
- The drive is empty
- The drive or storage is not connected well
- The device is damaged
- The cables used to connect the device are damaged
- Software and hardware issues with your PC
- Missing or outdated drivers
- The device is not compatible with your PC
Today, we are going to teach you
how to fix ‘the device is not ready’ issue.
Make sure you go through all the solutions we have provided until you find the one that works for you.
Table of Contents
- Recover data from the drive which is inaccessible
- Make sure that the drive is well connected
- Exit all programs that are using the drive
- Run hardware and device troubleshooter
- Uninstall and reinstall the USB controller driver
- Make sure your external drive has a drive letter
- Install your latest drivers in compatibility mode
- Perform a full virus system scan
- Repair your Windows registry
- Update your operating system
- Perform a clean boot of your computer
- Check your disk for errors
- Perform a system restore
Solution 1. Recover data from the drive which is inaccessible
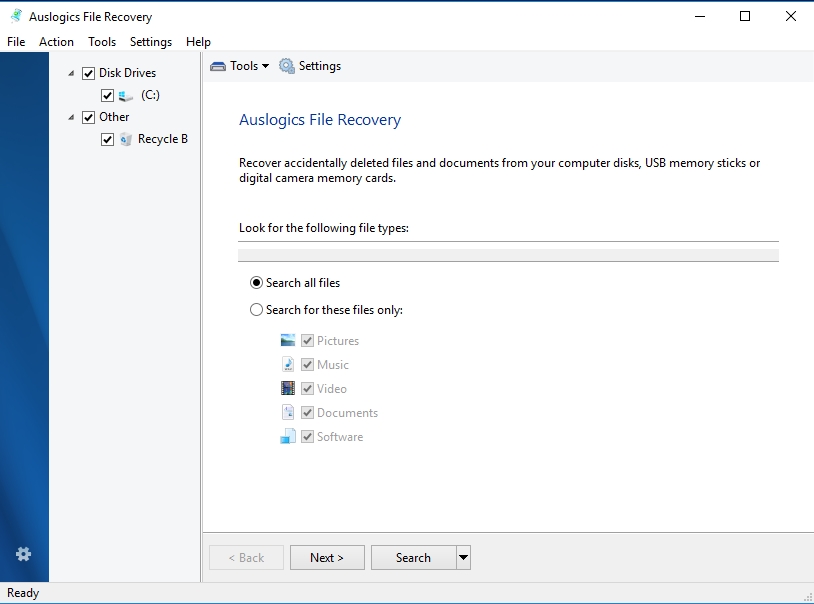
The first thing you should think of doing when you can’t access your USB drive or external storage is to recover the lost data on the disk. This step is very important because while trying other solutions, you may make a mistake and end up losing all the data stored on the disk permanently. However, is it easy or is it even possible to recover lost data? Yes, of course, it is possible. With the advancement in technology, you can now recover data from your inaccessible drive. That is why we recommend you to download and install Auslogics File Recovery. This is one of the most effective tools for recovering your lost files. It is common for people to make mistakes and delete files they did not intend to. Viruses are also a huge contributing factor to why people lose data on their drives. Also, in this case, inaccessible drives. But it does not matter how you lost the data, the Auslogics File Recovery tool will help recover what you lost.
Solution 2. Make sure that the drive is well connected
It is logical that if your drive is showing the inaccessible message, you need to check if it is well connected to your PC. You can unplug and plug it again to make sure of that. You should also unplug all the remaining USB peripheral devices which may be interfering with your drive’s connection. If you have a USB 3.0 port, try connecting your drive to it and check if it resolves the error. Also, not all USB cables are made the same. You can try other cables to check if the one you are using is faulty.
Solution 3. Exit all programs that are using the drive
Other programs may be using the drive, and that is why you are receiving the “The device is not ready” error. Try closing all the programs that are currently running on your PC and check if you can access the drive again. This method may prove to be very useful.
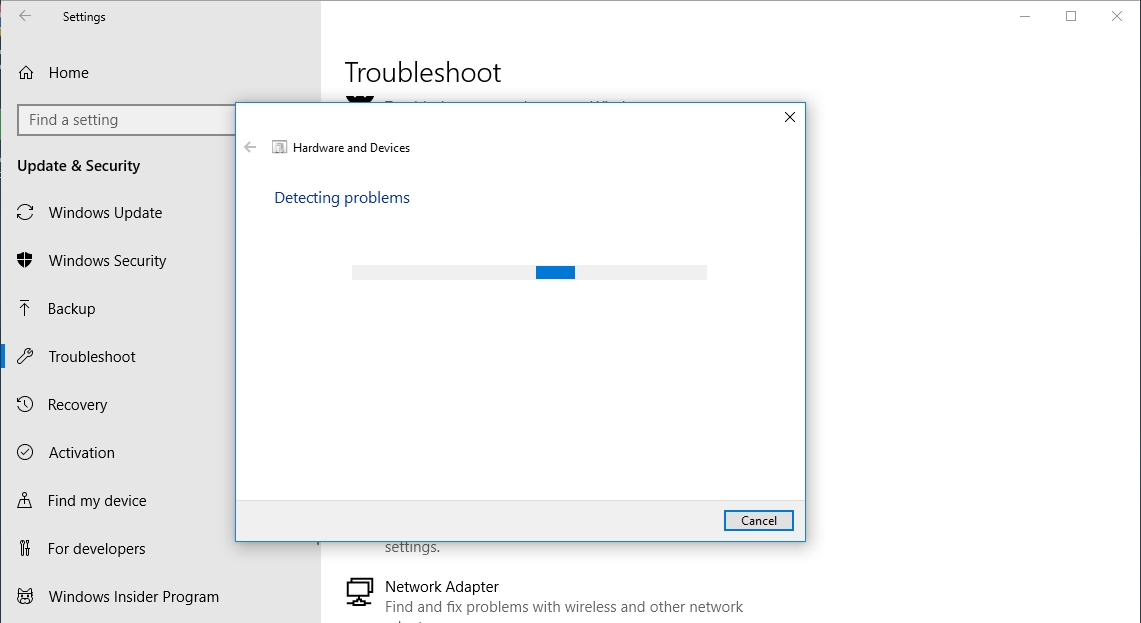
Solution 4. Run the hardware and devices troubleshooter
This problem can arise due to hardware issues. So, you will need to run the hardware troubleshooter to fix the issue. The Troubleshooter is a built-in tool for Windows used to fix common issues that occur within your system. It very useful because you will not have to visit a professional every time you have a minor issue with your PC. Here is how to run the Hardware and Devices Troubleshooter:
- Click on the Start or Home button and select the Settings icon from the pop-up menu. This will open the settings app
- Click on Update and Security from the options available
- Select Troubleshoot from the left-hand pane, then select Hardware and Devices under the Find and fix other problems option
- Now, select Run the troubleshooter
- Windows will find and fix issues related to your drives which may be causing you to experience this issue
Some device manufacturers have separate troubleshooters for their devices. You can also check them out on the internet and see if it helps the situation.
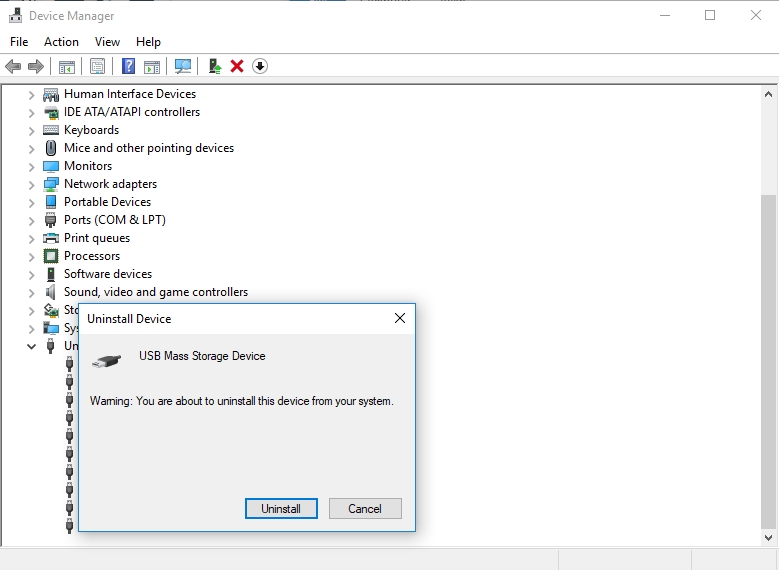
Solution 5. Uninstall and reinstall the USB controller driver
This is a major step to take since the USB controller driver is very important for the proper functioning of all your USB devices. That is why we recommend you to uninstall and reinstall your USB controller driver. To do this, use the following steps:
- Right-click on the Start or Home button and select Device Manager from the pop-up menu
- Click on the arrow next to Universal Serial Bus controllers to expand it and see the device which is installed on your PC
- Right-click on Universal Serial Bus controllers and select Uninstall

- Restart your PC when you are done
- Once your computer is restarted, Windows will automatically install the driver again
Solution 6. Make sure your external drive has a drive letter
- Press the Windows logo key + R on your keyboard to open the Run dialog box
- Input diskmgmt.msc in the search area and press Enter to open the Disk Management window
- Right-click on the drive you wish to change and select Change Drive Letter and Paths, then click Change
- Now, choose your desired drive letter and click OK. Make sure the letter does not coincide with any other drive letter on your PC
Solution 7. Install your latest drivers in compatibility mode
Installing your latest drivers is one of the key steps in solving this issue. There are various ways to do this, and we will show you them below:
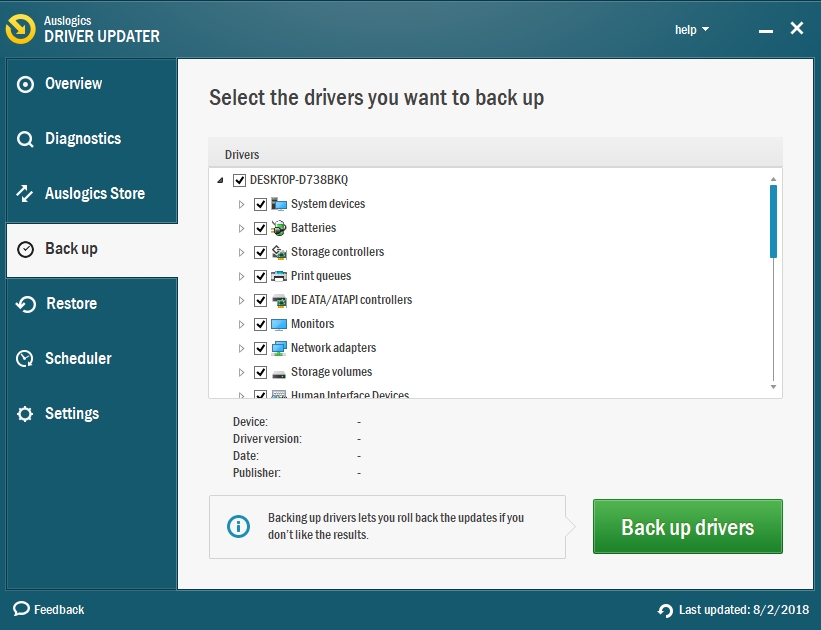
Method 1. Download and install Auslogics Driver Updater.
Updating your drivers with the tool is very easy and fast. You will be able to update all your drivers in just one click. This tool will check your computer for missing or outdated drivers and install the latest manufacturer-recommend versions. Here is how to download and install Auslogics Driver Updater on your PC:
- Click this link to download the setup file to your PC
- Once the download is finished, run the tool
- In the next window, choose the installation directory and your preferred language and then proceed
- When the installation is completed, the Auslogics Driver Updater tool will automatically open and start scanning your computer for missing or outdated drivers
- When it is done, you will be able to install your missing drivers in just one click
Method 2. Download the drivers from the manufacturer’s site.
This is a more time-consuming method because you will need to download and install each driver individually. Furthermore, you have to know the name and version of the device, and this is sometimes confusing. Once you have gathered all that information, you will find the drivers you are looking for in the support section of the site. Nowadays, manufacturers make it easy for users by creating software which will notify people of the drivers which are outdated and where to download their updated versions.
Method 3. Downloading the drivers via Device manager
- Right-click on the Start or Home button and select Device Manager from the pop-up menu. This will open the Device Manager window
- Now, right-click on the device which driver you want to update and click Update driver
- In the next window, select the option to download the driver automatically from the internet
- Windows will download and install the latest driver for your device
Solution 8. Perform a full virus scan of your computer
Viruses are capable of causing a wide range of problems to your system. This includes corrupting your drives and making them inaccessible. To fix this, you will need to download and install a good antivirus in your system. That is why we recommend that you download and install Auslogics Anti-Malware. This tool is very easy to use. You will be able to browse the internet in a safe environment. It protects you against newly created virus because its virus database is updated on a regular basis.

Solution 9. Repair your Windows registry
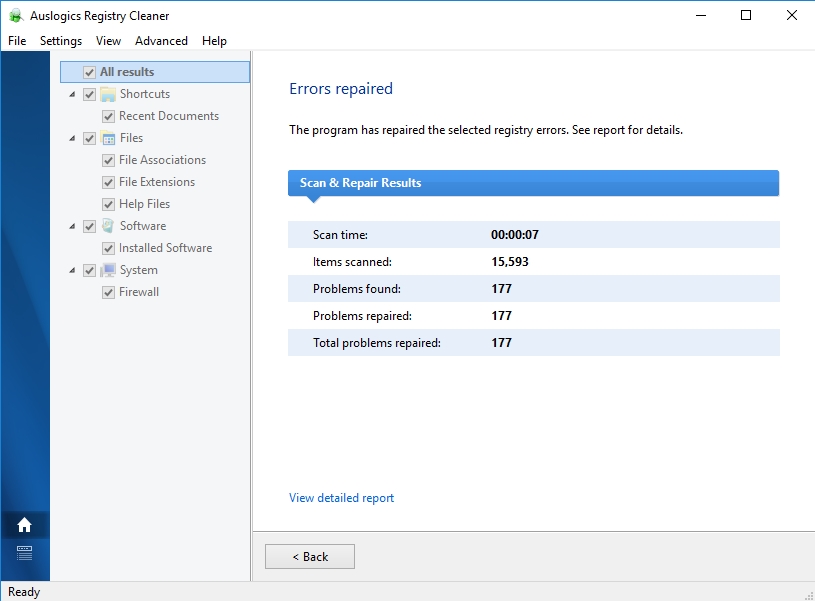
Repairing your Windows registry is a very complicated and delicate process. Any mistake you make here can result in irreversible damage to your system. That is why we recommend you to download and install Auslogics Registry Cleaner. This tool will do the job for you without any risks. It creates a restore point before starting the repairing process in case you want to revert the changes.
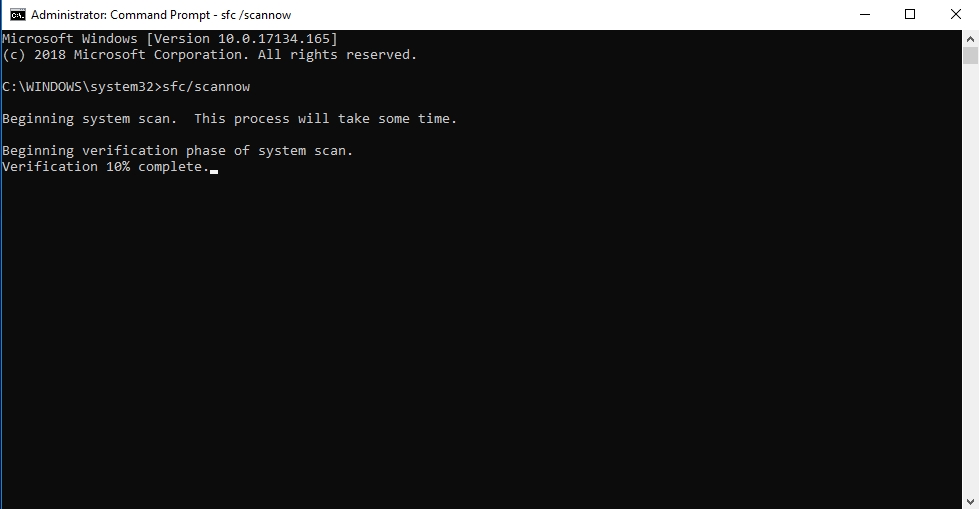
Also, repairing your system files using System File Checker can help resolve the issue by replacing them. To do this, use the following steps:
- Right-click on the Start or Home button and select Command Prompt (Admin). This should run Command Prompt as an administrator
- In the CMD window, input sfc /scannnow and press Enter
- Restart your PC when the scanning process is completed. Hopefully, your system files have been repaired and you will no longer encounter the “The Device is not ready” error
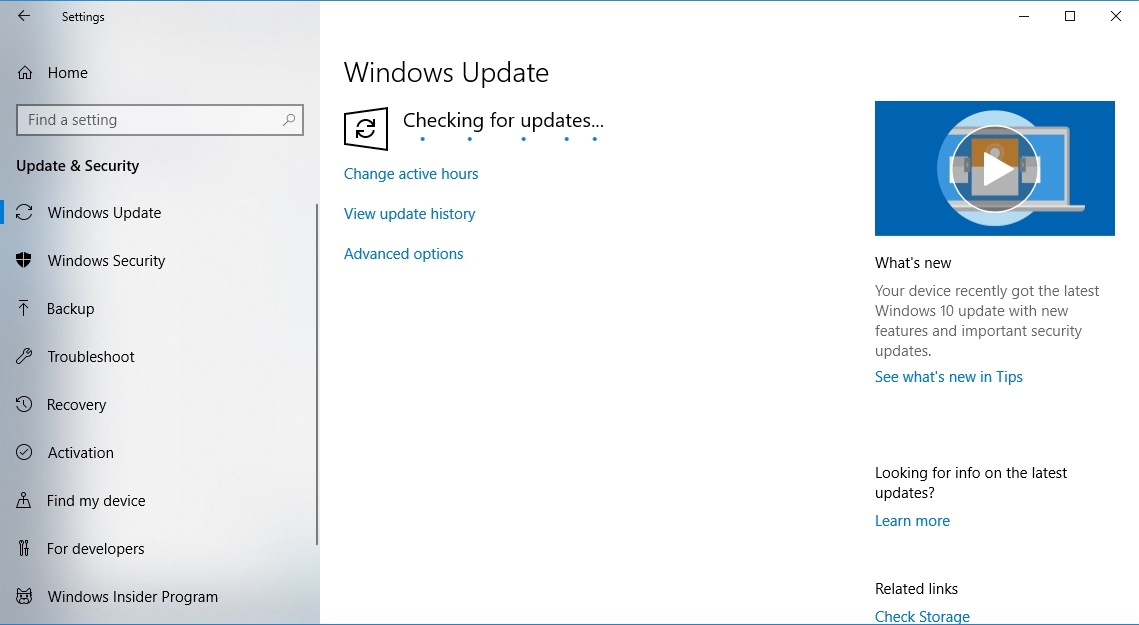
Solution 10. Update your operating system
Microsoft releases updates constantly to improve the operating system and in response to user reports. These updates may have the solution to common errors users encounter often. So, it is advisable to update your operating system to the latest version to help you fix this issue:
- Click on the Start or Home button and select the Settings icon in the pop-up menu
- Select Update and Security from the list of options
- Go to the Windows update tab and click Check for updates
- Windows will now look for updates for your system and install them
- Hopefully, this solves the problem
Solution 11. Perform a clean boot of your computer
This process boots your computer with the least number of drivers and programs to avoid conflicts between software. Here is how to perform a clean boot of your Windows 10 PC:
- Click the Start or Home button and input system configuration in the search box. Select System Configuration from the list of options. This will open the System Configuration window
- Navigate to the Service tab and check the Hide all Microsoft services box. This is to prevent you from disabling any important service which is vital for the normal functioning of your system, then click Disable all
- Now, go to the Startup tab and select Open Task Manager
- Once in the Task Manager window, navigate to the Startup tab, select all the items there and click Disable
- Exit the Task Manager and go back to the System Configuration window and click OK
- Restart your PC when you are done
Solution 12. Check your disk for errors
You should also check the disk for errors and try to fix it. Here is how to do it:
Press the Windows logo key + X on your keyboard and select Command Prompt (Admin) from the pop-up menu
- In the Command Prompt Window, input chkdsk C: /f and press Enter. You can replace C with the letter of the drive you are trying to repair
- Windows will now check for errors in your disk and try to repair them
- If the errors can’t be fixed, your only option is to get a new disk
Solution 13. Perform a system restore
System restore will revert all the changes that occurred in your system to a previous date in time. This tool is very useful when you are trying to fix an error which cause is unknown. Note that this process does not affect your personal files and folders. Furthermore, to perform this process, you are supposed to have created a system restore point previously, but sometimes Windows automatically creates these points when important changes want to occur in your system. Here is how to perform a system restore:
- Click the Start or Home button and type recovery in the search menu. Select Recovery from the list of options. This will open the Recovery dialog window in Control Panel
- Click Open system Restore and click Next
- In the Next page, you will see a list of points which you can restore your PC to. Choose a date which is before the error began, then click Finish
We hope that this article has solved your “The Device is not ready” error. Share it with others who encounter similar issues.
We appreciate your ideas and comments.
We are ready to answer all your questions regarding the above topic.