The error message in view indicates that DirectX failed to make or render an object. DirectX device creation failed or Failed to create DirectX device are similar messages describing the same error or problem in slightly different ways. The notification can come up in any of the following scenarios:
- After users install a 3rd party game or when they try to run it. Here are some examples of the games involved: Warframe, Battlefield 4, Trials Fusion, Fortnite, and so on.
- During gameplay or after the successful launch of a game. We have even seen reports that confirm that the error comes up when users click on the Play button in a game or when they reach specific locations or milestones
- When users try to open built-in Windows applications like the Windows Media Center utility or Microsoft games like Minesweeper, Solitaire, and so on. We tend to see the error in this particular form on versions of Windows older than Windows 8 (Windows 7, for example).
Causes of the DirectX device creation error
We have seen enough reports about the error, the forms of its manifestation and other details that helped us in our investigation of its behavior. We finally got hold of the culprits responsible, or we found some events to blame. Here are some of them:
- Corrupted or missing DirectX files. Users sometimes unintentionally delete the wrong stuff on their PC. A rogue app could also be involved. Malware activity too cannot be ruled out
- The conflicts between applications (usually 2 programs or more) may be to blame. For example, the Windows Media Center and a built-in app might attempt to use a specific DLL file around the same time, and the Failed to create DirectX device error message is the result of such software altercation
- Incompatibilities involving the operations of newer driver software on the Windows running on a PC. Graphics card makers (AMD and NVIDIA being the major ones) tend to release beta versions of drivers that are ridden with inconsistencies and bugs that cause a lot of problems, and these things cause the disturbing error to occur
- Software glitches within Windows that occurred independently of the system user. From the list of events or causes on this list, this one is the least likely to occur
- In a situation where your GPU card is struggling to meet the requirements of the game. In this scenario, after the “Failed to create Direct X device” part of the error description, you will see a message stating that the application requires at least DirectX AA compatible GPU (note that AA represents the specific Direct X number or version).
Of course, we would love to tell you to get better graphics cards to stop seeing the error, but we understand that things are not always the way they seem. Some users might see the error even when they have the best GPU on the market or the newest cards.
Pro Tip: It is possible to fix many PC issues by using the PC Repair tool. PC Repair is easy to use and reliable Windows optimization software developed to fix hundreds of system issues.
Special offer. About Outbyte, uninstall instructions, EULA, Privacy Policy.
We know of a good number of error messages that have something to do with a specific DirectX version running on a system, and to be fair, the DirectX device creation failed error occurs frequently. Therefore, we can quickly proffer enough effective solutions that will help you to get rid of the problem in any of the scenarios we talked about earlier.
How to remove the Directx device creation failed error?
As usual, we recommend that you start with the first fix on the list and work your way down to the bottom until you find what works for you. However, we would like you to note some important things.
- The first, second and third fixes on the list are geared toward users who experienced the error in the first and second scenarios (or in situations very similar to the description we gave).
- We provided the remaining solutions for users who encountered the problem in its required form for the last two scenarios on the list above. Nevertheless, individuals with problem descriptions that best fit the first and second scenarios are welcome to try them if they have used up the main fixes we outlined for them but are still struggling with the error.
Download and open DirectX End-User Runtime Web Installer:
From the description of the problem, we can conclude that Windows struggled to execute a specific DirectX function or procedure. Therefore, our first attempt to solve the issue involves the use of a program that Microsoft has designed to help users address challenges associated with DirectX.
The DirectX End-User Runtime Web Installer will help you install missing files or rectify damaged components. Follow these instructions to run the required tool:
- Open your web browser and search for “DirectX End-User Runtime Web Installer” without the quotes in the text box present on Google. From the result page, you should see a link to a download page on Microsoft’s website. Click on it
- After your browser loads up the page entirely, choose your preferred language from the list available and click on the Download button to get the file. Follow the instructions on the screen that come up to complete the procedure. Your download should start soon enough
- Once your browser notifies you that it has completed the download, click or double-click on the saved item to open and run it. Follow the displayed instructions to ensure a successful installation of downloaded files
Ø After all the operations end, you must restart your PC to see if anything has changed. Open the game or program with which you experienced the problem earlier. Check if the error occurs at launch or during gameplay. If nothing came up, then you know that you have successfully resolved the issue associated with the DirectX device creation failed error on your PC.
Roll back your GPU driver:
The operation you are going to execute here restores your driver software to an older version. Sometimes the Failed to create DirectX device error message comes up because the new device driver has unresolved bugs or it is just incompatible with your system. The Rollback feature in Windows becomes very handy here.
Follow these instructions:
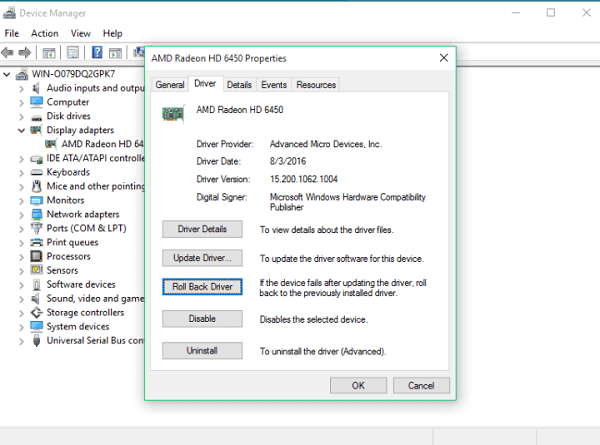
- Launch the Run app. Press (and hold) the Windows button on your keyboard, then tap the letter R key to open the program. Input devmgmt.msc into the text box present and hit the Enter key or click on the OK button to run this code. A Device Manager window should come up now to prove that your action was successful.
If for some strange reason the above method failed to work for you, you can open the required app with a more direct approach. Press (and hold) the Windows button on your keyboard and tap the letter X to see a list of programs, which include Device Manager. Right-clicking on the Windows Start icon always present on your desktop screen does the trick too
- After the program window opens, you should see the full list of device drivers available on your PC. Look for Display Adapters. Once you have found it, you must double-click on it to expand its menu. Now you should see your Graphics card drivers.
If you have a dedicated GPU, then you should see more than one item on that list. Otherwise, only the Intel graphics card driver will be present
- Double-click on the driver. The Properties window for the item should come up now. Navigate to the Driver tab and click on the Roll back driver button to restore the old driver

If you noticed that the Roll back driver button is greyed out (or you are unable to click on it with the effect you are used to), then either you are still using the old version of the driver or Windows cannot find the required software. You should move to the next fix (it involves the updating of drivers).
- A small dialog box requesting confirmation for your action should come up. Click on Yes (or OK) to continue. Follow the displayed instructions (if any) to finish the operation
- Now it is time you restarted your computer to let the new changes take effect. After the reboot, once your system comes on and settles down, open the game or program you struggled with due to the error and see how things go this time
Upgrade your graphics card drivers:
We earlier established that missing, corrupted or outdated graphics drivers can cause the DirectX device creation failed (or Failed to create DirectX device) error message to show up. An upgrade of the drivers involved is enough to solve the problem in the vast majority of scenarios, and we will guide you through the process.
You should skip the manual method below of updating drivers since it is riskier than the automatic procedure and it demands more time and effort. After all, it consists of long and numerous operations that a user must carry out in contrast to the quicker method, which involves the use of a unique program.
Therefore, we advise that you download and run Auslogics Driver Updater at once. This excellent program will perform all the operations that you otherwise would have been required to complete on your own had you preferred to go with the manual way of updating device drivers.
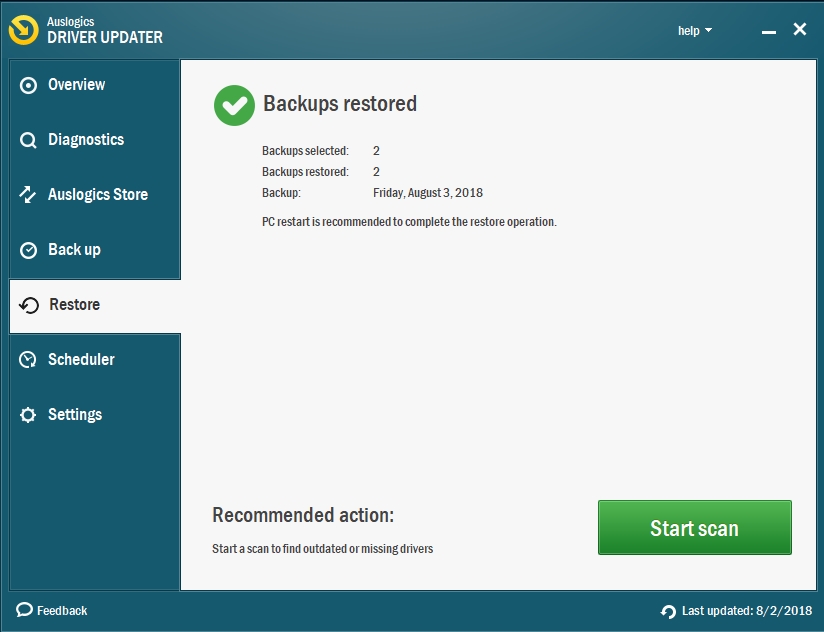
The recommended app will scan your PC to identify the driver problems, which range from missing to outdated drivers or even corrupted driver software. It will show you a report on the issues it found so that you can go through them.
There on, you can use the available option there (usually in the form of a button you can click) to update the drivers to their latest manufacturer-recommended versions or the iterations your system needs to function well. From the description of the process, the amount of time and effort you get to save becomes incredibly apparent.
After you finish downloading and installing the required software, you must restart your system for obvious reasons. Windows would probably prompt you to do so on its own. Now you must return to the activity you were involved with earlier before the error interrupted your work. See if anything changes.
Nevertheless, we have provided the instructions on using the more laborious method because it is inevitable that there will be users who end up choosing a different path:
- First, you must identify the affected drivers or the software that requires an upgrade. Open the Device Manager program. We provided instructions on doing this earlier. After the program window opens, go through the items you can see there. You should find Display Adapter on the list, expand its menu to make your drivers visible
- Expand the menu or window for each of the drivers there. Take note of the date or time Windows installed them on your PC. Check for any recorded issues or problems with them, and so on.
Some users might need to uninstall their drivers first in a different way before they can install the versions required. If you are not one of them, you can skip the short section below and move on the instructions for the search. Otherwise, you must go through these steps:
- Press (and hold) the Windows button on your keyboard, then hit the letter R to launch the Run app. After the small program window comes up, input the following code and press the Enter key to execute it: appwiz.cpl
- You should see the Add or Remove window in the Programs and Features app menu now. Locate your GPU drivers from the list of installed programs. Select it and click on the Uninstall button to get rid of it. Follow the instructions that come up to complete the process
- After the successful uninstallation of the driver, you are now free to move on the next operation
You must search for the updated versions of the drivers online. They could be anywhere.
- Your PC manufacturer webpage is an excellent place to start your search. Open your web browser and use the details about the drivers you obtained from the Device Manager program to narrow down your search operation. Whatever you do, ensure you download the correct drivers from reputable sources. Download the latest stable build of every driver.
- You surely would want to avoid installing the wrong software that can cause even worse problems. You would also hate to infect your system with viruses or malicious items. If you are unsure of the authenticity of anything or you do not trust its source, do not download it. It is not worth the risk
- If you see the WHQL (abbreviation for Windows Hardware Quality Labs testing) icon beside the driver’s name or in its description, then that driver is a durable build. Microsoft gives a program this standard detail after its engineers have extensively tested the software and certified it to be safe to use or stable in its operations.
- Beta drivers often promise performance improvements or optimizations but sometimes cause a lot of trouble because Microsoft has not certified them since the GPU maker has not done enough work on them. Download only WHQL certified drivers since you will not have any problem with them
- After you have finished downloading the required files, click or double-click on them (one at a time if they are numerous). Windows should run them and guide you through their installation. Follow any on-screen instruction that you see to ensure the success of this operation. Ensure that you install the latest version for every one of the outdated or missing drivers
- If you have completed the installation of all the needed software, then it is time you restarted your PC to let the new drivers start working so that the changes will take effect. After the reboot, your system should come on and settle down. Now you are free to run your game or program and see if your problem is no more.
Reboot your system and solve the issue with Windows updates:
In the vast majority of scenarios where the DirectX device creation failed error had something to do with Windows updates, we found out that that the problem came up after users attempted to download or install a specific update. Therefore, the first thing you must do is to check and ensure that you have no Windows updates that are pending currently.
Follow these instructions:
- Open the Windows update program menu and go through the information about its operations there. You can open the required app by pressing the Windows button on your keyboard or clicking on the Windows start icon, searching for update in the text box present, and finally clicking on the program in the list of results
- If you notice that you have a pending update, then a reboot of your PC might be all you need to fix the issue. Close all your open program windows and restart your computer. This procedure will also work for users who have not rebooted their systems in a long while.
We understand that some people prefer to use the Sleep or Hibernate option instead of the Shutdown procedure for reasons best understood by them. Those people must know that, in theory, the Windows operating system fails to refresh itself correctly due to their actions
- Your system should shut down as expected. Windows should start working on the updates. You might see messages indicating the progress of the operation and so on. Be patient.
- Whatever you did, after your system comes on, you must confirm that the problem has disappeared. Otherwise, you must open the Windows update program as you did earlier and check if there are still unresolved issues. To be fair, there is a good chance that you might not see an ongoing or pending update (even if there is supposed to be one) and you cannot do much about this.
However, what you can do is to ensure that your internet connection is up and working fine (Windows might still be downloading updates) and try to restart your PC numerous times until you get the breakthrough. If you feel you have executed enough reboots, but nothing has changed, then you must move on the next fix.
Try to resolve software conflicts:
Since we know nothing about the apps you have installed on your PC that might be causing the error, the descriptions we provide here might appear to be vague. To simplify things, we will use the conflicts that occur between the Windows Media Center and another app or game as our base case or reference point.
The Windows Media Center belongs to the exclusive class of startup program on a good number of Windows operating system versions. Its work is not supposed to inconvenience users, but sometimes we have observed that it causes problems with applications that use the same DLL files it employs.
For example, if a user tries to open a built-in game while the Windows Media Center program is running (or minimized), the Failed to create Directx device error message might pop up. To be honest, most experts still do not fully understand the intricacies of this issue, and there is a good chance that our description of the problem is poor in absolute terms.
However, the mysteries surrounding the problem are not enough to deter us from trying to troubleshoot it or proffering a solution. If you are getting the error whenever you try to open an app or while you are playing a game, check if the Windows Media Center app is running. Close it correctly. Avoid minimizing it. Now return to your program and see if the issue persists.
If the error fails to come up, then you know the reason it came up in the first place. Now you would have to remember to close the Windows Media Center program anytime you want to use the affected app or play the game.
Can you recall when we stated earlier that the Windows Media is not exactly at fault? Yes, we meant that this program might struggle to work well due to the operations of other apps. The solution to the software conflict in this scenario is based on the same principle we applied earlier, but this time the fix is in a reversed format.
That is, if you get the error while you are using the Windows Media Center app, then you must correctly terminate any built-in game or app that shares the same file if you want to resolve the conflict in this scenario.
Use the knowledge you have acquired here to resolve all software conflicts on your system wherever they might be. If you did everything required here, but nothing changed for you, then software conflicts are probably not to blame for your headache. Move on to other fixes.
Transfer specific files to another directory:
Some users reported that they had been able to solve the software conflict involving DLL files through this method. Here, you are going to move the data for the affected game to another location or a new place (usually a folder that is far away enough from the paths in view). After this operation, Windows will find it incredibly difficult to trigger the events that cause the DirectX device creation failed error.
Follow these instructions to move the files to another directory:
- Open the File Explorer program. Its icon is usually on the taskbar on your regular desktop screen. Click on it. After the program window opens, navigate to your default system drive or storage location (usually C)
- Now you must create a new folder that does not fall into the protected paths. You are free to give this fresh folder any name you want but ensure that its way (or the road involving the directories) is different from that of the protected games
- Navigate through the following folders: C: / Program Files / Microsoft Games
Remember that the Program Files location differs from Program Files (x86), so avoid going through the wrong path.
- Copy all the folders and files you see in your current destination by highlighting all of the items there, right-clicking on them and selecting Copy from the list of options that come up
- Navigate to the folder you created earlier, and there, you must paste the items that you copied recently. Take note of the apps or programs on the list you copied. You can get rid of any of them you hardly use.
- Now try to open your game by clicking or double-clicking on its executable file (the items in your newly created folder). The executable file usually ends with .exe.
You can even create a new shortcut of the game or program on your desktop screen if you find it inconvenient to go to the newly created file each time you want to run the program. Right-click on the app executable file and from the list of options that come up, select Send to, and you will see a short menu. Click on Desktop (create shortcut)
If the above fix failed to work for you, then there is only one procedure left for you to attempt.
Turn off the game features and re-enable them from the Windows features menu:
From the information we gathered through research on the internet, there is an effective way of resolving the software glitch that causes the problem. The operations here form the last fix on how to fix DirectX device creation failed in this guide.
If you are yet to figure out what you are going to do here from the fix description, then we will have to spell it out for you. Here, you are going to turn off game features, reboot your system, and turn back on the items you disabled earlier. This series of operations forces a new initialization of the components Windows need to run the game, and in the process, your problem disappears.
Follow these instructions:
- Press (and hold) the Windows button on your keyboard, then hit the letter R to launch the Run app. By now, you should be familiar with this procedure. After the small program window comes up, you should see a text box. There, you must type in the following code and run it by tapping the Enter key or clicking on the OK button: appwiz.cpl
- After the Program and Features window opens, click on the Turn Windows on or off link (on the right pane). You should see a list of items now
- Locate Games and untick the checkbox for it. This action will force Windows to disable all the built-in games on your PC. Click on the OK button to confirm and move on
- A small dialog box should come up to indicate that Windows is making the necessary changes. Be patient as this procedure can take a while. Once it ends, you must reboot your system
- After your computer comes on, you must reverse the operation that you executed not long ago. Perform steps number 1 and 2 again, but this time you must tick the checkbox for Games and click on OK to confirm as usual
- Windows will now carry the operation to re-enable the gaming components you got rid of earlier. This process too might use up considerable time. Windows should show you a message requesting that you restart your PC. Click on Yes (or OK). Otherwise, you must perform the reboot yourself.
- After your system comes on this time, we expect that the Failed to create DirectX device error is no more.