If you saw the Failed to play test tone message, then it is likely that your PC is unable to play sounds. Audio output failure is a disturbing problem as it severely distorts our experiences and affects the operations we carry out on Windows.
The issue can come up in many forms or ways in unexpected situations. If your computer audio device is Conexant Audio, Sound Blaster, IDT, or Realtek Audio, then the primary structure of the message is what is likely to show up. Users have also reported experiencing the problem with USB audio devices, graphics-related audio components (for example, AMD HDMI audio), different sound cards, and so on.
The underlying problem (usually between your hardware and software) is the same in all scenarios. You cannot hear sounds from your PC. The issue is quite common on computers running the latest Microsoft’s operating system (Windows 10), but users with devices on the older iterations of Windows (Windows 8.1, Windows 8, Windows 7) have been talking about it for quite some time.
Pro Tip: It is possible to fix many PC issues by using the PC Repair tool. PC Repair is easy to use and reliable Windows optimization software developed to fix hundreds of system issues.
Special offer. About Outbyte, uninstall instructions, EULA, Privacy Policy.
Cause of the problem
The Failed to play test tone error message is a result of one of the following issues or events:
- Missing, corrupted or outdated audio device drivers
- Invalid or incorrect sound configuration/settings
- Loss or corruption of critical Windows files and entries
Contrary to what many believe, a faulty or defective audio device is a poor choice for the cause of this sound problem. Therefore, almost every fix we can explore to solve this problem would be software-related procedures.
How to solve Failed to play sound test tone problem on Windows?
Since different events or issues can cause the problem to occur, you are required to try multiple solutions to increase the chances of the error becoming eliminated:
Run the built-in Windows audio troubleshooter:
Microsoft has always included troubleshooters for several problems to help users diagnose and sometimes fix the issue if possible. If you cannot play test tone on Windows 10 due to wrong configurations or settings, then running the Windows audio troubleshooter is your best bet for setting the correct parameters to resolve the problem. Follow these instructions:
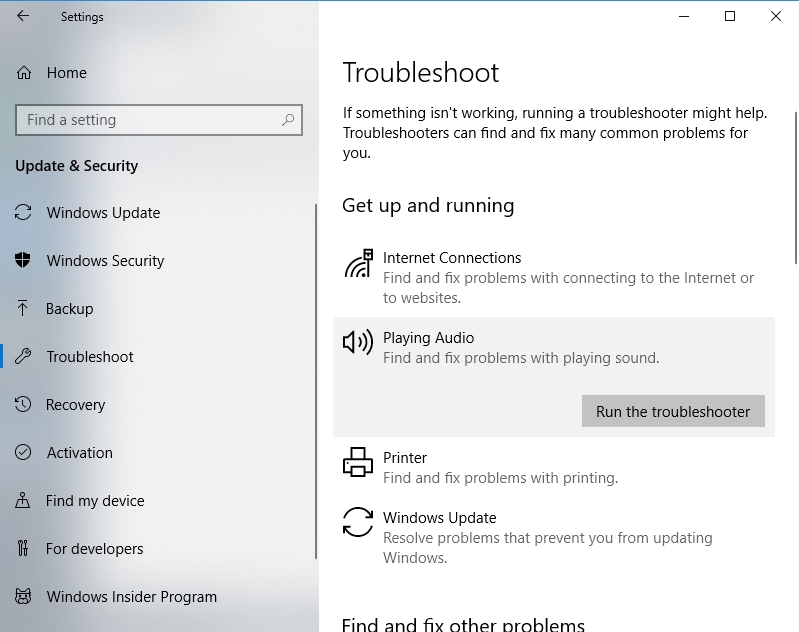
- Press and hold the Windows button on your keyboard, then hit the letter I to launch the Settings app
- After the window opens, go to the Update and Security section. Click on it to open its menu
- Select Troubleshooter from the list of options present on the left pane of the Window. Locate Playing Audio from the list of available troubleshooters on the right. Now click on Run the troubleshooter

- The troubleshooter should start working now. It will try to detect and fix sound problems. Follow the instructions on the screen if necessary. You should see a notification window about the operations carried out by the troubleshooter. If it was successful, it should tell you just that. Otherwise, the problem might remain, and you must continue with the fixes below.
Restart the Windows Audio Service:
The Windows Audio Service enables and the same time governs all audio input or output activities. A restart of this service might be enough to correct audio configuration problems. Here are the instructions you need:
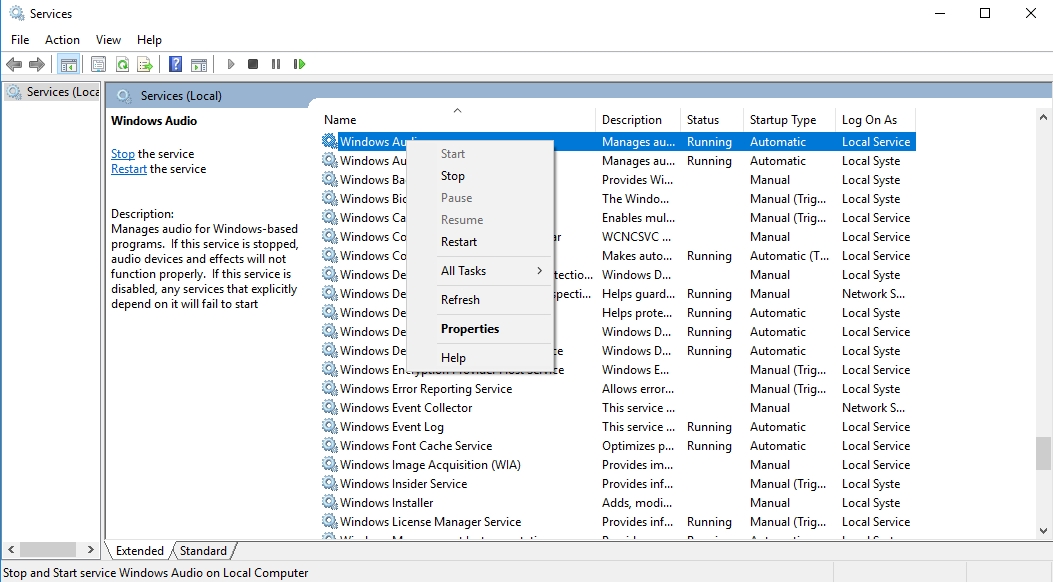
- Open the Run app by pressing and holding the button with the Windows logo on your keyboard, then hitting the letter R key. After the window comes on, input services.msc into the available text box and press the Enter key to run the command
- After the Services window opens, locate Windows Audio on the list. Once you have found this service, right-click on it and select Restart from the small window that popped up.
- The action forces a restart of the Windows Audio Service. Check if this procedure has resolved your problem. Verify that you can now hear sounds from your system.
Fix corrupted critical system files:
Viruses and malware are often the culprits that spring up to our mind when we think of corruption of system files, but several simple operations (some of which you executed yourself) are capable of messing with essential items without your knowledge. Audio devices are casualties sometimes in such scenarios. Thus, sound problems come up.
Follow these instructions to use the System File Check utility to scan for or repair corrupted files and replace them when possible:
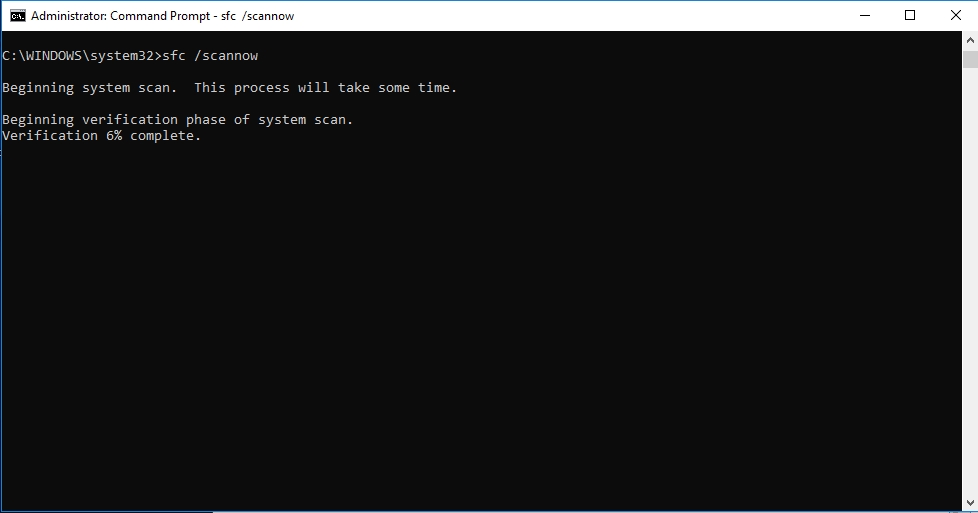
- Right-click on the Windows icon on your desktop screen. Select Command Prompt (Admin) from the list of options and programs that pop up to launch a Command Prompt window with administrative powers
- After the required window loads completely, input the following code and tap the Enter key to run it: sfc / scannow
- Windows might require a lot of time to complete the operation (several minutes in most cases). Be patient and wait until its end. You will see notifications about the status of the process, and once it is done, you should see a message stating that verification is 100% complete. Restart your system and see what changes.
Alter the sample rate:
Some users confirmed that inputting a different value for their sample rate option had fixed their problems. It might also work for you if you tried it out. Here are the instructions you need:
- Locate the Sound icon on the right-hand side of the taskbar on your desktop screen. Right-click on it and select Playback devices. A window should pop up
- After it opens, you should navigate to the Playback tab. Under this section, select your sound card. Click on Properties. Another window (Speaker Properties) should come up
- Now navigate to the Advanced tab. Your sample rate should be set to 16 bit, 44100 Hz by default. Choose a different value like as 16 bit, 48000 Hz for now. If your sample rate was set to a value that differs from the stated default data, then the operation you must carry out is slightly different. You must return your sample rate to its default settings. Click on Restore Defaults button
- Click on Apply and check if this action resolved the problem. If the result was positive, click on OK to enable the changes you have just made become your permanent settings.
Disable Audio Enhancements:
If there is still no audio output on your PC, then it is time you did away with all forms of audio enhancements that might be interfering with the state of your audio device and be the actual cause of your problem. They are of no use to you if you cannot even hear anything. Follow these instructions to disable audio enhancements:
- Quickly open the Sound settings window by right-clicking on the sound icon on the taskbar of your desktop screen and selecting Playback Devices
- Select Speakers, then click on Properties. You should see the Speaker Properties window now
- This time, you must navigate to the Enhancements tab. Tick the checkbox for Disable all enhancements (or Disable all sound effects on systems running specific iterations of Windows)
- Click on the Apply button to see what effect this has had on your problem. If it was successful in fixing your sound problem, click on OK to save the changes you made. Otherwise, move on and try the other fixes.
Remove and restore audio devices driver:
Recall that we earlier identified missing, corrupted or outdated drivers as items that could cause the Failed to play test tone problem. Here, you are going to perform series of operations to rectify the stated issues if they apply in your scenario. Follow these instructions:
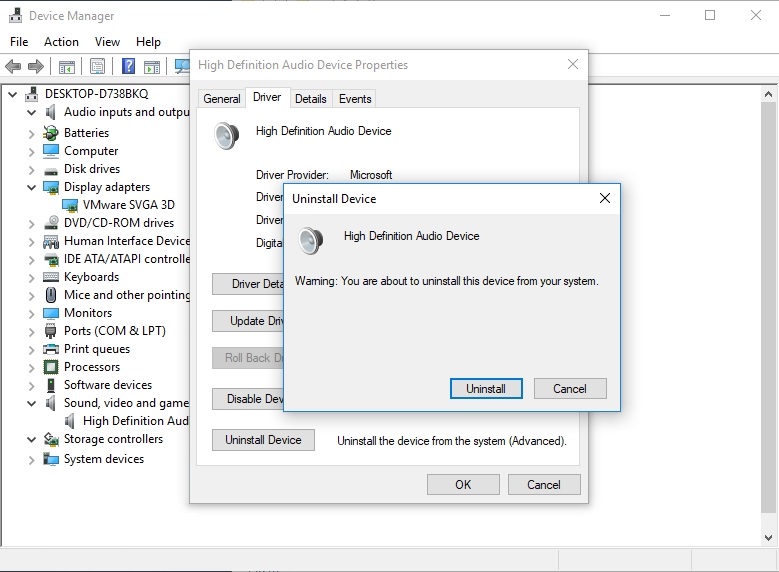
- Right-click on the Windows start icon. Select Device Manager from the list of programs and options that came up
- After the required window opens, navigate to the Sound, video and game controllers section. Click on it to expand its menu. Now you should see the list of audio devices on your system
- Right-click on each audio device there and select Uninstall to remove the driver software. Once you are sure that you have carried out this particular operation for every device there, you are free to exit all open windows and reboot your system.
After your system restarts, Windows should automatically detect that some drivers are missing and it should install the required software as soon as possible. If Windows fails to carry out this operation, or it does it with the procedure failing to have any effect on your problem, then a thorough update of your drivers is what you need.
There are so many audio devices that you would have to upgrade. The procedure of updating all these drivers can be long and tedious as you will need to:
- Identify each driver correctly. You cannot search for something you have no information about it.
- Find every one of them online. Some searches do not go the way you think. If you are lucky, you might find the audio driver on your manufacturer’s homepage. In other scenarios, you would have to dig deep into google search results and download pages
- Locate their ideal replacement. You must find the correct versions of the drivers that are compatible with your system. You certainly do not want new problems that arise after the installation of wrong or incompatible driver software
- Download and install the items you found. Finally, you must restart your system to let the new changes take effect
Alternatively, you can download and run Auslogics Driver Updater to upgrade all your audio drivers (or all your device drivers in fact) in the most efficient and risk-free way possible. This superb program is capable of scanning your computer for all driver issues, detecting even potential problems to identify the missing or outdated drivers, and fetching their manufacturer-recommended versions for you.
When it comes to the updating of drivers, the use of an excellent driver updater program (the one we recommended) is as easy as it gets. The manual method of updating drivers does not deserve your precious time and effort which you can put to better use.
Alter local user and group settings:
A change in specific parameters of local and group settings resolved the error for a good number of users. You too can check it out. Follow these instructions:
- Press and hold the Windows button, then tap the letter R key to open the Run app. After the required window opens, input the following code and hit the Enter key to execute it as usual: lusrmgr.msc
- After the Local Users and Group window launches, click on Groups (one of the items on the left pane). Right-click on Administrators (an option that is located in the right pane) and select Add to group from the list of options on the drop-down menu that popped up. You should now see the list of members in that entry
- Under the General tab, click on the Add button. A new window (Select Users) should come up. In the field under Enter the object names to select, input Local Service. To verify it, click on the Check names button
- If everything goes fine, click on OK. NT Authority/Local Service should now appear on the list of members. Click on Apply to temporary force Windows into a different state with the changes you have just made. Click on OK to make everything permanent. Exit all opened windows
- Finally, restart Windows and check if your audio problems persist.
Disable Exclusive mode:
Some applications run better when given explicit permissions to manage your system’s audio output or input. However, such powers might tamper with the general state and configuration of your sound settings, or its exploitation by poorly developed programs might be harmful to your system’s performance. All these issues can result in audio problems like those that are associated with the Fail to play test tone message.
Here are the instructions on disabling Exclusive mode:
Launch your sound or speaker settings: right-click on the sound icon on the taskbar of your desktop screen and click on Playback Devices
After the required window opens, navigate to the Advanced tab. You should see the Exclusive mode option. Untick the checkbox for Allow applications to take exclusive control of this device to disable the mode
Finally, click on Apply and OK to save the alteration you have just made.
Do away with Audio effects:
Many manufacturers bundle sound devices or their specially designed hardware components with dedicated programs that allow their customers to get more from their PC’s audio. It is all well and good until a user starts experiencing problems due to these performance maximization techniques.
The Failed to play test tone error message on Windows is easily one of the problems brought about by audio effects. You should consider disabling all sound effects regardless of where they apply or how useful they might be.
Open your dedicated audio device app and find the Settings for Effects. You might have to check the advanced menu or unique options sections of the program to see what you are looking for in the software. Disable all effects and reduce the values for similar parameters to the minimum possible.
If the problem sprung up just recently after you downloaded and installed Windows updates, then it is time you understood that those sequence of events did not occur coincidentally. Windows updates might be to blame for your audio issues.
Although Microsoft releases the upgrades with embedded patches to fix bugs and bring about improvements, Windows updates themselves sometimes are home to bugs, or they cause stability problems on individual systems due to incompatibility. You can never be sure that a particular Windows update is not the cause of sound problem until you remove that update and see what happens.
On the other hand, if you have not updated the Windows running on your PC in a while, then your fix might be the reverse operation instead—check for, download and install updates. Restart your PC and see if the error message disturbing you has disappeared.
Disconnect USB devices:
If you are of those getting the error while trying to play audio through devices connected via USB (headphones and speakers, for example), then a disconnection of all other hardware items on your system’s port to eliminate all forms of interference might be an action that ends your nightmare involving no sound.
You should remove all flash drives, gaming pads, and so on. For example, some users solved their problem by removing the Xbox 360 wireless gaming receiver from their PC’s port. The item you need to remove could be different; the idea or principle remains the same.
After you remove the hardware device, restart your PC. After your computer reboots and comes on, check if your audio output is in order once again. If this operation proves successful, then you can consider reconnecting the item you removed or getting an alternative device to prevent similar problems in the future.
Set your audio device as the default option:
If the device you are trying to play your audio with is not set as the default option for specific parameters, then it might lack the necessary permissions or powers to play sound. The Failed to play test tone is a visible manifestation of such events sometimes. If you want to get rid of the error message and put your audio in order, follow these instructions:
- Open your audio device settings. We have provided instructions on doing this a good number of times already
- Under the Playback tab, right-click on the particular audio device in view from the presented list to see some important options. Now click on Set as Default Communication Device
- Right-click on that audio device again but this time select Set as default device. Now your audio hardware should have all the rights or permissions it needs to operate flawlessly, and you might finally stop seeing the message describing the sound failure.
Disable and re-enable the software for your audio device:
You might be able to induce a form of reset or restart of your audio device by temporary disabling its software and then bringing it back to life. These are the steps you must follow to execute the required operations:
- Press and hold the Windows button on your keyboard, then hit the letter X to see a list of useful programs and options. Select Device Manager
- After the required window opens, locate Sound, video and game controllers. Click on this item to expand its menu. You should see your audio device
- Right-click on each audio device and select Disable device from the menu that pops up. A dialog box requesting confirmation for the action should pop up now
- Click on Yes to go on. You should now see a message asking you to restart your PC. Click on Yes to reboot your system
- After your computer comes on, open Device Manager once more. Locate the items that you disabled earlier. Right-click on each driver (one at a time) and select Enable device. Check if this operation solved your audio problems.
For users who might still be struggling with the Failed to play test tone problem after attempting all the fixes above, we have compiled a short list of other things to try in fewer details to keep the length of this guide in check. Go through this list carefully:
Connect your audio device without USB hubs:
USB hubs or similar attachments might be useful items because they help users deal with or manage several tools that need a connection to their system because USB ports are limited in number. However, manufacturers of these items and similar attachments do not optimize them well enough electronically to allow them to operate correctly in some instances.
For example, problems spring up in scenarios where multiple devices (connected via a single hub) share a particular audio device or when they try to use a specific audio function at the same time. Several users confirmed that they had been able to solve their problems by doing away with as many devices as possible.
Some even got rid of the hubs ultimately to allow them to connect their peripherals directly to their PC. Stop employing laptop-docking stations too and see if anything changes.
Perform certain operations on your registry:
First, make a backup of your system registry. Things could go wrong in ways you cannot imagine, and you would not want to be without something to fall back on in such scenarios. Find another Windows computer and check out the registry permissions in that Windows PC for your audio devices. Alter the values in your PC’s registry to match those on the other machine.
You can also do away with the DefaultLaunchPermission entry if it is present in your registry. After performing these operations, restart your PC to adjust your system state for changes that have occurred. You might finally stop seeing the annoying Failed to play test tone message.