Cortana is the virtual assistant available by default on the latest version of Microsoft’s operating system (Windows 10). Its abilities go beyond the regular search function. The virtual assistant can carry out basic PC operations on behalf of the user, perform tasks even on the lock screen, sync settings or configurations across PCs or other Windows devices, and so on.
Therefore, it is not surprising that Microsoft collects a significant amount of data from Cortana. Speech or voice data and user interests, for example, form a good part of the information that Windows sends to some servers for processing. To be fair, the operating system maker claims it uses the data to improve users’ experiences.
Cortana and Bing know your search requests (the queries you make within your PC and the online ones). Since they get exclusive access to this information, they tend to use it to customize their recommendations for you on the Windows operating system environment. The vast majority of this data ends up in your Microsoft account anyway.
Pro Tip: It is possible to fix many PC issues by using the PC Repair tool. PC Repair is easy to use and reliable Windows optimization software developed to fix hundreds of system issues.
Special offer. About Outbyte, uninstall instructions, EULA, Privacy Policy.
In this guide, we are going to explore and go through the kind of information Cortana collects (for example, personal data) and where they are stored. Finally, we are going to show you how to get rid of them immediately if the need ever arises.
If you used the virtual assistant for a reasonable period, you probably signed into your Microsoft account to take advantage of Cortana’s full ability or functionality. In case you are wondering, the reverse procedure (signing out of your account) is not enough to force a complete removal of your data. You will need to do better than that.
Before you begin, we would like to point out that Cortana has some personal options you can set or manipulate to maintain a higher level of control over your privacy. You might want to consider going through some of them to see if you will find any option there that matches your needs or personalization demands.
Things to note
- Well, first things first. You must sign out of Cortana to end all ongoing data collection operations or activities.
- We know that Cortana obtains all its data from events happening on your PC. However, the disk on your system is not the only location where it stores its stuff.
- Cortana also places your information in the cloud (or on your privacy dashboard) for synchronization and other purposes. Sometimes, the saved data also serves as a backup.
- When you signed into Cortana with your Microsoft account, the virtual assistant started collecting data in the following forms: search queries, contact details, events on the calendar, location information, and so on.
- When you sign out of Cortana, Windows will clear all the data Cortana has associated with your device. If you have the same or similar data for Cortana on other devices, they will remain untouched unless you sign out of Cortana on those platforms too.
- If you sign out of Cortana, the personal assistant will stop collecting new stuff and clear the already saved information, but it will not remove the data saved on your Microsoft account.
- Moreover, Windows will continue to send some other forms of data (already inaccessible to use by Cortana) to Bing. For example, the search engine will still see characters you type into the search bar on Windows and will use this information to offer search recommendations to you.
- If you do not want Microsoft to get any information at all, then you must stop using Cortana entirely. Signing out of the service is not enough like we stated earlier.
How to sign out from Cortana
Follow these instructions to sign out of Cortana:
- First, you must ensure that the current account linked to the Settings app is the right one. You would want to be sure that the profile you log out from Cortana is the one you intend to work on at the moment. Open the Settings app by pressing (and holding) the Windows button on your keyboard, then tapping the letter I key
- Go to the Accounts menu and check that everything is in order. Look at the email address listed there or take note of the Microsoft account associated with it. Once you have confirmed the necessary details, you can move on the actual procedure on logging out of Cortana
- Go to the Cortana menu. Navigate to the About me section. You can also get to the required destination by clicking on the Search bar and selecting the Switch to Notebook option
- Now you should see your online account there as one of the items on the list. Click on it. Something should pop up
- Now you must click on your account on the pop window once more to use the Remove option. Now you can sign out.
Once you have logged out your account from the virtual assistant, you have free reign to get rid of data as you like.
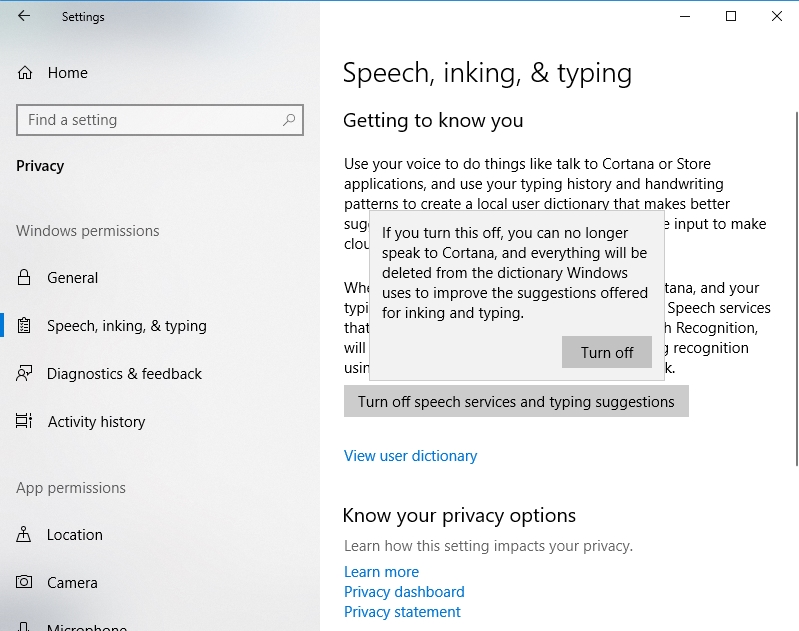
How to turn off speech services and typing suggestions
Usually, when these services are on, users can use their voice to talk to Cortana or Apps they got from the Windows store. Windows also collects data or details from your typing history and uses them alongside the patterns of your handwriting to create a customized dictionary, which is capable of making excellent suggestions for you.
Similarly, Microsoft improves cloud-based services to function more effectively for you after it analyses your voice input.
This operation involved here will force Windows to clear your dictionary and related data for inking and data. Note that when you turn off the service, you will be unable to use voice input with Cortana. If there is any consolation, speech services that have nothing to do with data stored on the cloud should still work albeit a lot poorer than before.
The suggestions you see when you type should still appear, and your system dictionary should continue to function normally, but they will be worse off.
Follow these instructions to carry out the required operation:
- Press the Windows button on your keyboard or click on the Windows Start icon on your desktop screen to see a list of programs and options. Click on Settings to open it.
You can also open the required program by pressing (and holding) the Windows button, then tapping the letter I key
- After the program window comes up, click on Privacy or its icon. Select the Speech, inking, & typing menu on the left side
- Check the right pane. You should see the Turn off speech services and typing suggestions button. Click on it
- A small window or dialog box requesting confirmation for your action should come up now. Do the necessary (click on Turn off) and move on. You are free to close the Settings window now
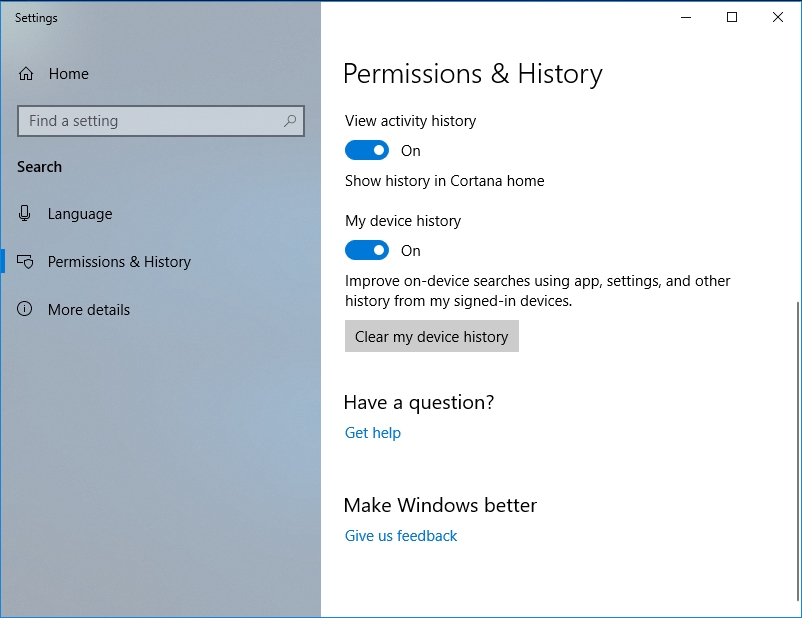
How to clear Cortana data stored on your PC
Now you are free to get rid of the files and other stuff Cortana saved on your PC. Here are the instructions you need:
- Open the Settings app. We provided instructions on various methods of doing this earlier, and we think this is the fastest way: Press (and hold) the Windows button on your keyboard, then hit the letter I key
- Click on Cortana, which is one of the options or items available. On the next screen, you must click on Permissions and History

- Now on your current screen, under My Device History, you should see the Clear my device history button. Click on it to remove the stated data
How to remove personal data on the cloud saved by Cortana
Once you have successfully deleted the data that Cortana saved on your PC (or Windows device), then it is time you got rid of the information or related items that the assistant saved on the cloud. Surely, you would want to do this to ensure that your Microsoft does not use your data in ways you do not endorse. You would also want to reduce the risk of your stuff falling into the wrong hands (third-party firms mostly).
The data in view here covers almost everything that Cortana knows about you. We are talking about your plans, interests, favorites, and much more. After all, the personal assistant is capable of accessing or working on the following items: calendar, contacts, location history or places you have been to, browsing history or habits, and so on.
Well, to the fair, Cortana needs access to these things to be able to provide useful recommendations. Therefore, if you get rid of the stored data, you are going to hamper your personal assistant’s ability to recommend stuff to you severely. Cortana will also struggle to personalize your experience when you are using the speech or typing service.
Here are the instructions if you want to continue:
- Open the Settings app as you have done a good number of times already. After the window loads on, navigate to the Cortana menu by clicking on Cortana or its icon
- Click on Permissions and History. You should see many options and settings that form the basis of how Cortana works for you or how it handles your request, data, and so on
- Now you must go into Privacy Portal where Cortana has been storing your data online. You should see a link with these words: Change what Cortana knows about me in the cloud on the right. Click on it
- Windows will now direct you to your destination by opening a new screen in Cortana’s box. The Clear button should be at the bottom of the page. Scroll down if need be to click on it. A message stating that your recommendations are now cleared should come up to confirm the success of your action if everything went well
- Exit Cortana Settings menu
How to remove your personal information from Cortana and other Microsoft services
We made this procedure the last on the list to help you round up and ensure that no stone is left unturned. We recommend that you go a step further in performing operations along the same lines as the ones above:
- Open your web browser. After the program window comes up, perform a search on Google for the following keywords in the text box present: Bing personalization
- From the search results you see, click on the first item (usually a link to a place on Bing’s servers) on the list. Now you should see your Microsoft account. If you have not logged in already with your profile there, the page will ask you to enter your details to sign in. Do the necessary and move on
- After you have entered with your Microsoft account, you should see the Account navigation bar. There, you must select Privacy. Now you should see a list of items that make up your data or the personal information accessible by Microsoft products and services (Cortana, for example)
Here, you can quickly clear your browsing history since other Microsoft products or applications can use the details about the web pages you surf or your browsing habits
- Similarly, since Bing is a search engine that handles your requests and Cortana gets updates on these details, you can clear the data they have on you, so your information remains inaccessible to others. To do this, you must click on the View and clear search history button
- You can also remove information about your movements and positions by clicking on the View and clear location button. The data involved here probably belongs to the class of the most sensitive details for most users, and it is easy to see why
- You can also work on Cortana here. After all, you sought to get rid of the data the personal assistant has on you. If you have not done what you needed to do already, you will be glad to know that you can use the Edit data option to control what kind of details Cortana gets access to, or you can choose to remove specific parts of the saved data.
This operation is the last procedure involved in getting rid of the data Cortana has or had on you (those things that it saved for you or obtained access to). Note that if you ever sign in to Cortana—well, you could change your mind in the future or you might do it unintentionally—the assistant will immediately resume its data collection activities automatically.
Meanwhile, if your privacy is this much important to you, we expect that you would care a lot more about your security. Therefore, we recommend that you download and install Auslogics Anti-Malware to create that extra layer of protection if you desire an improvement on your current security setup.
Even if you are running an antivirus already as your primary defense program, you do not have to worry about interferences or software conflicts between two programs recruited to do the same or a similar job. Auslogics Anti-malware is very much capable of working in tandem with the vast majority of antivirus brands to keep you as safe as possible.