All operating systems we know of require a file system to coordinate the storage of data and the accessibility of items from its base disk. Windows is no exception to this rule. Understandably, Microsoft has used NTFS as the primary file system for its OS since the launch of Windows XP and Windows NT 3.1 (for Windows-based servers).
Recently, the operating system maker introduced its new file system (ReFS) on Windows server 2012 and not so long ago included it on the latest version of its operating system (Windows 10), and it is easy to see why. NTFS is already old or maybe we can say it is past it. These days there are far too many limitations to the work it can do, and there are challenges we dare not bring to its door. ReFS comes in nicely here.
As of now, ReFS is available for users to employ as a part of the Storage Space feature (specifically, drive-pooling). We expect Microsoft to include significant improvements to the file system by the time it releases it on Windows server 2016. The setup should also be available on the professional version of its latest operating system (Windows 10) for workstations.
Pro Tip: It is possible to fix many PC issues by using the PC Repair tool. PC Repair is easy to use and reliable Windows optimization software developed to fix hundreds of system issues.
Special offer. About Outbyte, uninstall instructions, EULA, Privacy Policy.
What are the differences between FAT32 NTFS, and ReFS file systems?
Since a file system usually consists of a set of rules or guidelines which determine how data is stored and how it is accessed, it is only logical that several forms or types exist. Nevertheless, we will talk about only 3 file systems from the lot: FAT32, NTFS, and ReFS.
FAT is an acronym for File Allocation Table. Microsoft initially introduced it as far back as 1977, but we came to see subsequent advancements in the form of FAT12, FAT16, and FAT32 (widely used today).NTFS is an acronym for New Technology File System and came into use in 1993. ReFS is the latest.
The major difference between the file systems described lies in their abilities or features. We mean their compatibility, pros, cons, and usage.
What is ReFS?
ReFS is an abbreviation for Resilient File System. Its development involved the use of code from the file system Windows employs currently. We wished we could say it is a replacement for NTFS, but at the moment it is not. To be fair, work on it is still ongoing.
You get some advantages when you go with this new file system, but some downsides tag along too. Nevertheless, there is no option you can select to use ReFS outrightly on your system drive as of now. Think of ReFS as the new kid on the block with whom you are not allowed to play some games yet.
Microsoft designed it to address some major challenges associated with the use of NTFS. From its name or description (ReFS or Resilient File System), it is supposed to be more resilient against the corruption that affects stored data. Its setup should also enable it to perform better for specific workloads. Also, when you are dealing with large file systems, ReFS should scale considerably better. We will go into these things in details soon enough.
What do we mean when we say that ReFS is more resilient against data corruption? How does the new file system achieve the improvement in this crucial area?
There is a reason this keyword “resilient” is in the name of the new file system. It earned its place. ReFS has a built-in way of checking for data corruption on the go. It uses checksum for metadata, and you can always set the option for it to use checksum for file data if you want this. With this setup, whenever it reads a file, the file system examines the available checksum to ensure its correctness or accuracy.
ReFS works in tandem with the Storage Spaces Feature. By this we mean that if you use ReFS to create a mirrored storage, your system becomes capable of detecting file system corruption. Windows will also repair problems automatically where possible. It does this by copying the alternate or reserve copy of the data to another drive. You can take advantage of this functionality if your PC is running Windows 10 or 8.1.
In cases where the Resilient File System detects corrupted data but lacks an alternate or reserve copy to achieve restoration, it will get rid of the data affected by corruption immediately. This operation is in stark contrast to what NTFS (the old file system) does when it identifies corruption. You do not have to restart your system anymore. The times you had to take the affected drive offline are long gone too.
Moreover, ReFS does more than ordinary corruption-checking operations on files when it is reading or writing them. It goes a step further in its actions by using an integrity scanner (usually an automated one) to scan through all the files passing through it. This way, it quickly identifies and fixes data corruption sometimes without you knowing anything about it.
If you are used to running multiple checks for corruption in your data, using the Check Disk tool or command (CHKDSK), then this new file system might make your life a lot easier. Furthermore, you will surely take joy in hearing that the ReFS is even more resistant to data corruption through other reliable means.
Consider a scenario where power goes off when you are trying to change the name for an item (or update any other file’s metadata). There is a high possibility that the data involved becomes corrupted because the NTFS file system does it work through the modification of the file’s metadata directly.
Things are considerably different when Windows uses ReFS. Here, the file system performs an update of a file’s metadata through the creation of a new copy of the metadata involved. ReSF will not point the file towards the new metadata if Windows has not yet finished making the new stuff. Therefore, there is no chance that the data involved becomes corrupted.
The procedure employed by ReFS that we described above is referred to as “copy-on-write”. Other file systems (especially the ones developers came up with in modern times) also make use of it.
Some improvements you need to know about
Because ReFS is newer than NTFS, it easily supports complications in terms of larger volumes and lengthier file names. We do not expect most people to see the importance of such abilities now, but in the future, they certainly will understand what we meant by this.
The character limit on the NTFS file system is 255. As you have to expect when dealing with ReFS, the figure here is much higher. You can use up to 32768 characters in the new file system. If we are to be honest, we must say that it is already possible to get rid of the short character limit on Windows 10. Then again, you would not have to disable anything if you were dealing with ReFS volumes. The action or operation is worth something at least.
There is something else. ReFS does away with the old filenames associated with DOS. Meanwhile, you can still access such items on the NTFS file system. If you still need this ability to ensure compatibility with some programs you run on Windows, then you just got a win with NTFS because ReFS is wholly done with such old stuff and it does not look like it is going to give in to the past.
On NTFS, the maximum volume size is 16 Exabyte (the stated value in theory, anyway). ReFS blows this amount away by a considerable margin. Its theoretical maximum volume size is 262144. To be fair, these figures might appear more fanciful than they are supposed to for now, but things will change soon enough.
How much these improvements mean?
ReFS might not outgun NTFS in all performance metrics because Microsoft focused its work on the new file system to bring about essential optimizations or select improvements. Thus, ReFS outperforms NTFS only in special scenarios (not necessarily outliers).
For example, you get real-time optimization when you use Storages Spaces and integrate it with ReFS. Your setup should consist of drives optimized for performance and those tweaked for capacity enhancements.
ReFS maximizes performance by writing data only to the drive best suited for optimal performance. In the same way, the file system transfers large volumes of data to the non-optimized or slower drivers and stores them there in the long term.
With the release of Windows Server 2016, the maker of Windows OS made major improvements to its new file system. These enhancements helped ReSF provide better performance for features associated with virtual reality machines. One element we found to be of interest is block cloning. With this capability, virtual machine cloning gets a considerable increase in speed. Windows will also execute checkpoint merging operations faster than before.
ReFS easily creates clone copies of the virtual machine. Its operations are simple and straightforward because the new file system needs to create a new copy of the metadata on the drive, and after it does this successfully, it will point what it produced to existing data on the drive. This setup only works because various files can lead to the same data saved on a disk if ReFS is the active file system.
We expect that the virtual machine will undergo some changes and get involved in several activities. Therefore, new data will eventually appear on the drive. Windows typically writes the fresh stuff to a location that differs from the original one while the initial data for the virtual machine remains untouched on the drive. It should be plain easy for you to see how this sequence of events fastens up the cloning process. You might also notice that the operations here require fewer system resources (usually output involving your disk).
The Sparse VDL is a new feature that enables quick writing of zeros to large file size. Microsoft has included it on ReFS. Now the operations you need to execute to create a fresh, empty fixed sized hard disks would run considerably faster. We expect that the required time will be about 10 seconds on the new file system, but users usually have to wait for up to 10 minutes to do the same task on NTFS.
How to use ReFS?
If you have a system running the latest version of Windows (Windows 10) in an excellent state, then you could try out the Storage Space feature to engage with ReFS. Note that you will have to format your storage space using the new file system (ReFS and not NTFS). You can perform the required operation on the screen where the System file option appears.
After all, if you go with ReFS, your system or Windows will take advantage of the data integrity functionality or security features available in the new file system.
If you use Windows Server instead, then you could format some disk volumes based on the new file system, using the regular disk management tools. This setup will undoubtedly prove useful if you have placed some virtual machines on the drives involved. People with computers running Windows 10 Pro for workstations and Windows 10 Enterprise can also catch on the fun because Microsoft has made ReFS functionality or its features available on those platforms too.
Create the virtual drives needed
If you are running Windows 10, you can follow these instructions to create a virtual drive:
- Press (and hold) the Windows button on your keyboard to see a list of items and programs. You could also bring up the Power User menu by right-clicking on the Windows Start icon always present on your desktop screen. Whichever method you go with, select Disk Management to launch the required app
- After the program window shows up, click on Action. Select VHDX from the short menu list that appears. Now you have to find or select a location where you want to store the stuff you asked Windows to create. Click on the Browse button to continue
- Once you have found your desired place, choose the name you want to use for the drive. Now you must click on the Save button
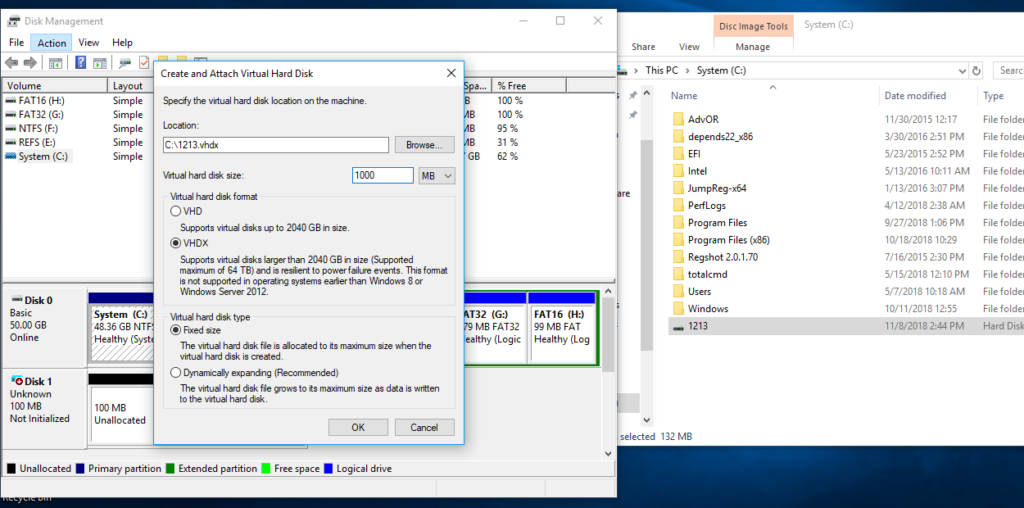
- Now you need to set the size limit for the drive (how big you want it to be). 5GB, for example. Tick the radio button for VHDX to use it
- Go with the Fixed size (recommended option) since at this stage we do not expect you to know much about the others. Click on OK to complete the operation
Now you must create the second virtual hard drive for obvious reasons. After you do this, you will find out that Windows lists the new drives as Unknown and not Initialized. To round off the operations for the two new drives, you must continue with the following instructions:
- Right-click on the Disk tile you see. From the short list of options that appear, select Initialize Disk. This action forces Windows to show you a list of disks you can initialize. After you finish going through them, you must ensure that both drives are selected from the outline you saw. Click on the OK button to continue
Windows will do as you ask to initialize the stated drives. Your system should now present them to you as Online. Having achieved success with this operation, you are now free to move on to create a storage piece using the new file system in view (ReFS).
Work on Storage Space
After all, Storage Space is a feature which allows you to group multiple drives to form what can be referred to as a Storage Pool. Its abilities are based on the technology of virtualization. You can then use the newly created Storage Pool to create a new form of storage using ReFS.
Since you have linked the drives we need to work on together, half of our job is done already. Now we have to use Storage Space to create new storage using the new file system. Go through these steps:
- Press the Windows button on your keyboard or click on the Windows Start icon always present on your desktop screen. Input the following keywords into the text box present to perform a quick search:Storage Spaces
Click on the result (usually the first item on the list) to open the program we need
- After the Storage Spaces menu in a Control Panel program window shows up, click on the Create a new pool and storage space link. Now you must tick the checkboxes for the two drives on which you intend to use the new file system (ReSF)
- After you select the right items for use, click on the Create button to move on. Windows should now show you the newly created storage space. There, you must input a new name for the new drive. You are free to use any description you want, but you must make sure that it is something that you can quickly recall or remember
- Now you have to choose a letter for the drive. In the drop-menu for File System, you must select ReFS from the list of available items. Now we move on to the more critical steps and details you must set
- Under the Resiliency menu, you should see Resiliency type. Here, you must choose Two-way mirror to ensure that Windows formats the storage correctly using the new file system.
You might be tempted to go with Simple (no resiliency) or Parity, but we can confidently tell you in advance that either of these selections or options will struggle to go past this process. In fact, even if they somehow managed to scrape through here, in the end, the whole thing is still likely to be a failure.
- For Size (Maximum), we recommend that you go with the default settings (leave anything there as it is). If you want to change it, then ensure that your effort is worth the risk at least; go with something bigger
To be fair, if you ever end up in the state described as low capacity, you will be able to add more storage easily. Thus, you are not going to lose much by going with less space for now.
- Finally, you must click on the Create storage space button to complete the entire operation.
How to check if ReFS is active
You can run a basic test to verify that Windows is making use of ReFS. Follow these instructions at once:
- Open the File Explorer program. Its icon is usually on the taskbar on the desktop on most screens, so you must click on it to launch the app. You could also achieve the same result by pressing (and holding) the Windows button on your keyboard, then tapping the letter E key
- After the program window shows up, you must click or double-click on Open this PC and right-click on the drive you created not long ago. From the list of options that come up, you must select Properties
- After the small Properties window shows, navigate to the General tab (if you are not there already), and look at the value for the File system. If you did everything correctly and things went fine, you should see ReFS there.
How to employ Resilient File System without the use of Storage Spaces:
For users who do not want anything to do with Storage Spaces and all its trouble, we will show you a way of using the new file system independently of the stated utility. Here, you are going to end up using a single (non-mirrored) drive as a Resilient File System drive.
Note that this method takes away some of the resilient abilities of this file system due the way it works, and at the same time, you must know that you cannot boot Windows from the new drive you formatted as ReFS.
Begin you begin, we recommend that you make a backup of all items on your registry in case you make mistakes or if things go wrong due to no fault yours. Follow these instructions to carry out the required operations on the registry:
- You need to open the built-in Windows app users employ for work on their registry (Registry Editor): press (and hold) the Windows button on your keyboard, then tap the letter R key to open the Run app. After the small program window appears, input the following code into the text box present and hit the Enter key to execute it at once:regedit
A small dialog box might come up to seek confirmation for your request. Click on the Yes button there and move on
- After the Registry Editor program window appears, you must navigate through the following keys or items: HKEY_LOCAL_MACHINE \ SYSTEM \ CurrentControlSet \ Control
There, in your current location, you must create a new key. To do this, you have to right-click on the Control leaf and select New key from the short list of options that pop up. You must input the following text as the name of this new key:
MiniNT
- After you have completed the work to create the first key, you must create a new DWORD inside it. You have to right-click on any space void of icons in your current pane and select New Dword from the short menu list that appears. You must input the following code as the name of this key:AllowRefsFormatOverNonmirrorVolume
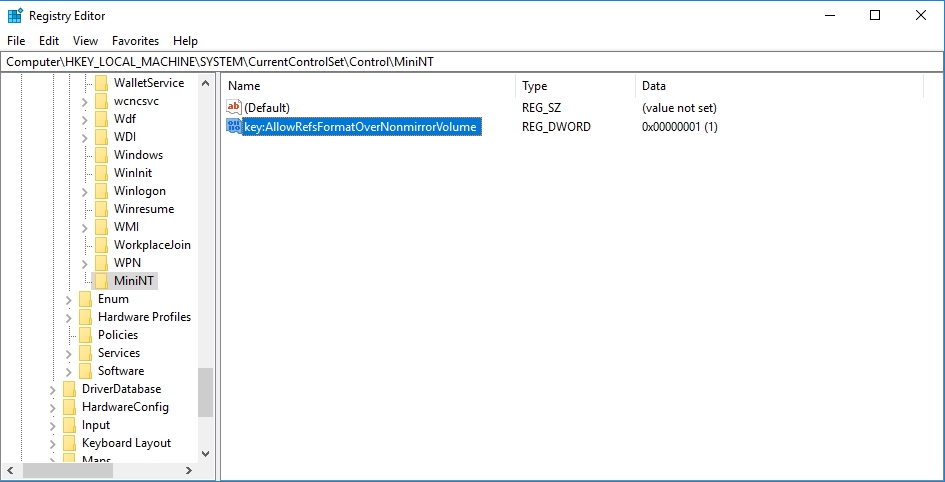
You must give that new item a value of 1
- Now it is time you restarted your PC to let the new changes take effect.
After your computer reboots and Windows settles down, you are free to format a drive, using GUI. You could also carry out the same operations by running codes on an elevated Command Prompt window.
Note that if you use GUI to get the job done, your integrity streams will end up being disabled because mirrored drives are not involved. On the other hand, if you go with working on the Command Prompt option, you will need to format the location as a Resilient File System drive, using the /fs:refs flag. Similarly, you can use /i:enable to enable integrity streams for data
- When Window has finished formatting your drive, you must open the Registry Editor program (we provided instructions on doing this earlier). There, you remove the MiniNT entry or item you created earlier. Reboot your system once you have done this.
Some components on Windows might wrongly interpret that MiniNT is running in a pre-installation environment. The occurrence of such an event may result in challenging problems for you, so it was best you ensured that there was no chance of it happening.
Summary of the main points
The new Resilient File System works to achieve these goals:
- Compatibility: Although the compatibility we are referring to is selective, ReFS maintaining support for essential NTFS features is the key talking point here. We expect that more adaptation in varied ways will follow in the future
- Reliability: Besides the term “resilient” being a key attribute in its name, the new file system isolates the source or location of a problem from others when a data corruption event has occurred. It does this to ensure that there is unrestricted access to rest of the volume involved
- Automatic correction and verification of data: In Resilient File System, there is a setup to check and correct data as things. Such operations are easy to execute all the time because fewer data fall prone to corruption in general
- Scalability and resiliency: We discussed attributes like scalability when we expanded on the limits for the new file system. We also demonstrated the extent of its resiliency, which was beyond the older file systems.
Conclusion and verdict
Although we have outlined a good number of areas or aspects of computing where ReFS trumps NTFS, it is essential we inform you that the new file system is a not a direct replacement or substitute for the old one. The switch is not as easy as you think. For example, Microsoft is yet to design Windows to make it boot from a system using ReFS.
Then again, ReFS lacks a good number of capabilities or qualities NTFS possesses, and this fact should count for something too. Data deduplication, hard links, disk quotas, compression and encryption of file systems, extended attributes are some of the features we were talking about which do not have a place on the new file system as of now.
Furthermore, users cannot use any old partition to rebase it as ReFS. Users can take advantage of the new file system only on utilities such as Storage Space where it helps to prevent data corruption through its reliability features and stable setup.
Nevertheless, if you use Windows server 2016, you can use ReFS (if you want) in place of NTFS to format volumes, and this is as good as it gets. We recommend that you use this feature only on volumes where you want to store virtual machines. Unfortunately, Windows will still not let you use ReFS as the base system on your boot volume. Your PC still supports only NTFS drives for booting.
We can only hope that things change soon, but nothing is guaranteed anyway. We do not know what exactly ReFS might evolve into in the future. Microsoft might work hard and make further improvements to the system, but in the same way, ReFS could lose support and might be replaced by something better. We also cannot define the timeline or period in which these events would happen.
As far as we know and from what we have observed in your study, ReFS supports only specific tasks or features. It has not been groomed well enough to act as a standalone file system. Well, we mean at least for now.
If you were looking to improve your system performance by implementing a new file storage system, then you probably have not seen enough to get what you want. Therefore, we recommend that you download and run Auslogics BoostSpeed. This excellent program is capable of executing numerous system optimization procedures to speed or tune your PC.