The Windows 10 operating system is a complex piece of software, and with each update, we get more and more complicated scanning operations implemented on our PCs. There are some built-in tools like Windows Defender that stand to protect your computer from the outer world of malware, but there are also tools like the Driver Verifier. The main reason for this tool to exist is to test your drivers.
You see, the drivers in your system are the lifelines that you need to take care of constantly. If your drivers are out of date or corrupted, this will undoubtedly lead to serious problems with your computer. So, the idea behind the Driver Verifier is to stress test the essential drivers in order to know if something is amiss. It doesn’t prevent any corruption, but it will at least give you a hint by executing the Blue Screen of Death (BSOD). This begs the questions: “Is Windows Driver Verifier useful?” and “How can a user ensure that the tool is working?”
To answer these and other questions connected with the Driver Verifier tool, we suggest reading this article and maybe implementing some of the provided tips. Mostly, of course, Driver Verifier is a tool for developers. There are several quite helpful tests that it can perform:
Pro Tip: It is possible to fix many PC issues by using the PC Repair tool. PC Repair is easy to use and reliable Windows optimization software developed to fix hundreds of system issues.
Special offer. About Outbyte, uninstall instructions, EULA, Privacy Policy.
- Driver Verifier can start memory requests to execute a random fail to check the drivers
- Driver Verifier can also check for memory leaks and security vulnerabilities.
If you are interested in performing some of these tests, you should be advised that they are quite complex, and without proper training, you shouldn’t try to execute them. You should keep in mind that this tool can stress test the software of the driver itself, but it will be quite useless if you try to locate a problem with a hardware component that is failing.
You might still be wondering, however, how to use Driver Verifier in Windows 10
Tip 1. Ask to test unsigned drivers
To check if your system is running correctly, you can run the Driver Verifier and ask if there are any unsigned drivers that you should be aware of. But remember that the modern Windows system by default uses only signed drivers. They are part of the whole package since modern 64-bit versions of Windows need signed drivers to run.
Tip 2. To avoid driver crashes, don’t use Driver Verifier
Some users report that there might not be a good reason to run Driver Verifier. Unless you are developing a driver, of course. The crashes of the system may be caused by the stress test the tool is trying to execute. If the enabled Driver Verifier finds a corrupted driver, however, it will present you with the Blue Screen of Death. In turn, this might mean a great deal of troubleshooting for you without any apparent reason (if the driver is not corrupted and the stress test was inconclusive).
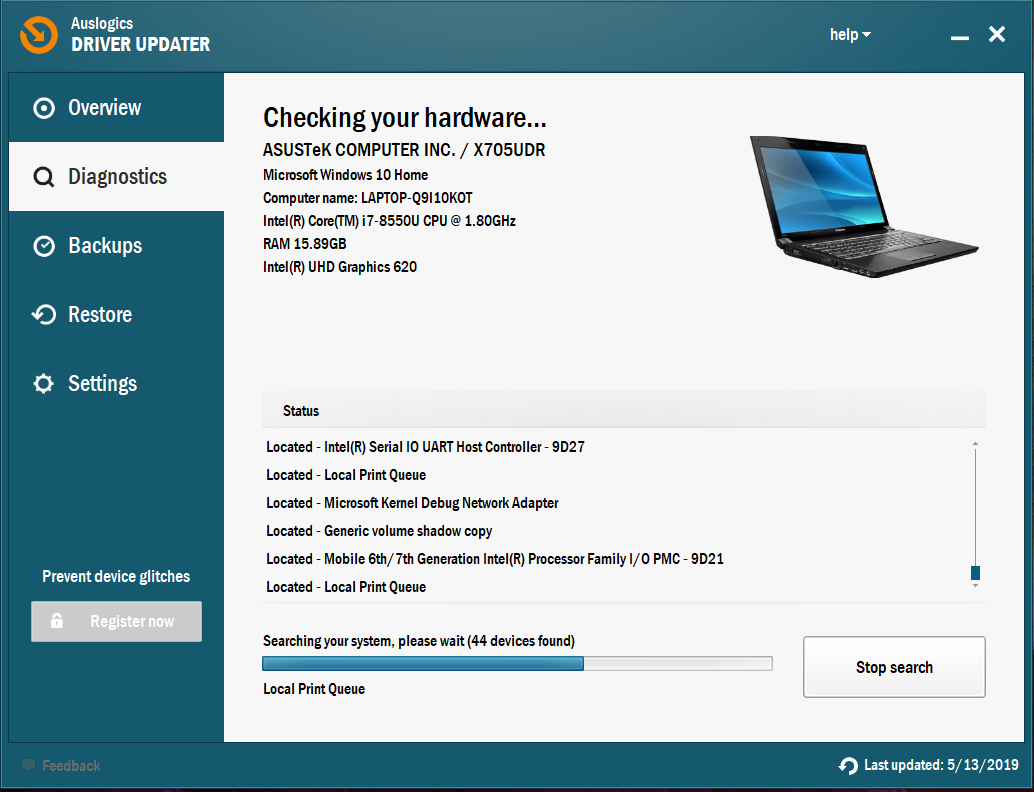
Microsoft developers suggest that you should not run Driver Verifier on a regular computer precisely because they are aware of these issues. To make sure you are still protected from driver failure, we suggest running another tool that doesn’t have quite the same approach to driver management: Auslogics Driver Updater will scan for problems without resorting to stress tests.
If you are stuck with the Driver Verifier that is causing the computer to present the BSOD, you will probably have issues with booting up normally. In this case, you need to restart in Safe Mode and then disable the Driver Verifier.
Here is the instruction on how to disable the Driver Verifier:
- Step 1. Open Command Prompt as an administrator.
- Step 2. Type ‘verifier’ and hit Enter.
- Step 3. When the Driver Verifier window opens, disable the application by selecting “Delete Existing Settings”.
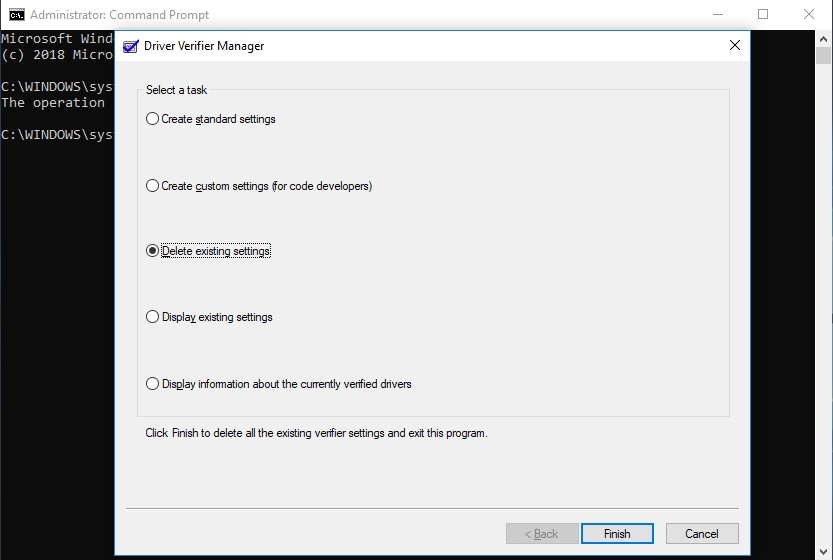
- Step 4. Click Finish and restart your computer.
After this simple manipulation, your computer shouldn’t crash at boot. Be mindful that this tactic might not work, and that’s why you should schedule to save System Restore points in order to have a point where you can return to repair the system.
Tip 3. Then you should maybe run Driver Verifier
As we have stated above, the need to run this tool depends on your own capabilities. But there are some reasonable enough cases when you might need to run it:
for example, if your BSOD is displaying the file name of the driver that is having the issue. This will lead you to troubleshoot the driver that is causing the crash. There are several possible reasons for a system error like this. It could be failing hardware, or malware, or some corrupted files in your registry. But the device driver will show up as the reason, and you should deal with that presently. There are other, potentially less dangerous ways to manage the bad driver situation: starting from updating the driver manually, installing a special tool that will do that for you or removing the hardware device from your PC. All of these methods can prove to be as effective.
However, if your mind is set on running the Driver Verifier, please create a System restore point before you do anything. That way you will have a fallback plan if you experience some serious issues with Driver Verifier.
This is how you can use Driver Verifier:
- Step 1. Open the Start Menu and type ‘verifier’ into the search box.
- Step 2. The results of the search will produce the link to Driver Verifier, open it.
- Step 3. Select “Create standard settings” and hit Next.
- Step 4. If you are an advanced developer, you are free to select “Create custom settings (for code developers).
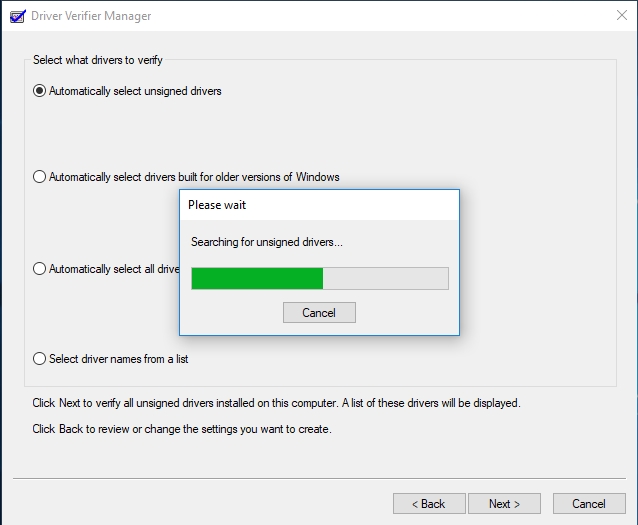
- Step 5. From the presented list, select one of the following:
- “Automatically select unsigned drivers” can check for unsigned drivers.

- “Automatically select drivers built for older versions of Windows” can check for drivers designed for an older version of Windows.
- Choose “Select driver names from a list” to select the driver you know you want to debug.
- “Automatically select all drivers installed on this computer”- this option will stress test all drivers on your PC.
- Step 6. After you have made the selection, click Finish and reboot your computer.
- Step 7. After the reboot, the test will begin in the background. You will know what is happening to the driver shortly after that.
If even after the reboot and test, your computer crashes and displays the Blue Screen of Death, then you know that the driver is corrupted and/or beyond repair. Make sure to disable the Driver Verifier (as shown above in this article) after that and find how to resolve the corrupted driver issue before it takes hold of your computer. Hopefully, this article was instrumental in understanding what Driver Verifier is and how you use it.