Your memory or RAM (no matter its size or build) is hardly ever enough for a wide variety of operations. Many programs require an extraordinary amount of data or considerable active space. The Windows operating system often creates files to help with ongoing tasks on a PC, but the nature of the produced items makes them redundant after the work in view becomes completed.
In theory, Windows or the programs themselves are supposed to delete such files after utilizing them. However, this process sometimes does not go as expected due to inconsistencies in data types and other shortcomings. Thus, the temporary files become junk since they end up taking up valuable space.
The unused items can build up over time and start to slow down your system’s drive and general operations due to their sheer size. The good news is that the removal of temporary files is a relatively harmless process. Furthermore, you would free up considerable storage space, and there might even be a noticeable improvement in the speed of activities on your computer.
Pro Tip: It is possible to fix many PC issues by using the PC Repair tool. PC Repair is easy to use and reliable Windows optimization software developed to fix hundreds of system issues.
Special offer. About Outbyte, uninstall instructions, EULA, Privacy Policy.
The storage section or option contained in the Settings program on Windows 10 is incredibly buggy. To be fair, there are not many areas like this in Windows 10, so this issue often comes as a big surprise. We saw reports from users who cannot even navigate through the Settings app to get to this particular location without experiencing freezes or slowdowns.
So what do you do if you areunable to delete temporary files on Windows 10?
Yes, this event is not rare at all. A good number of users who were tired of the junk on their system tried to clean their PC but could not do it no matter how many times they tried. We cannot precisely say why the temporary files not deleting problem arises, but we are sure that there are practical solutions or workarounds to this issue.
How to fix the problem of temporary files refusing to delete on Windows 10?
We would explore almost every known method of deleting temporary files, especially the manual processes that are more likely to work for everyone regardless of the bugs on their system, their settings or configuration, PC’ specifications, and so on.
Delete the files manually:
You can try going to the place where the Windows operating system stores the junk files and try deleting them there directly. Follow these instructions on how to delete temporary files manually:
- Press and hold the Windows button on your system, then hit the letter R key to launch the Run app. Type temp into the text box and tap the Enter key to run this code (or click on the OK button)
- If a dialog box comes up and requests confirmation, click on the Yes or the Continue button depending on which one of them is available to move on. Whatever you do, if your action was successful, you should be directed to a location on your drive in a File Explorer window
- After the window loads completely, press and hold the CTRL button, then tap the letter A key to highlight all the items contained in the list you are seeing. Click on the Delete option on your screen or tap the Delete button on your keyboard to safely remove the unwanted files
- Now open the Run program once more by following the instructions in the first step of this ongoing operation. This time, input %temp% into the available text box and press the Enter key as usual to run this new code. You should be directed to a location in the File Explorer program once more
- Select (highlight) all the files that you can see by using a combination of the CTRL button and the letter A key. Press the Delete key to get rid of all of them
- Now open the Run app for the last time. You should type prefetch into the text box and click on OK to run the code. Windows would direct you to a specific location using the File Explorer app. Delete the contents of the directory there like you have done so many times by highlighting all the items there and deleting them in one swipe
Note that Windows probably just sent the files that you deleted to the Recycle Bin. You might have to open this Windows storage utility and locate the items you thought you got rid of entirely. Now, you must finish the job by removing them from there. You could even empty the Recycle bin if you do not care about the other items that were there before your action on temporary files.
If you want to delete an item directly (without it going into the Recycle Bin at all), use the SHIFT key alongside the Delete button when you are trying to remove the file.
Remove the files using the Disk Cleanup program:
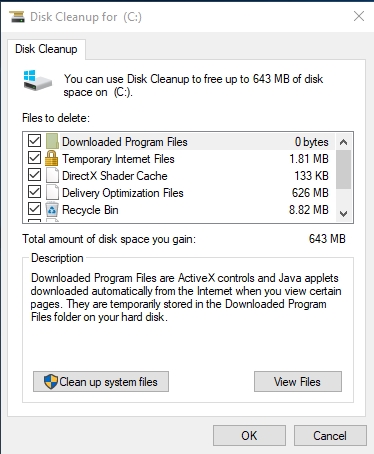
Microsoft has always included a unique utility or application for managing the hard drives on computers. On the more recent versions of its operating system and Windows 10, the Disk Cleanup tool is the app that will help you scan your disk and provide you with information about the temporary files on your computer.
After the Disk Cleanup app completes its analysis of your disk, it would group or classify files into various types and show you the amount of space they are using at the time. Follow these instructions to use this unique program to remove temporary files that Windows failed to delete in the standard way:
- Press and hold the Windows button, then tap the letter S to bring up the search screen. Input Disk into the text box to find the required app. Select Disk Cleanup from the results that show up.
You can also launch the Disk Cleanup app by going through these steps: Open the File Explorer program. Its icon should be on your taskbar on your desktop. Click on it. After the required window opens, click on My PC. Right-click on the C: drive or your default disk and select properties from the list of options that show up. Under the General tab, you should see the Disk Cleanup button. Click on this button to launch the app.
- After the required window launches, select the drive you intend to work on now. It is usually the default location for the installation of Windows (System drive C:). After choosing it, click on OK to move on. The program should start scanning and analyzing the contents of your drive now

- After it has finished executing the necessary operations, you should see a list of different classes or files. Tick the checkboxes for the groups you intend to do away with (in this case, Temporary files at least). You can select other file classes to free up even more space
- Once you are done, click on OK to start the file removal process. Windows should delete the items you selected, and you should see more space on your drive as confirmation that this operation was carried out successfully.
Perform the operations in Command Prompt:
Some users confirmed that were only able to get rid of the junk on their system by running some codes in the Command Prompt window after the regular way of deleting temporary files refused to work for them. You might experience success with the same method. You can never tell until you try it at least. Here are the instructions you need to follow:
- First, you must open an elevated Command Prompt window (the Command Prompt with administrative powers or rights). You can do this by right-clicking on the Windows start icon and selecting Command Prompt (Admin) from the list of programs and options present
- After the window loads as expected, input the following code and press the Enter button on your keyboard to run it: del /q/f/s %TEMP%\*
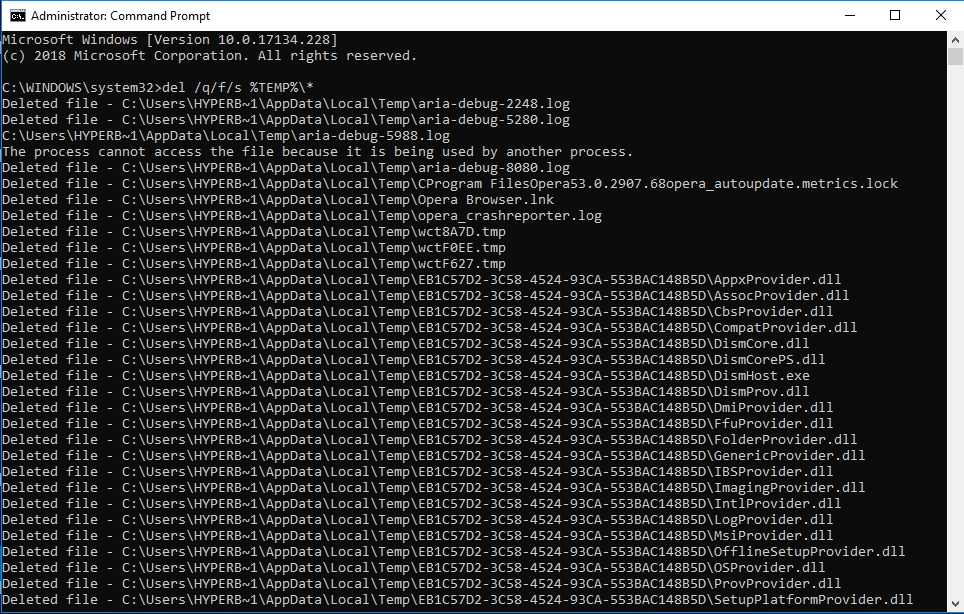
If this operation works as designed, then Windows should delete all your temporary files, and this means that you have quickly bypassed the method with which you were experiencing issues.
Update the Windows on your system:
A good number of users cannot delete their temporary files not because they messed with things on their computer but due to existing bugs on their build of Windows. Blaming Microsoft in such scenarios is fair. Even with all the good that they claim Windows updates provide, the upgrades still come with their bugs. Nevertheless, they try to resolve any identified issue in subsequent releases.
You should try to update your OS and see if you finally can get rid of the unwanted items. This procedure is invaluable regardless of the last time you downloaded and installed the latest Windows updates. Follow these instructions to check for updates immediately:
- Tap the Windows button on your keyboard or click on the Windows start icon at the bottom-left of your computer screen to bring up some programs and options. Click on Settings
- After the required window opens, click on Update and Security. Select Windows updates
- Now click on the Check for updates to force Windows to connect to Microsoft servers and see if there is anything that should be on your system. Download and install the updates if you see any. Otherwise, you should move on if you see the message telling you that you have all the available updates.

Delete a particular directory:
Several reports confirm that Windows struggles to delete temporary files due to the presence of the SoftwareDistribution directory. Windows updates data tends to be in this folder. Given the critical nature of these items, it is not surprising that they can cause so much trouble.
You can quickly get rid of that folder and see if anything changes in your case. This removal process, if carried out the right way, is relatively harmless, so do not worry. Follow these instructions:
- First, ensure that Windows is not in the process of searching for and downloading Windows updates. You should search for updates (using the instructions above) to make sure that this event is not ongoing and would not commence anytime soon. Alternatively, you can stop Windows from updating itself for the time being by following these instructions:
- Right-click on the Windows start icon and select Command Prompt (Admin) to launch a Command Prompt window with administrative permissions
- Input the following lines of code one after the other and press the Enter key after inputting each one of them:
- net stop bits
- net stop wuauserv
You are free to move on to the next step after you have met this condition of Windows not updating itself at the moment.
- Open the Run app as usual by pressing and holding the Windows button on your keyboard, then tapping the letter R key. Input%WINDIR%\SoftwareDistribution\Downloadinto the available text box and hit the Enter key to run the code
- If your computer successfully carried out the operation above, you should see some files in a particular location in the File Explorer program. Highlight all the items in this directory by pressing and holding the CTRL key, then tapping the letter A key
- Press the Delete button to remove the contents of that folder. Do not delete the folder itself
- Reboot your system
You should now be able to delete your temporary files. Attempt the procedure you used earlier or go through the other methods of removing junk in this guide.
Get rid of the files in Safe Mode:
Since the safe mode is a way of starting the Windows operating system with the fewest number of drivers, startup apps, and services possible, there are no conflicts between programs. Also, applications that would probably interfere with your actions are not running. Thus, you can be sure that nothing would hinder you in your quest to get rid of temporary files.
Follow these instructions to boot your system into Safe Mode:
- Click on the Windows start icon. Click on the power button or its icon to see a short menu
- While pressing and holding the SHIFT button on your keyboard, click on Restart from that list of options
- Click on Troubleshoot. Select Advanced options
- Click on Startup Settings. Now click on the Restart button. Windows should shut down now
- After your computer restarts, you should see a screen with a list of options. Press the required key (according to the instructions you can see) to boot into the desired version of Safe Mode.
Once you are in safe mode, you should be able to delete all the temporary files without any problem.
Storage Sense:
After you are done with everything, consider setting up Storage Sense. Microsoft included this feature in the Windows Fall Creator Update to help users delete their temporary files automatically so they would not have to bother about getting rid of them every time as they build up. Follow these instructions:
- Click on the Windows start icon and open the Settings app
- After the program window opens, click on System. Select Storage
- Toggle on the Storage Sense switch
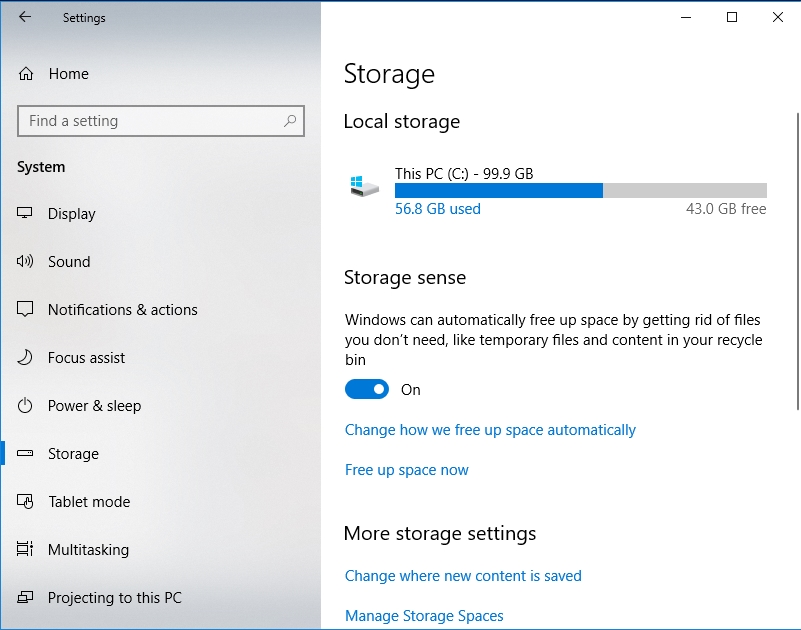
If you carried out the above operation correctly, then Windows should now start automatically removing temporary files for you. It will also permanently get rid of the items that have been in the Recycle bin for more than 30 days.
How to delete Temporary Internet Files on Windows?
Now it is time you understood that the items used by your browsers and similar applications were probably not part of the items you removed. It is easy to deduce this possibility though as there are different types of things that we can group as temporary files. Hence, Windows might not be able to identify all of them correctly or even when it does so, it might still handle them differently due to their diverse nature.
If you are looking to free up as much space as possible or get a boost in disk speed and performance, then you are likely to have made up your mind already about going through with it. However, be warned; removal of some items can end up being counterproductive for you.
Most browsers use the cache to store images, scripts, and other parts of websites because they find it faster to access them from your hard disk than fetching them from the required servers on the internet. This setup helps to speed up your browsing experience. Therefore, if you clear the cache just because you need some space, you might lose some fluidity and speed when surfing the web.
We advise that you delete your browser cache only if it is vital. Of course, it is fair game when you are experiencing problems like websites loading incorrectly or formatting issues. When you clear your cache, your browser would have to fetch the newest copy of any webpage you try to visit. In theory, the application should do this itself automatically, but sometimes it does not, hence, the need to clear the cache.
You would have to delete such temporary files through a manual process yourself. This procedure is the most feasible method we can recommend. We have included a short guide for those who came here to find out how to fix ‘Can’t delete temporary internet files on Windows 10’.
For the most popular browsers, the files are usually in these locations:
- Mozilla Firefox stores data here: C: \ Users \ \ AppData \ Local\Mozilla \ Firefox \ Profiles \ xxx xxx.default \ cache
- You would find the data that Google Chrome uses here: C: \ Users \ \ AppData \Local \ Google \ Chrome \ User Data \ Default \ Cache
- The Opera browser makes use of this directory: C: \ Users \ \ AppData \ Local \ Opera \ Opera \ cache
To avoid unnecessary complications and save time, we recommend that you boot your computer into Safe Mode to get rid of these items. We have provided instructions on doing this in the 6th fix. After you enter Windows using Safe Mode, you can open File Explorer, alter its settings to force it to show you hidden files and folders, navigate to the directories where the data are contained and get rid of them yourself.
Alternatively, you can use the guide below for your browser. You should be able to get to the Clear Data Menu of most modern desktop browsers by pressing (and holding) the CTRL and SHIFT buttons, then hitting the Del button on your keyboard.
Here are required instructions on clearing your browser cache and related data systematically.
For users with Google Chrome as their browser:
- Open Chrome. Right-click on its menu icon located on the right-hand side of the window (the 3 dots that form a vertical line)
- Click on More tools. Select Clear browsing data. Now choose the time range for the items you want to delete. You will see a lot of options to select from and manipulate as you like
- After choosing the timeframe, tick the checkboxes for the items you want to get rid of using Chrome. Cached and Image files, for example in this case
- Click on Clear data to initiate the removal process. Close all your opened browser windows and reopen the application to let the changes take effect
For users with Mozilla Firefox as their browser:
- Open Firefox as usual. Click on the menu icon (the 3 horizontal lines arranged parallel to one another)
- Click on the Privacy and Security option. Go to the section for Cached web content
- Click on Clear now to remove the saved items. Close all your opened browser windows and reopen the application to let the changes take effect
For users with Edge as their browser:
- Open the Edge browser. Click on the hub icon on the right-hand side (the star-like figure that consists of 3 horizontal lines)
- Click on History (its icon is similar in appearance to a clock). Click on Clear all history
- Now select the items you intend to get rid of in this browser. For example, Cached data and files in this case
- Click on the clear button to start the data removal process. You should see a confirmation message that indicates the success of the operation. After this, you should close all your open browser windows and reopen the application to let the changes take effect
For users with Internet Explorer as their browser:
- Open your browser. Click on Tools. Select Safety
- Click on Delete browsing history. Untick the checkbox for Preserve Favorite website data. Select the items you intend to remove for this browser. For example, Temporary Internet files or Temporary Internet files and website files in this case
- Click on delete to let the file removal process commence. You should see a message that confirms the completion of the process. Exit all your open windows to close the browser. Reopen the application.
For users with Opera as their browser:
- Click on the Opera menu and select Settings from the options that you can see
- Click on Privacy and Security. Now click on Clear Browsing data. You should see a dialog box come up
- Under Obliterate the following items, choose your preferred timeframe. Now select the group of things you intend to do away with for this browser. For example, Cached files and images in this scenario
- Click on Clear Browsing data. Close all Opera windows currently in use to exit the application. Open your browser once more
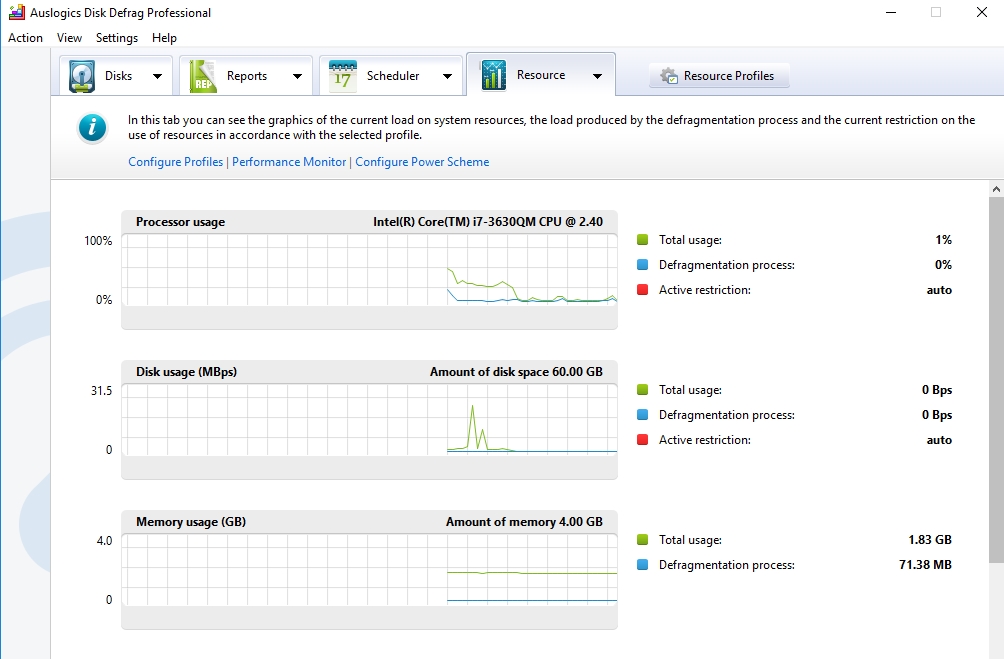
Overall, it is fair to say that most users try to get rid of their temporary files to free up space (which is the most important reason) and maybe even get a speed boost. The latter is much more difficult to achieve if you were wondering. Therefore, if you use a hard drive, we recommend that you go a step further to optimize your hard disk for speed and fluidity in its operations.
Download and run an excellent defragmenter app like Auslogics Disk Defrag Pro to defrag your system’s drive. Your hard disk is probably fragmented; it does unnecessary hard work. Defragmentation is a process, which involves the optimization of file placement on your drive to increase access speeds and improve the efficiency of operations. We cannot imagine who would not want this.