“Once we believe in ourselves, we can risk curiosity, wonder,
spontaneous delight, or any experience
that reveals the human spirit.”
Pro Tip: It is possible to fix many PC issues by using the PC Repair tool. PC Repair is easy to use and reliable Windows optimization software developed to fix hundreds of system issues.
Special offer. About Outbyte, uninstall instructions, EULA, Privacy Policy.
—E. E. Cummings
One of the biggest concerns of a PC user is high CPU usage. This slows down the computer considerably and makes it difficult to use. This can be very frustrating, especially when your computer was working just fine and all of a sudden it becomes very slow, and you can even hear your fan overworking. There are various reasons for this to occur. One way to know if you are experiencing high CPU usage is to check in Task Manager: there you will see the amount of CPU your computer is currently using. you see a very high CPU usage when your PC is at rest, then there is a process which is draining you computer’s resources.
One of those processes is the Windows Modules Installer Worker. This is very common when you are running Windows 10 on your PC. In this article, we are going to show you how to stop Windows Modules Installer Worker on Windows 10. Before we start troubleshooting the issue, we need to know what Windows Modules Installer worker is. It is also known as WMIW or TrustedInstaller.exe (TiWorker.exe). So, do not be confused if you see any of the above names. It is a Windows background service which is used for the automatic downloading and installation of Windows updates. As you are well aware of, Windows 10 downloads, installs and modifies Windows updates automatically. This is the process that manages it. This process needs to continuously check for updates to make sure that your computer is up to date.
The high CPU usage will occur when this process becomes messed up. Sometimes, it consumes more than 50% of your CPU’s resources, which will lead to the slowing down, freezing, and overloading of your system. Common fixes such as restarting your system will not work in this case. This issue must be resolved manually.
Table of Contents
- Set Windows update to manual mode
- Update your drivers
- Run a virus scan of your system
- Kill the process
- Troubleshoot Windows update
- Run System File Checker
- Set your connection to metered
Solution 1. Set Windows update to manual mode
This method works by switching the Windows update process from automatic to manual. This is to make sure that the process does not continuously demand resources from your CPU. On the other hand, you will miss out on the updates which may improve other aspects of your system. Here is how to set Windows update to manual mode:
- Press the Windows logo key + R on your keyboard to open the Run dialog box
- Input services.msc in the search area and press Enter. This will open the Services window
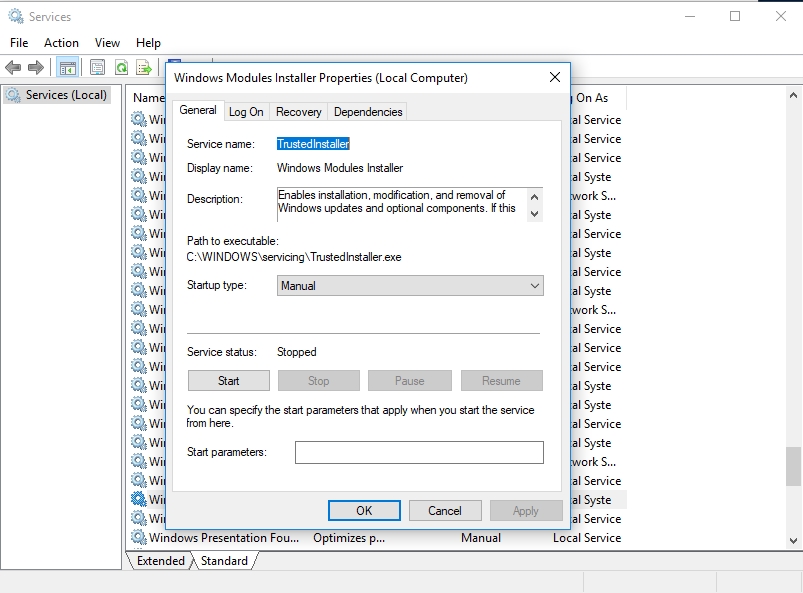
- Find the Windows Modules Installer and double-click on it. This will open its Properties window
- In the General tab, look for Startup type and change it to Manual

- Click Apply and OK to confirm the changes you made
- Now, return to the Services window and, double-click on Windows Update and repeat the above process
- Restart your PC when you are done and check if the issue has been resolved
Solution 2. Update your drivers
Lots of issues can arise on your PC when you have old and outdated drivers. This problem is not an exception. You can easily update your drivers, using the methods we have provided below:
Method 1. Download and install Auslogics Driver Updater.
This is one of the easiest and fastest methods to update your drivers. Driver incompatibility will not be an issue if you are using this method. This tool will scan your system for outdated or missing drivers and install the manufacturer-recommended versions. With just one click, you will be able to install all your drivers. Use the following steps to download and install Auslogics Driver Updater on your system:
- Click the link above to be taken to the download site
- Run the setup file once the download is completed. This will open the Auslogics Driver Updater installer
- In this dialog box, you will have the option to choose your language and installation folder. Once this is done, select the Click to install and check drivers button
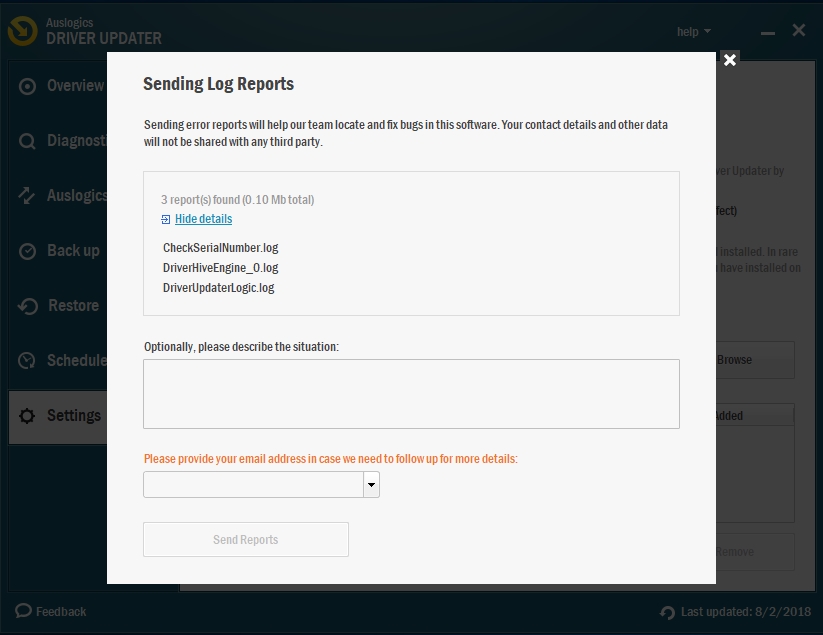
- Now, wait for the installation to finish; the Auslogics Driver Updater tool will automatically open and start scanning your system for outdated drivers
- Once this is done, you will see a list of drivers which need to be updated on your computer
- Click Update all, and all your missing or outdated drivers will be installed
Method 2. Download the driver from the manufacturer’s site.
This method can be used only when you know the name and version of the device which drivers you need to update. The reason for this is that downloading a wrong driver will cause your device to malfunction. You will find all the drivers in the support section of the site. Recently, driver manufacturers have started creating programs which users can install on their computers. This program notifies the users whenever the manufacturer releases updated versions of the drivers. It will also direct them to the site where they can download the updated version of the driver.
Method 3. Use Device Manager
- Right-click on the Start or Home button and select Device Manager from the pop-up menu. This will open the Device Manager dialog box
- Right-click on the device which driver you wish to update and select Update driver software
- Now, choose Search automatically for updated driver software in the next window
- The latest driver for that device will be downloaded and installed
Solution 3. Run a virus scan of your PC
There are many viruses that can disguise themselves as system files so that they will not be easily detected. This can be very problematic. But so far, we have not received any reports of viruses mimicking the TiWorker.exe process. If you want to double-check, we advise you to download and install Auslogics Anti-Malware. This tool will detect and eliminate viruses from your system. You will be able to surf the internet in a safe environment. It also schedules regular scans of your PC to keep it virus-free. Its virus database is updated on a regular basis to fight against newly created viruses. Here is how to download and install it on your computer:
- Follow the link provided above to go to the manufacturer’s site. Download the setup file and run it
- Click on Install in the next window and wait for the installation to complete
- The installation process may take some time, depending on the specs of your computer
- Now, check the Launch Anti-Malware and scan PC box and select Finish
- The Auslogics Anti-Malware dialog box will automatically launch, and the tool will start scanning your computer for infected files and folders that may be causing you to experience the high CPU usage.
- When the scanning is complete, click Remove threats to delete all the infected files from your system
Solution 4. Kill the TiWorker.exe process
Disabling the process has its pros and cons, the disadvantage being that you will not be able to get important updates for your system. But if it is necessary and you do not care about the updates, then feel free to disable the process:
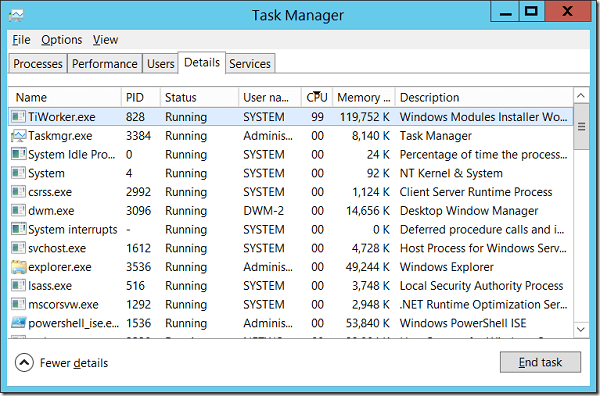
- Press Ctrl + Shift + Esc on your keyboard to open the Task Manager
- Under the Processes tab, look for the TiWorker.exe process, select it and click End Task
- This should disable the process
- Check if it has solved the issue
Solution 5. Run the Windows Update troubleshooter
Since this issue is directly related to the Windows update process, it is logical to run the Windows Update troubleshooter. This tool will find and fix any problems with the Windows update process, including this. There are two methods to do this:
Method 1.
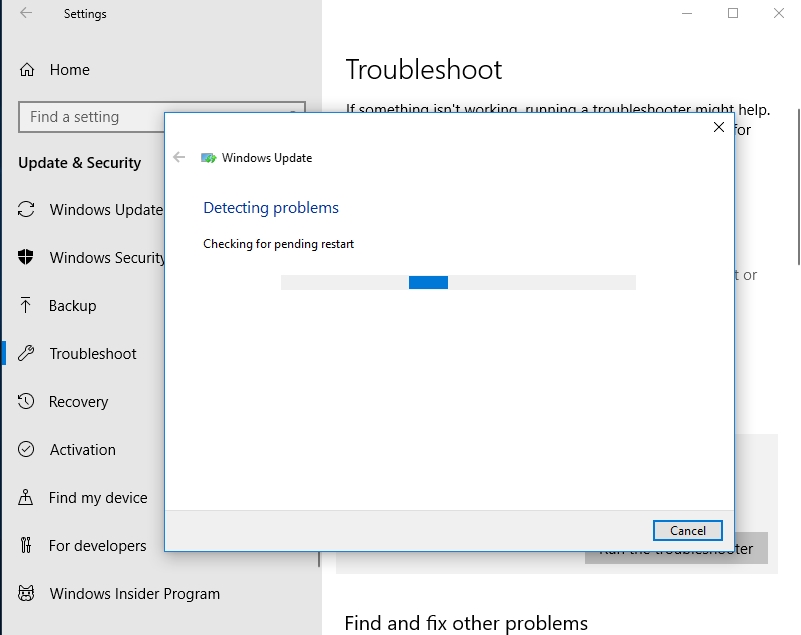
- Press the Windows logo key + I on your keyboard to open the Settings app
- Click on Update and Security from the options available
- Select the Troubleshoot tab and click Windows update under the Get up and running option
- Now, click Run the troubleshooter
Method 2.
- Click the Start or Home button and type control panel in the search box. Click Control Panel from the results
- In Control Panel, type troubleshoot in the search box at the top right corner and select Troubleshooting from the list of results
- Now, select Fix problems with Windows Update under the System and Security option
- Follow the instructions of the wizard to complete the process
- Windows will now find and fix issues with your Windows update process
Solution 6. Run the System File Checker
This is a built-in Windows tool which is used to find and fix problems with system files. It is a very important tool when dealing with issues like this. Here is how to run it:
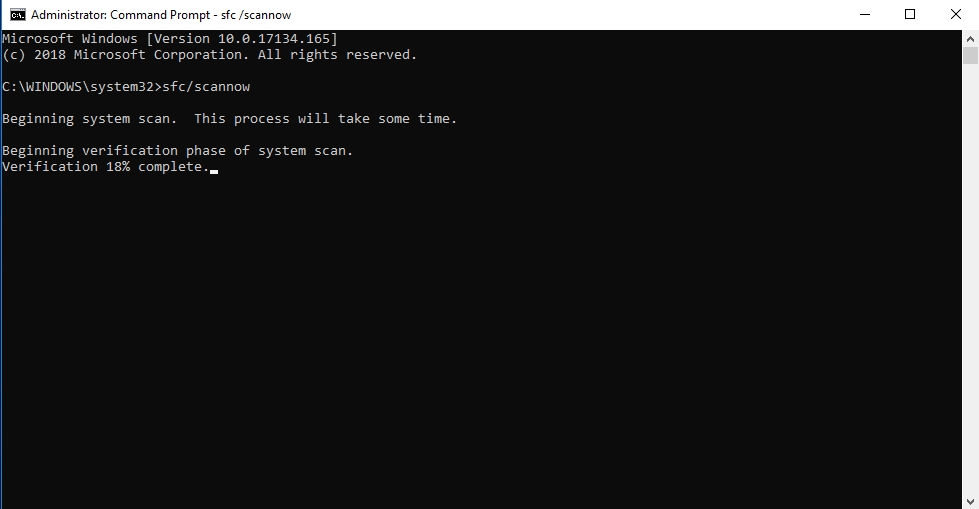
- Right-click on the Start or Home button and select Command Prompt (Admin) from the pop-up menu. This will let you run cmd as an administrator
- Once the Command Prompt window opens, input sfc /scannow and press Enter
- Be patient until the scan is complete
- Windows will find and fix issues with your system files which may be causing you to experience the high CPU usage
Solution 7. Set your Connection as Metered
A metered connection will prevent Windows from automatically downloading and installing updates. As we have said before, this method may help solve the issue, but you will miss out on important updates for your system. This method is different for both Wi-Fi and Ethernet users. So, we will explain both options separately:
For Wi-Fi users:
- Click the Wi-Fi icon at the right bottom corner of your taskbar, select your connection and click Properties
- In the next page, enable the Set as metered connection option

For Ethernet users, it is more complicated:
- Click the Start or Home button and type regedit in the search box. Right-click on regedit from the list of options and select Run as administrator. This will open the Registry Editor as an administrator
- Now, navigate to the following location HKEY_LOCAL_MACHINE > SOFTWARE > Microsoft > Windows NT > CurrentVersion > NetworkList > DefaultMediaCost
- Right-click on DefualtMediaCost and select Permissions. This will open the Permissions window
- Under the Security tab, click Advanced
- Click the Change link next to TrustedInstaller
- Input administrators in the Enter the object name to select area
- Now, click on Check Names and then OK to save the changes
- Return to the Advanced Security settings for DefaultMediaCost window and check the Replace owner on subcontainers and objects box, then click Apply and OK
- Now, under the Group or user names options in the Permissions for DefaultMediaCost window, select Administrators
- Click Apply and OK to save your changes
- In the Registry Editor, double-click on Ethernet and, edit the value data to 2 and click OK
- Once you are done, restart your PC
We hope that this article has helped you with the TiWork.exe high CPU usage. Share it with others who experience the same issue.
We appreciate your ideas and comments.
We are ready to answer all your questions regarding the above topic.