Network adapters are the hardware components that make communication between systems and networks possible. Windows, for example, makes use of them to connect your PC to the internet.
Nevertheless, as important as they might be, users sometimes have good reason to disable them. In fact, in extreme scenarios, you might be justified in getting rid of them altogether.
If you rarely use a specific network, for example, then the thought of putting it off might cross your mind. This way, you get to terminate operations you have not authorized and even save power or improve your laptop’s battery life. Or perhaps you have never used a specific adapter, and you are sure you would not need its services in the future, then you might be tempted to remove it at once.
Pro Tip: It is possible to fix many PC issues by using the PC Repair tool. PC Repair is easy to use and reliable Windows optimization software developed to fix hundreds of system issues.
Special offer. About Outbyte, uninstall instructions, EULA, Privacy Policy.
Well, if you are here to find out how to enable network adapters on Windows 10, then we are glad to inform you that you are at the right place. Everything is also fine if you came here to learn how to perform the reverse operation.
In Windows 10, while you can carry out some operations through the Settings app to edit your network settings if need be, you will not find the options you need to enable or disable network adapters there. You will need to go through other programs that have been there long before Microsoft introduce the new Settings app to manage several parameters or functions on Windows devices.
Tip:
If you are experiencing problems with your network adapters (or you cannot connect to the Internet because of them), then you should know that the disabling or enabling of drivers might not be enough to give you the result you desire. The vast majority of driver issues, after all, usually have something to do with their software becoming corrupted, outdated or not being where Windows needs it.
An update of the affected drivers is probably the fix that will prove useful for you. To this end, we implore you to download and run Auslogics Driver Updater. This superb program will scan your system to identify the missing, corrupted, outdated, or problematic drivers, then it will give you the option to update every single one of them to their latest manufacturer-recommended versions.

It is obvious you will not have to waste your time on the manual or difficult procedures involved in the updating of drivers. With the help of the recommended program, you can employ the automatic method, which is the safest, fastest, and most efficient way of getting the job done.
How to enable or disable network adapters, using Control Panel on Windows 10?
You do this in 2 ways: You can directly launch the Control Panel app and navigate through the menus there to get to the destination needed, or you could start by opening Settings to take advantage of its options to get to the required spot in a Control Panel window indirectly. Since the Settings app on Windows 10 is here to stay, we will provide instructions for the latter:
- If you want to disable a network adapter on a Windows 10 PC, follow these instructions:
- Press the Windows button on your keyboard or click on the Window Start icon that is always visible on your desktop screen. From the programs or options you see, click on Settings
- After the program window comes up, click on Network and Security. On the next screen, click on Status, which is usually one of the options on the list on the left pane
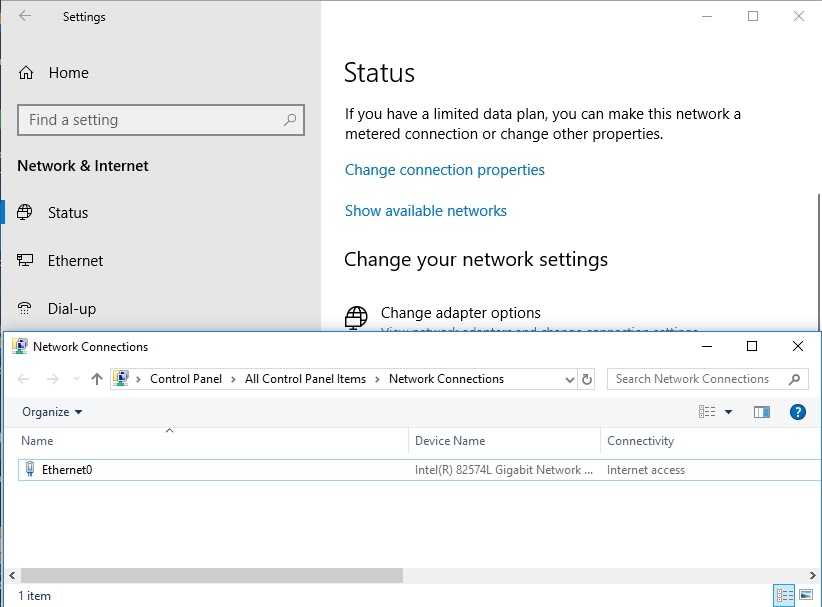
- Under the Change your network setting menu, click on Change Adapter options. Windows should launch a specific location in the Control Panel program window for you. There, you should see the network adapters currently available on your PC
- Locate the network adapter you want to disable, right-click on it and select the Disable option from the short menu list that shows up.
- Here are the instructions you need to follow if you want to enable a network adapter on a device running Windows 10:
- Press the Windows button on your keyboard, then tap the letter I key to launch the Settings app. After the program window appears, click on the Network and Security option to enter its menu
- On the left pane, you will see a list of options. Click on Status. Under the Change your network setting menu, you will see the Change adapter options, which you must click on now. A Control Panel program window will appear soon, and there, you must continue your work
- Windows will display the network adapters that are currently available for use on your computer. Once you have identified the adapter you want to enable, you must right-click on it and select the Enable option from the short menu list that comes up.
How to disable or enable network adapters through Device Manager on Windows 10?
- Go through these steps if you want to disable the network adapter on a device running Windows 10:
- Press the Windows button on your keyboard, then tap the letter X key to bring up the Power User menu, which consists of a list of programs or options. Now, you will see Device Manager, which you must click on to open the app we need here
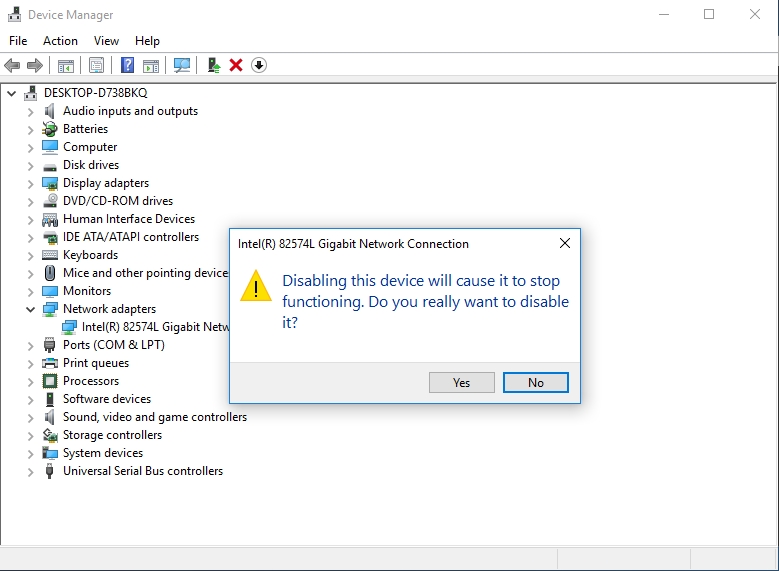
- After the program window shows up, you will see a comprehensive list of network adapters available for use on your device. Locate the Network Adapter option, and double-click on it to expand its menu
- Windows will now show you the full list of network adapters, and now you must identify the one you seek to disable. You have to right-click on it and select the Disable option from the short menu list that appears
- If you wish to enable a network adapter on a Windows 10 computer, then here are the instructions you need:
- Press the Windows button on your keyboard or click on the Windows Start icon. Input the following keywords into the textbox present to do a quick search for them: Device Manager
From the list of results you see, click on the first item to open the app we need
- After the program window comes up, go through the list of adapters you see. Expand the menu for Network Adapters by double-clicking on it. Now you must identify the adapter you want to enable from the short list you see currently
- Right-click on it and select Enable from the short list of options that pop up. You should be good to go now
How to enable or disable network adapters through Command Prompt in Windows 10?
On the latest version of Windows, you can employ some netsh tools or command lines to disable or enable network adapters on your system.
- These instructions will prove useful if you want to disable a network adapter on a system running Windows 10:
- First, you need to open an elevated Command Prompt window because the operations you are going to carry out demand a lot of permissions or privileges to function well. We believe this is the fastest way of doing it: Right-click on the Windows Start icon always present on your desktop screen to see a list of programs and options that form the Power User menu, then select Command Prompt (Admin)
- After the Administrator: Command Prompt Window comes up, you will need to identify the name of the adapter you want to disable before you can proceed. To do this, input the following code and hit the Enter key at once to force its execution:
netsh interface show interface
Windows will now show you what it uses to identify your network adapters here under the interface name. It is time you took note of the name of the adapter you want to disable
- To disable the adapter, you need to input the following code and press the Enter key once you are done as to run it (remember to replace the XXXX part in the command with the name of your adapter):
netsh interface set interface “XXXX” disable
For example, if you came here to find how to disable a Wi-Wi adapter on a Windows 10 laptop, then this is the code you should be inputting and running:
netsh interface set interface Wi-Fi disable
Note that the quotation marks are not needed if there is no space between the name (or element) you inputted.
- If you want to enable a network adapter on a Windows 10 PC, then here are the instructions you need to follow:
- First, you need to open a Command Prompt window with more powers or privileges than the regular Command Prompt app. Press the Windows button on your keyboard or click on the Windows Start icon that is always visible on your desktop screen. Input the following keywords into the text box present to do a quick search for them:Command PromptFrom the list of results that comes up, you must right-click on Command Prompt (usually the first item) and select Run as administrator from the short list of options you see
- After the required program window comes up, you must input the following code and tap the Enter key once you are done typing to execute it at once:netsh interface show interface
Windows will now show you a list comprising of the network adapters on your device. Go through them and identify the network adapter you wish to activate. The value under Interface name for that adapter is a crucial attribute here
- Since you have obtained the name of the adapter in view, you can move on to enable it. You will have to input some code as usual. This time, before you execute the command, you must make some changes to it. You have to replace the XXXX part of the code with the name of the network adapter you wish to enable and delete the quotation marks
Here is the code:
netsh interface set interface “XXXX” enable
- Hit the Enter key. Your work is complete
How to enable or disable a network adapter on Windows 10 through PowerShell
Finally, we will show you how to carry out the same operations on Windows 10 with the help of the PowerShell app, and this will be the last method. Here are the instructions you need to follow if you want to disable or enable a network adapter:
- Press the Windows button on your keyboard or click on the Windows Start icon that is always visible on your desktop screen. Type the following keyword into the text box present to perform a quick search for it:PowerShell
Windows will show you a list of results from which you must right-click on PowerShell (usually the item at the top) and select Run as administrator from the short list of options you see
- After the Administrator: PowerShell window comes up, you will need to identify the name of the adapter you want to work on now. To do this, you must input the following code and hit the Enter key to execute it:
Get-NetAdapter | format-table
Windows will present a list, and under the Name column, you must locate and take note of the name of the adapter you want to disable or enable. Once you finish doing this, you can now move on to the main part of the operation
- If you want to disable the adapter, then you must input the following command and hit the Enter key to force its execution (remember to replace the XXXX part of the code with the name of the adapter Windows displayed earlier):
Disable-NetAdapter -Name “XXXX” -Confirm:$false
- If you want to enable the adapter, then you must type in the following command and tap the Enter key once you are done to execute it (the XXXX part in the code must be replaced by the name of the adapter you took note of earlier):
Enable-NetAdapter -Name “YOUR-ADAPTER-NAME” -Confirm:$false
Surely, by now, you must have had success with your preferred method in disabling or enabling your network adapter on Windows 10.