If you enjoyed using the Windows Live Mail app in Windows 7, then you might be a bit distraught because Microsoft refused to include it on the later iterations of its operating system (Windows 8, Windows 8.1 and Windows 10, which is the newest version). We know that the new Mail app available on these newer builds is not everyone’s cup of tea. You are not alone in this regards.
A good number of people still prefer and use the Windows Live Mail app as their primary email client. The application does not come bundled with Windows 10, but this setback did not stop them from bringing it on board because they really want to.
You too can download the required program from trusted sources and install it. Nevertheless, you will have to make a good number of changes or alterations to make things work as they should. In this guide, you will find instructions that will guide you through every process.
Pro Tip: It is possible to fix many PC issues by using the PC Repair tool. PC Repair is easy to use and reliable Windows optimization software developed to fix hundreds of system issues.
Special offer. About Outbyte, uninstall instructions, EULA, Privacy Policy.
Unfortunately, Microsoft has opted not to provide updates for the Windows Live Mail app (which is obviously outdated). It asked users to switch to a different email program instead. As far as we know, most users ended up going with the Mail app (that came embedded with recent iterations of Windows) or the Outlook app (which is a part of the Microsoft Office package).
What are the features of Windows Live Mail in Windows 10?
The same functionalities present on the Windows Live Mail app when it is running on Windows 7 are also available when the program is operating on a more recent version of Windows (Windows 10, in particular). The competition from its replacements (Mail or Outlook) on the newer platforms is not stiff enough to be fair.
The available choices are not exactly solid ones. Both options struggle to replace the Live Mail App as a direct equivalent. You cannot remain at the same level using either of them.
- If you go with the built-in Mail app, it is fair to say you have downgraded because the Mail app is more straightforward to use but invariably less powerful than the Windows Live Mail app.
- Outlook, on the other hand, is easily more powerful than Windows Live Mail, but you might not need all the features it provides. It also costs money.
Tip:
Since you need an email client to handle your mail operations, it is easy to infer that you engage in many activities that involve sending and receiving messages, attachments, files, and so on. Therefore, we recommend you download and run Auslogics Anti-Malware to take your security setup several levels up. Through the addition of the recommended app, you get an extra layer of protection that helps to keep your PC safer than ever.
How to install Windows Live Mail on Windows 10?
First, you need to download and run Windows Essentials as the Windows Live Mail app is one of the programs from that package. Here are some of the other applications that come along with it: Photo Gallery, Movie Maker, Windows Live Writer, and OneDrive. Nevertheless, only the Windows Live Mail is of interest to us currently. Follow these instructions:
- Open your browser. Type in the following keywords into the text box present to do a quick search for them on Google: Windows Essentials 2012
From the list of results you see, click on any link (for a reputable site or download center). Click on the Download button; your browser should fetch the file
Note:
- You cannot get the installer for Windows Essentials from Microsoft because the operating system maker discontinued support for it. The Microsoft download page for the file is no longer accessible. Therefore, you have to make do with downloads from non-official sources. Nevertheless, it is imperative that you take precautions so that you do not download malicious programs
- The setup file you need is under 2MB in size. Depending on what Windows 10 build your device is running, you will get to choose between the 32-bit and 64-bit versions of the needed file.
- There are other Windows Essentials installers, but we recommended Windows Live Essentials 12 (2012) because it is the latest version of the file you need. Microsoft has not released an updated iteration of Windows Essentials for a long time.
At this point, we expect that your browser has completed the download. Open and run the saved item by clicking or double-clicking on it. The installer should come up now. Click on the Yes button to confirm when a dialog box from User Account Control comes up.
- From the list of programs available for installation, ensure that the option for the Windows Live Mail app is selected. You can install other applications from the package if you need them.
(If you use the Install all of Windows Essentials option, you will get all the applications. If you want to install only the Windows Live Mail app, then you must go with the second option and tick the checkbox for the Mail app only)
- Follow the instructions that come up when necessary. The installation should begin, and you will have to wait till its completion. Once everything is set, you can check out the list of available programs to open the recently-installed Windows Live Mail app and see how things go.
Even if you get a message stating that the installation has failed with Error 0x800c0006 appearing, you will do well to check your Programs folder. You might be amazed at what you see there. If the installation problems persist, then continue with the instructions below:
- Open the Control Panel program. You can do this by pressing (and holding) the Windows button on your keyboard, tapping the letter X to bring up the Power User menu, then selecting Control Panel from the list that shows up.
- Navigate through the options available to enter the Programs and Features menu. Click on the Uninstall an update link (usually one of the options on the left pane). Go through the list of updates that Windows has installed on your device. Locate KB3093594.
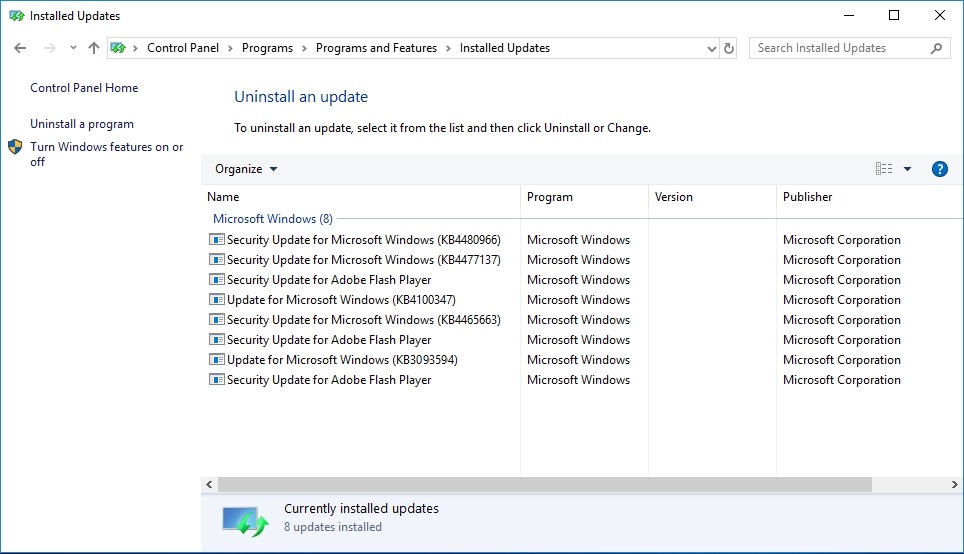
- Click on the stated update to highlight it. Click on the Uninstall button that appears to get rid of that update. A small dialog box might come up to request confirmation for the operation you initiated. Confirm your action by clicking on the Yes button there
- Exit all the program windows you opened and restart your system to let the new changes take effect. After your PC comes on and Windows settles down, you must check if the installed Windows Live Mail app now runs without issues. If the app failed to install, then you must attempt installing it again. Run the Windows Essentials installer once more and follow the instructions we provided earlier.
We hope you were successful in getting the Windows Live Mail app to work on your Windows 10, but we advise that you do not invest too much into it as it is difficult to say how long it is going to stay void of problems. To be fair, the lack of support from Microsoft for it has exacerbated its struggles.
Subsequently, Microsoft is continuously trying to get people to use the built-in universal Mail app because the company has probably decided that a 10-year-old application is not worth supporting.
How to set up and configure the Windows Live Mail app on Windows 10?
We believe you just recently installed a new email client with our help, so it is only fair we show you how to set it up. Here are the instructions you need to go through:
- Tap the Windows button on your keyboard or click on the Windows icon that is always visible on your Desktop screen. Type in the following keywords into the text field present to do a quick search for them: Live Mail
- From the list of results that appear, click on the Windows Live Mail app to open it (or hit the Enter key on your keyboard)
- The Mail app should be up and running now. The Add your Email accounts menu should come up automatically. If this does not happen, then you must click on the Accounts tab, then click on Email (or its icon) to arrive at the needed destination
- Input the Email address and the password for the account you want to add to the Live Mail app. Click on the Next button to continue. If the account details you inputted are from a popular Mail service provider (Gmail, for example), then Windows Live Mail should have no problems detecting and configuring the right settings for you.
If you need to make changes to the settings (especially if things do not go as planned), then you must tick the checkbox for Manually configure server settings. Input the necessary details.
- Click on the Yes button to move on if any confirmation prompt comes up. After the Windows Live Mail adds your account, you will see a message stating that your mail address was successfully added.
The app should move on to begin syncing your account. Note that the synchronization process might take some time (especially if the contents of your email are voluminous), so be patient and wait for the completion of the job, and finally, the Windows Live Mail app will be ready for use without issues on your Windows 10 computer.