The best feature of modern-day devices is that they are small and portable. Their size makes it possible to travel around with your computer. There are some pitfalls on the way, of course. For example, you should always back up your data on an external drive because you never know when you will be parted from your laptop. Another thing to consider is the safety of connections that you will be using in different locations. You should definitely research beforehand what kind of connection your destination will have and prepare your device accordingly. For example, use Auslogics BoostSpeed to protect your device while roaming the web and also increase its overall performance. A powerful anti-virus tool is also a good idea.
The issue we will discuss in this article is more a nuisance than a threat, but you should be aware of it nonetheless. Some users have reported that they are trying hard to find a workaround for how to stop windows from connecting to wireless network. Since not every network is a secure and trusted option, we advise to anticipate this matter and take action before you get spammed with malicious software and viruses. Below you will find a step-by-step guide on how to stop Windows 10 from connecting to Wi-fi.
Pro Tip: It is possible to fix many PC issues by using the PC Repair tool. PC Repair is easy to use and reliable Windows optimization software developed to fix hundreds of system issues.
Special offer. About Outbyte, uninstall instructions, EULA, Privacy Policy.
Why is this happening?
It’s a built-in setting for Windows to automatically connect to Wi-fi networks you’ve previously connected to. And that’s why it’s very useful for time management’s sake. However, it can also become a hazard if you are using your computer in some random coffee shop. Windows 10 has the upgraded feature that allows you to avoid automatically connecting to certain or all networks. The trick is this – all the information will be stored, like the passphrase and other connection details, but your computer will wait for you to initiate the exchange manually before connecting.
So, if you want to stop Windows 10 from connecting to Wi-fi, follow these steps:
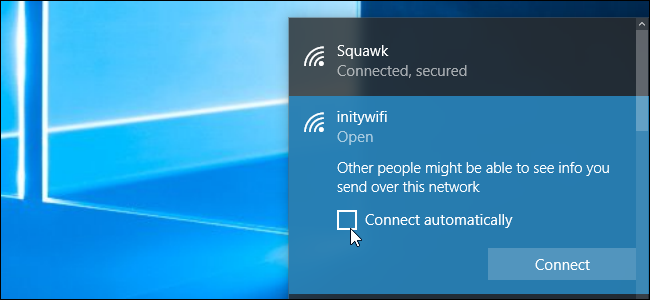
- Step 1. Hover over the left lower corner of your screen to open up the Wi-fi panel.
- Step 2. You will see the connection open up, and there will be a checkbox that says: ‘Connect automatically’, uncheck it.

- Step 3. From now on, whenever you are near this hotspot, you will need to connect to it manually.
Case 2. If you are not near a network and you don’t see the network on the Wi-fi panel.
- Step 1. Follow this pathway to modify the settings of your system: Settings > Network & Internet > Wi-Fi.
- Step 2. Click the “Manage known networks” option.
- Step 3. In the list of existing networks, find the one you want to edit.
- Step 4. Click Properties.
- Step 5. Set the “Connect automatically when in range” option to OFF.
- Step 6. Windows 10 will not automatically connect to this network again. To connect to it, you will need to manually select it, and the saved passphrase will work for it.