In 2018 the internet has become an irreplaceable part of our lives. Some go as far as to call it an addiction. Whatever it may be, friend or foe, a lost connection or DNS issues come across as disappointing and majorly frustrating.
What is the DNS?
DNS stands for Domain Name System, which is in charge or managing IP dresses. This crucial part of the Internet has made it possible to users to access websites with easy. The DNS system deals with IP addresses and some issues occur when your computer is attacked by malware. The malicious software can change your preferred DNS server and instead of the website, you wanted to visit, lead you to some scam websites. Visiting those websites will result in loss of your personal information or some other, more dangerous ramifications. To protect your computer from malware we advise to use a tool like Auslogics Anti-Malware.
Pro Tip: It is possible to fix many PC issues by using the PC Repair tool. PC Repair is easy to use and reliable Windows optimization software developed to fix hundreds of system issues.
Special offer. About Outbyte, uninstall instructions, EULA, Privacy Policy.
How to solve DNS server not responding errors?
So, you are reading this articles because you cannot access the preferred website or you just cannot access the Internet at all. You have already checked your Wi-Fi connection, the fact that your router is up and running and that your computer is in the vicinity of a protected network. And you still cannot access the internet. You probably have an issue with the DNS. This article deals with that issue in a myriad of ways, we hope that at least one them will prove useful to you.
How to fix DNS server not responding on Windows 10?
Method 1. Fix it with Command Prompt.
This simple troubleshooting technique will help you understand if the issue you are having is deeper than what Command Prompt can easily fix.
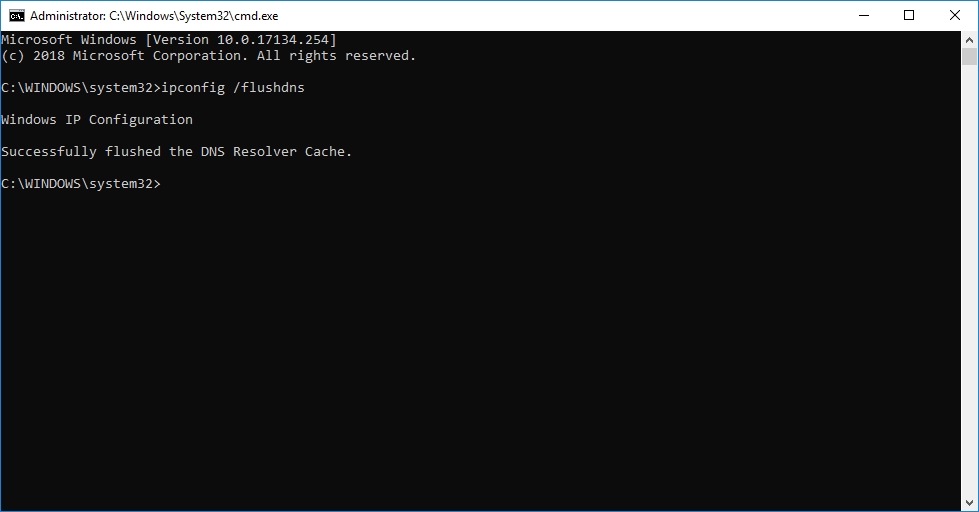
- Start Command Prompt and be sure to choose the Admin version. Select the Windows key together with K and open the Menu, then select Command Prompt (Admin) from the list.
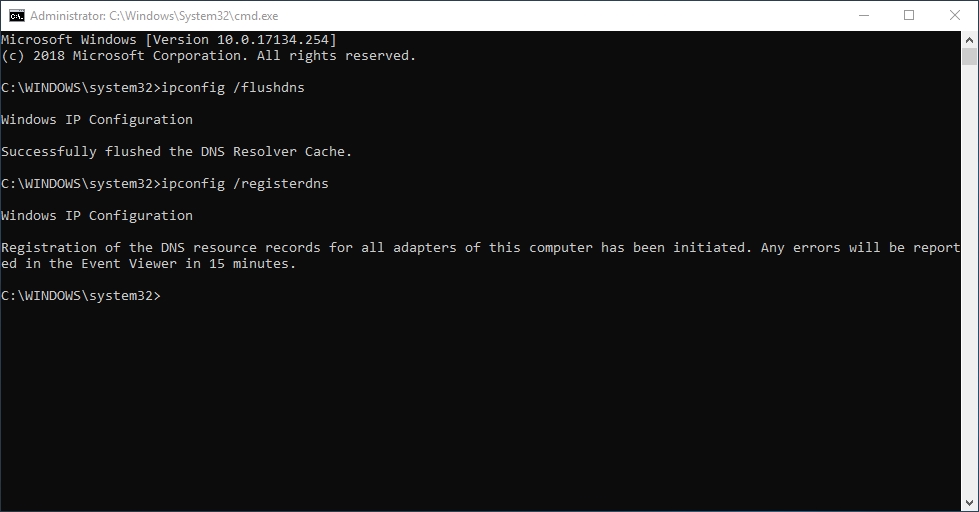
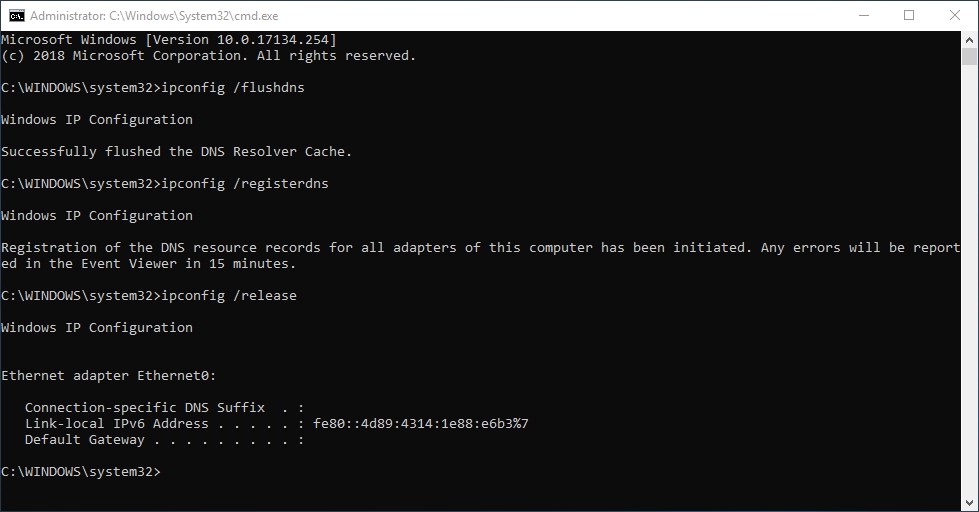
- When it opens, type in the following commands:
- ipconfig /flushdns

- ipconfig /registerdns
- ipconfig /release
- ipconfig /renew
- NETSH winsock reset catalog
- NETSH int ipv4 reset reset.log
- NETSH int ipv6 reset reset.log
- Exit
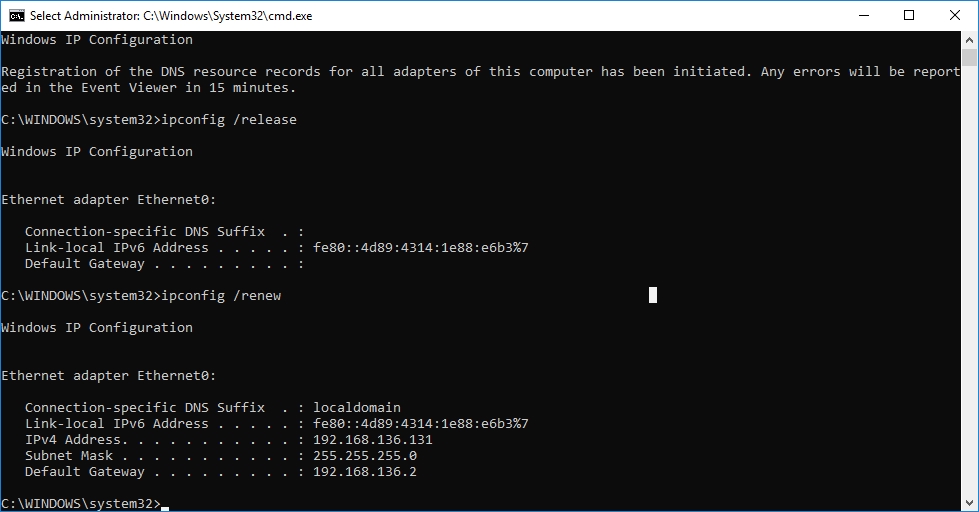
- After you have entered all of these commands, close the Command Prompt and check if the issue you were having is gone.
Method 2. Stop the peer-to-peer download for Windows update.
Some users have reported that the Windows Update is messing up the DNS on their computer. So, to determine if this might be the case with you, turn off the peer-to-peer download settings. To do that follow this guide:
- Step 1. Open the Settings app and go to Update and Security section
- Step 2. Select Advanced options
- Step 3. Choose how updates are delivered and checkbox the right option
- Step 4. Select PC on my local network and turn off Updates from more than one place
- Step 5. Close the settings and try accessing the Internet.
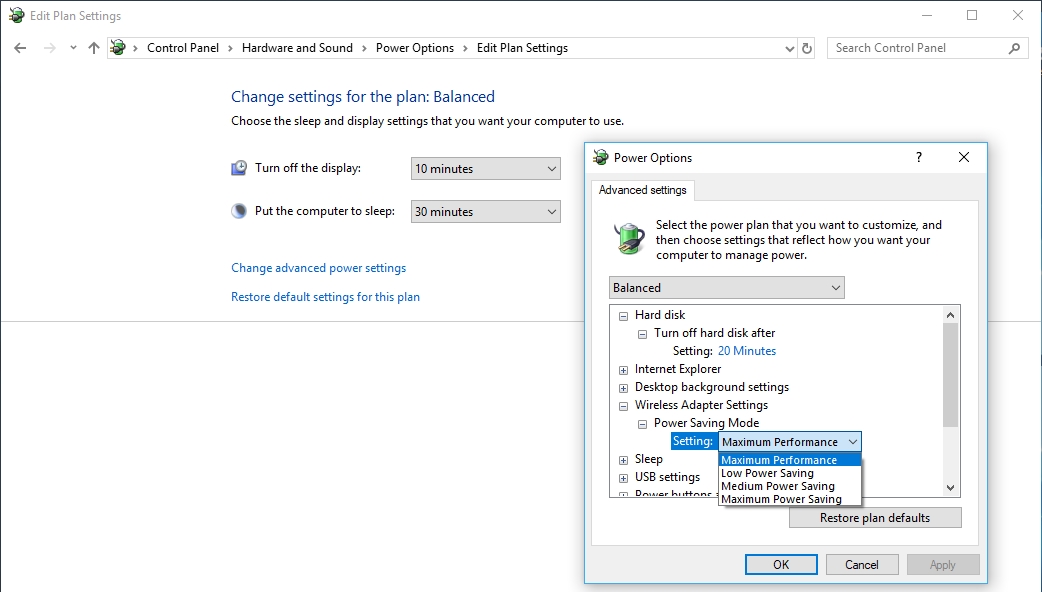
Method 3. Customise Power Options.
Sometimes the power settings of your wireless network adapter are making it impossible to access the internet, which doesn’t mean that you have a problem with the DNS, just that you need to modify the setting of your device. To do that, take these steps:
- Step 1. Use the shortcut Windows key + S and choose the Power Options
- Step 2. In the preferred plans, click on Change plan settings that correspond to the plan you have picked out
- Step 3. Select Change advanced power settings at the bottom of the page
- Step 4. Find Wireless Adapter Settings and set them to Maximum Performance.
- Step 5. Remember to click Apply and OK to save the changed you made. This should help with the issue you are having.
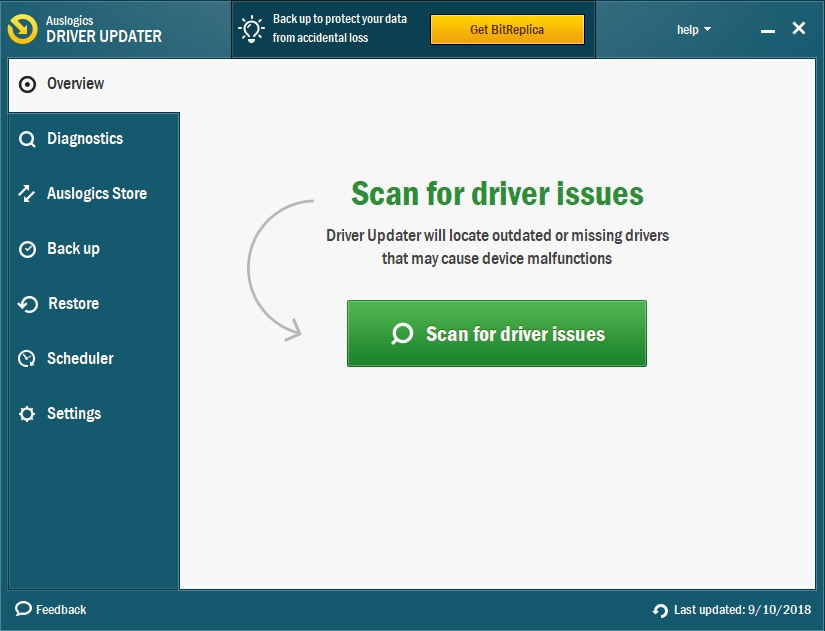
Method 4. Check your drivers.
One of the main reasons for any kind of malfunction of an operation that used to work perfectly can be the possibility of a miscommunication between the software and the hardware. In your case, it could be the network adapter drivers that have become obsolete. This happens when you install a new software application or maybe even an update of the operational system (Windows Update), but you failed to upgrade your driver as well. Given that the system has new protocols for everything, it’s highly possible that your new software is not getting through to the adapters because the driver is unupdated. Most users fall into this trap, so, to help you with your network adapter driver we suggest to install a tool that will help you track the status and check for updates automatically. It’s called Auslogics Driver Updater and it will provide you with a service that can scan drivers for malfunction, needed repair or new features and schedules scan for upcoming updates.
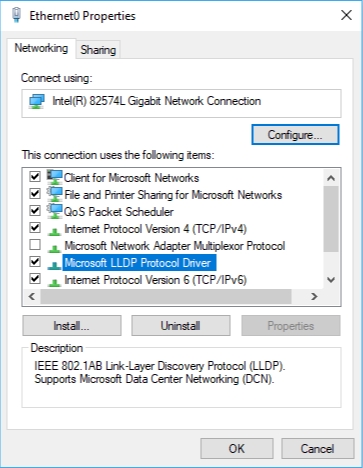
Method 5. Check if the Microsoft LLDP Protocol Driver is enabled.
To check, follow this path:
- Step 1. Windows key + X, open Network Connections
- Step 2. Locate your connection and right-click it, choose Properties
- Step 3. Locate Microsoft Protocol LLDP Protocol Driver, make sure that the box is checked – that means it is indeed enabled.
- Step 4. Click OK. You need to perform this check up in order to have the full picture. If the box is unchecked, this could be the source of your issue.
Method 6. Execute a Clean Boot.
By performing a Clean Boot of your computer, you will be able to determine what is causing the DNS issue. Follow these steps:
- Step 1. Press Window key and R, type in ‘msconfig’ into the Run box, hit Enter
- Step 2. Open the Services tab in System Configuration
- Step 3. Check the ‘Hide all Microsoft Services’ and click the Disable all button.
- Step 4. Hit Apply and OK to save the changes.
- Step 5. Restart your computer. All non-Microsoft services will now be disabled, if the issue is gone, you can repeat the steps for each of the services and figure out which one is causing the DNS issue.
Method 7. Configure your wireless router.
This can be the most common problem with not having access to the Internet, so definitely try this method. Windows 10 users have reported that with certain wireless frequencies and standards, it’s possible to experience some loss of connection. It seems that Windows 10 is not very friendly with 2.4GHz networks, so make sure that your wireless adapter supports the 2.4Ghz network option. You might want to check out your wireless router manual to fix this issue.